Sunday, 20 December 2020

Speedy Christmas Pyjamas

 I couldn't resist these cute Christmas knit prints that were on sale at RubyJam recently


1m of each is enough for a short sleeved T-shirt (Oliver + S School bus tee) and a pair of pull on shorts (Oliver + S playtime leggings) - and should somebody have a Christmas season baby there's probably enough leftover for a novelty romper!


The ribbings were whatever colour there was enough of in the fabric stash. By putting ribbed cuffs everywhere instead of hems, they're super quick to sew. Not even sew to be honest - bang out on the overlocker is a more fitting description.

Both kids got size 12 (cause it was traced off and ready to go) for top and bottoms with just adjustments for their preferred leg/sleeve length.

Quick and cute and Christmas ready.


Tuesday, 15 December 2020

Grade 6 Graduation

Today was the "graduation" day for P's grade 6 class. I'm yet to see or hear much about it, as we weren't able to attend in person, and I was working when the live video feed went up. But I do know what he wore, cause I made it...


The dress code was "smart casual" and he didn't really know what that meant.  We talked about whether he wanted to wear a suit - some kids did, or a button up shirt - he thought he might. But eventually he decided he wanted a t-shirt with a collar and his all time favourite cargo pants.


I was running low on fabrics suitable for pants, so I hit up the Brunswick stores and picked up this blue drill for just a few dollars. It's a cotton/synthetic (judging from the weird smell when ironed) and is sturdy but also lightweight enough to be summer long pants.

Then came the fabrics for the top which were picked from the stash. The pattern is the Oliver + S Parachute Polo shirt. It's a great pattern for a polo shirt using a woven fabric for the placket and collar. The only thing to note is that the interfacing on the back of the placket would be visible if it were worn wide open. I usually peel it back off to the edge of the placket after construction. I should just remember to cut a thinner strip.


The cotton for the placket and collar is a cute Zonen09 fabric from years ago that I purchased from Maaidesign and made this shirt.

I'd just seen Kylie and the Machine's new Sweary Sewist labels and P and I bought a pack from FibreSmith and agreed that we'd sneak a couple into his outfit.


He approved f the "I didn't fuck it up" label in the polo as it applied to both my sewing and his 7 years of primary school!

I did make him promise not to show anyone, but I'm not sure how well that worked out. The label that I put on the outside was this "Quality Shit" one, slipped into the pocket of his cargoes:


The Oliver + S Field Trip cargo pants are his all time favourite pants. I've just cut the bottoms off the two pairs that I made back here (and here), and turned them into shorts.

This pair are a size up from those (size 12) with 1" extra length mid thigh, and another 1&1/2" length at the hem. That pretty much puts us at the end of the pattern sizing. I'm not sure what's more alarming for me: his finishing primary school or his outgrowing the Oliver + S pattern sizing


Details:
Patterns: Oliver + S parachute Polo and Field trip cargo pants
Size: Shirt: Size 12 with 1" extra sleeve length beyond the short sleeve line
Pants: Size 12 with 1" length added mis thigh and 1&1/2" extra length at the ankle hem
Fabrics: Grey cotton lycra, Cotton lawn for collar, interfacing and buttons all from stash. Mystery synthetic/cotton drill from one of the shops on the east side of Sydney Rd


Friday, 11 December 2020

Does it compile?

I'm not even going to pretend to understand my own title question, but I'm told the answer is "probably, yes"


A few months ago I spotted this cotton lycra print on the RubyJam instagram feed and immediately showed it to the head of the household IT Department (aka Flipper). I wasn't silly enough to buy fabric that looked like computer code without first checking that it really looked like computer code. He approved.

The pattern is the Liesl & Co Metro T-Shirt which is always a winner for him. The fabric quality is also really great. 


...and I'm told that the fabric design is sufficiently legitimate for a computer coder to wear it happily. Nice one RubyJam.

Please notice the new lawn which is Flipper's sole responsibility and growing luscious with all the attention. Also of note are the old aviators which he hasn't stopped wearing since Joe Biden won the US election. 

In the background of the first photo you can also see the earliest photos of our garden's "feature tree" We named it Sticky, as it arrived looking not at all like a feature, but more like a very expensive , tall twig. Hopefully there will be many more blog photos with Sticky looking more and more impressive... And the lawn still green (fingers crossed)

Saturday, 5 December 2020

Girl on the Go - twice

We've been a whole family on the go really. October flew by without a single blog post.

Moving back into our renovated house (and having no internet connection for weeks) meant October just disappeared. But I had been busily making things (to avoid those tedious, but important jobs, like unpacking) and so now I have lots of catching up to do.


Almost as soon as we'd moved into the house, and barely a week after the kids had finally returned to school (in the physical sense, rather than the homeschool imposed by Covid19 restrictions) it was announced that it was Bookweek. My usual enthusiasm for a last minute costume was "somewhat lacking".

After telling me she wanted a simple white dress, A changed her mind and did something else with what she already had. But I had been led to get out the Girl On The Go dress pattern from Oliver + S which I'd never yet sewn, and now I was curious.


It's a nice, basic T-shirt dress with a boat neck shaped neckline finished with a facing. Ties are sewn into the side waist and can tie in the front or back. I made a straight size 10 as per her measurement with no alterations and it fits perfectly. A bit slower to sew than a T-shirt, but not by much.

The fabric was a remnant from a dress I made myself way back here, and is a lovely quality Froy & Dind knit that came from Maaidesign. I was delighted to find it was just enough leftovers for this dress and is now all used up


We took these pictures on my phone one day between racing around doing stuff, and decided to try our new courtyard vertical garden as a backdrop. The garden is made with a giant piece of felt attached to a backboard, then little slits are cut into the felt and the plants tucked into little pockets. It's supercute as it looks like every plant has a little sleeping bag of felt.

She was enjoying wearing that dress a lot, and I had an idea for another in a bold print that I'd picked up in Spotlight from their discount rack. This time, to maximise the print, I left off the waist ties and gave the dress a bucketload of swingy flare...


It's really easy to take a pattern that you like and slash and spread it to get the swing skirt. There's a blog post with instructions here.

I may have gone overboard with the amount of twirl, but this light, drapey rayon knit needed volume


Her favourite colour at the moment is orange, So I used a bright orange thread for the stitching around the facing and hems.


The vertical garden is growing really well - maybe because it's on an automatic watering system and so not reliant on us to remember it. Here's hoping we can keep some other plants alive elsewhere around the place!

We've certainly been feeding and watering the kids sufficiently. They're growing so fast!!


Details:
Size: 10
Alterations: first one straight up. Second one with added skirt flare and no ties
Fabrics: Long stashed knits / remnants

Saturday, 26 September 2020

Goldilocks - sans bears

Some days the boredom is indescribable. The weather has turned cold and miserable and we're all locked indoors. As we have been for months. It's school holidays but that looks just like school days except there's no incentive at all for the kids to get out of their pyjamas...

On a long list of non events was the reason for this dress (last year's link here). I felt like not sharing it here in case an opportunity for the event arose later, but honestly it won't fit for that long. Who knows when "later" will be. So bored.

Anyways, here's Goldilocks! (and there's a huge pile of unsewn bear fleece in the stash ready for a post-Covid world)


She absolutely insisted on wearing my boots for this photoshoot and since I never thought she would wear the dress I consented. They're far too big, but I've been told when I've "grown out of them" they're hers.


This year was to be A's first Roobaix and a full family affair, so our costumes were chosen: Goldilocks and the three bears. The Roobaix was meant to be in June, and briefly, June was looking like a good month. We got out to the country for a weekend and saw my parents. I bought the fabric I needed for our costumes. Then, suddenly we were all sent  back into a long, long locked down winter.

By the time we can leave our small 5km radius and ride some of Melburn's cobbles it will probably be far too hot for bear suits.


I'd traced off the bear suits, but the only cutting I had got around to was this dress. I detest having unfinished things lying around so once something is cut, it gets sewn. And hey, I've inadvertently joined in with a hashtag - Sew Vintage in September, as well as the Sewing Pattern Review current costume competition.

The pattern is a one size (size 10) retro number from Simplicity. 


My copy has the surname of one of my aunts scribbled on it, so I'm guessing my poor cousin Narelle had to wear this first time around. I'd love to see a photo of that.

I gave A free rummage through all my patterns to pick what she thought would be most Goldilocks like and this was her pick. 


The fabric is just a poplin from Spotlight, and so was perfectly pleasant to sew. I appreciated the pattern's technique for the pleated neckline. The pattern is cut out with a square top. The pleats are sewn, and then a neckline/armhole template is used to shape the top part of the pattern. 

The hemline looks growth pleats but are actually folded bias strips stitched in place. The resultant length is quiet retro (read short) and between that  and the well fitted bodice it's certainly true to size and probably short lived.


I made one small change by using an invisible zip at centre back instead of a lapped zipper. It's what I had on hand and I always prefer an invisible zip in this kind of dress.


A porridge bowl and wooden spoon was as far as our props imagination went, and is enough of a nod to our titular character, no?

She surprised me by wearing the dress on a few occasions (when it was sunnier) after this photoshoot. Funny what they take to. I had no hopes for this to be anything but a one off costume.


Hopefully we'll get a Goldilocks day for the Roobaix some time soon - not too hot, not too cold, not too windy, and the freedom to find some cobbles outside our own little neighbourhood.


Sunday, 13 September 2020

Dawn Jeans muslins - two near misses

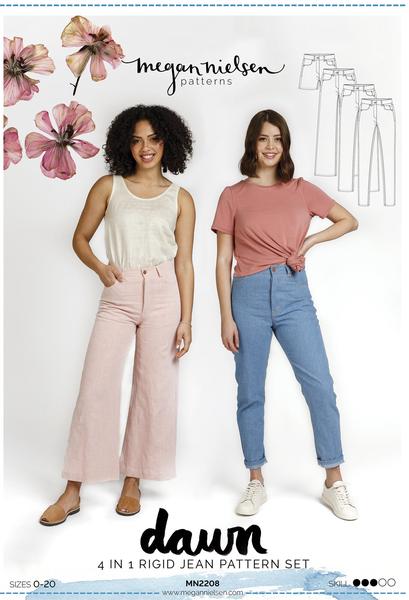
I've had the Megan Nielsen Dawn Jeans pattern for so long now, and I finally thought to have a go at making a pair for myself....

There was some black, heavy, rigid denim out for another make which I'll share soon and so I decided it was time to trace off and cut out some jeans. At $4/m from Eliza's I had nothing to lose. Based on measurements I chose a size 10 waist blending out to 12 from the hips down.

And initially they were looking good:


But they were so short! I hadn't paid a lot of attention to the inseam length, but just gone for the "regular" length cutting line. I figured at 170cm (5'7") I was pretty "regular".

I also, perhaps wrongly, assumed that the models on the pattern cover were wearing the cropped length. It doesn't state whether they're wearing the cropped, regular or tall length, so it's not easy to judge the drafted length of the jeans...


I tried adding a cuff of denim to the bottom, but that looked daft, and they were still at least two inches too short. So I cut the cuff off, narrowed the leg to be more tapered and then single fold hemmed them again. The end result is only half an inch shorter than the "regular" length would be on me, and seriously, wtf are these if not cropped?!


The other changes that I'd made during construction was to take the centre back seam in by 3/8" from just below where the yoke attaches. That reduced the waist measurement by 3/4" yet the waistband was too short.

I went back to my traced off pattern piece and checked I'd cut correctly, yep. Then I checked my pattern piece against the original pattern, all correct.

The discrepancy appeared to be entirely on one side of the front. If I matched the side seams and notches it was all fine from one front edge all the way round the back to the opposite side seam. Then I was missing about an inch and half between that side seam and the centre front. Bizarre.

Given that I'd taken a decent wedge out of the centre back, and I don't mind the idea of easing the pants onto a shorter waistband, I just ignored the notches and ploughed on.

I fully understand the concept of easing trousers onto a smaller waistband, but this was not that. Either I'd constructed the fly incorrectly (and I don't see how I could have) or the waistband pattern piece was in error. 


From the photo above you can see how much droopy/gathered fabric there would have been in the back yoke if I'd left the centre seam alone. As it is I need to take some height out to get rid of that horizontal wrinkle.

And then I wondered what I could do about the horizontal wrinkles on the backs of my upper thighs..


I read some handy tips on Sewing Pattern Review that this might be due to the crotch curve pushing the upper leg down, and sure enough, if I pull up on the centre back waistband the wrinkles disappear.

So for my second pair I tried an adjustment to the lower seat curve where I cut a deeper curve and then added that fabric back on at the side seam. I only made about a 1/4" adjustment. 

I also then tried taking a little pinch more of length out of the upper back leg so that they would have to be stretched slightly when pinned to the front leg. I'm not entirely sure I achieved anything...


I've tried wearing this first pair as they really are very comfortable and feel like nice jeans to wear for a day, but the length is just stupid. If it's warm enough to wear cropped pants and have flat shoes and ankles on display, then it's too warm for heavy, rigid, black denim.

I have a shorter friend in mind that they might fit. Otherwise I don't know what I'll do. I'm definitely not one for tight fitting denim shorts. Eeek.

So muslin number 2: Some tweaks to crotch and upper back thigh length. The same centre back chunk removed. The same this-waistband-doesn't-fit-but-I'm-going-to-make-it moment. A bit of width added to the front upper thigh, and then sewn with a smaller front seam allowance over the upper thigh, trying to get that side seam vertical. And finally, an additional 3" of extra length.

And I still think they're too short!


Maybe I'm weirdly old fashioned, but I think jeans should at the very least touch the tops of my shoes. I'd actually prefer them to rest there slightly with a little fold, or quarter break

I looked up the description of trouser length and found this handy descriptor of no break, quarter break, half break and full break...


I hemmed these jeans by only a single 1/2" fold, so they're effectively 3&1/2" longer than the drafted "regular" length. I'd want at least another half inch, so I figure I need to add 5" to be able to hem them as per the instructions with the option of trimming a little off. That's bonkers!! 


I don't think I had much effect on those back thigh wrinkles after all.


But I did have a bit of fun with this second pair using all black thread and black hardware. I had some great matte black jeans buttons from Buttonmania, and then bought some black rivets from MRecht.

There's some detailed pocket stitching and I even embossed a little Kraft-Tex jeans patch with my blog logo. Initially i'd drawn it with a silver fabric pain pen but it was way too bright so I simply flipped it over and pressed the logo into the other wide by tracing over a printed copy with a ballpoint pen and pressing really hard.

It looked cool, but has all but vanished after the first wash.


So... If, and it's a very big if, I could be bothered with a round 3:
I'd leave the front crotch the same,
Narrow and shorten the back centre waist
Take even more out of the lower crotch and add it back to the outer thigh.
Add more again to the front thigh 
Maybe make the thighs a good bit wider all round and give myself a slacker cut
Add a bucket load of length


I have other rigid denim fabrics in my stash, but I also have a lot of other pants patterns that could make jeans.

As much as I feel like I may just be getting somewhere with this one, I wonder if starting over somewhere else may not work just as well. It would certainly be more interesting.

Tuesday, 11 August 2020

Jalie Jeans take two

Way back in February I made those green Jalie Eleanor Jeans which got a woeful reception (although I'm happy to say they've been worn occasionally since then) and I planned to try again.
A while ago I did:


Those few lovely weeks when the kids could go back to school and I could use the dining table to sew on my rostered days off, lead to these jeans.

The fabric is a stretch cotton of a sort of denim weight. I can't think where it came from but it was  a 1m remnant that was just the right amount.

The main problem with the first pair had been the height of the rise and the constant feeling like they were falling down 


For this pair I used the same size N pattern but made some adjustments above the hip. I cut the front pattern piece horizontally about mid way up the crotch curve and raised the centre front by 2" and the side front by 1&1/2"

The back pattern piece I also cut midway across and raised by an even 1&1/2". For my own reference there's a drawing in my sewing notebook to make sense of that. Then the leg length was shortened by 1&1/2"


I played around with some metallic topstitching thread on the back pockets, but it's such horrible stuff to use I'm glad she wasn't keen on topstitching everywhere. I've since heard the suggestion to use it in the bobbin rather than the needle (where it frays and snags terribly) so I'll give that a go next time.

If I was going for perfect fit I could probably try and "de-wedgy" that back crotch curve, but the way kids grow, you could muck around with the fit only to find they've outgrown that size by the time you get it right anyway!

I also cut the elastic quite a bit shorter for the waistband of these ones so they would be a snug fit at the higher waist. they seems to be much better and are one of the first things she reaches for if they're clean and in the wardrobe.

I do have quite a few cuts of stretch denim, more like jeggings fabric, and so long as I remember that extra butt room and extra height I think I could make her plenty of these and they'd get worn. I just need my sewing table back and some sewing mojo...