Friday 31 January 2014

The terrors of the universe!

"These creatures, my dear ignorant blog readers, are the most brutal, vindictive, venomous, murderous beasts in the entire universe!"
"VERMICIOUS KNIDS! That's what they are!"
 
..... So yeah, we've been reading books and I've been painting T-shirts with the kids again, and this morning both my gorgeous little vermicious knids trotted off to daycare in their brand new clothes.
 
I gave P a collection of Roald Dahl books for Christmas and we've read The Twits, Charlie and the Chocolate Factory and now Charlie and the Great Glass Elevator.
 
 
The kids definitely found the nasty aliens in the lifts of the Space Hotel lobby pretty frightening but then they got really involved in the story and were delighted when everyone escaped those murderous beasties. In fact, A has requested a Vermicious* Knid teddy to sleep with. If only I could crochet, I think an egg shaped, greenish-brownish blob would be pretty easy really.
 
* and yes, a not quite three year old trying to say 'vermicious' is pretty cute!


I also figured that an egg shaped blob would be pretty easy to paint, so the kids painted their own Knids with the help of a freezer paper stencil outline. P's T-Shirt is a standard size 6 Field Trip raglan T


Here I did the lettering by using the Transfer Pencil that I used for P's Kenzo Tiger sweater and then hand painting over it.


And then I snuck this on the back! He thinks it's a bit dorky, which cracks me up, cause really the whole T-shirt is kinda dorky and I'm not sure that this is what tips it over the edge! Their mum is a book nerd who likes to sew and paint so he'll have to get used to it!

I used a T-Shirt Transfer on the back and was too lazy to cut out every letter so it looks pretty ordinary. I think the ultimate way to do lettering would be to use a stencil cutting machine to make a freezer paper stencil. Did you hear that Flipper? Birthday idea there darling....


A's dress is an alteration of the same Field Trip pattern. I used the size 3 and lengthened and widened it to make a basic A line dress. Sadly, my red Transfer Pencil wouldn't work on the pink fabric and I couldn't see it well enough to paint over it. But it made enough of a mark that I had to try and put the T-Shirt Transfer lettering over the top. Minor fail, but she had such fun painting her Knid she doesn't mind at all.


I finally ran out of the pink cotton/lycra knit (used here and here) so we found some nice stripes for the back. I can't recall where this stripey knit came from but it feels so very nice. I might find a use for the rest of it for me!

 When they're not storming through the house destroying everything in their path the Knids Kids like to play Fairies too. That would be much more peaceful except that A gallops up and down the hall shouting "Flutter, Flutter" at the top of her voice. At least my Christmas Tutu is getting worn, and he accessorised with the handbag himself!


Friday 24 January 2014

LTTS Cover To Cover Challenge : Guest post

When you line up at the start of a mountain bike race you can see your competitors

 
You know who you're racing against. You know the other rider's strengths and weaknesses. And if you don't recognise them from other races you can check them out on the start line, what kind of bike are they riding, how fit do they look. The photo above is, I presume (memories fade), from a National round race as I'm conspicuously absent from the front line. Here I am, down the back somewhere, taking a much more relaxed approach to the line up.
 
 
Well, when you throw out a challenge on the internet you don't know who's going to line up and there's one "competitor" that's been an absolute stand out so far in our Cover to Cover Challenge. If sewing was an Olympic sport she'd be wearing gold for sure.
 

Before she gets too far in front and I lose sight of her, let me hand you over to Sharon of Sweetpea and Pumkins my first ever (trumpet fanfare) guest poster with her very cool big kid version of the Penguin Backpack..


Hello! I am Sharon from over at Sweetpea and Pumkins, I started The Little Things To sew challenge in the hope to make every project in this book. (After all I did tell my hubby that It would be a great investment seeing I was going to sew everything in this book...two years later)

So when Shelley started this challenge it was perfect for me to get in gear and finish all those projects I planned but had not started.


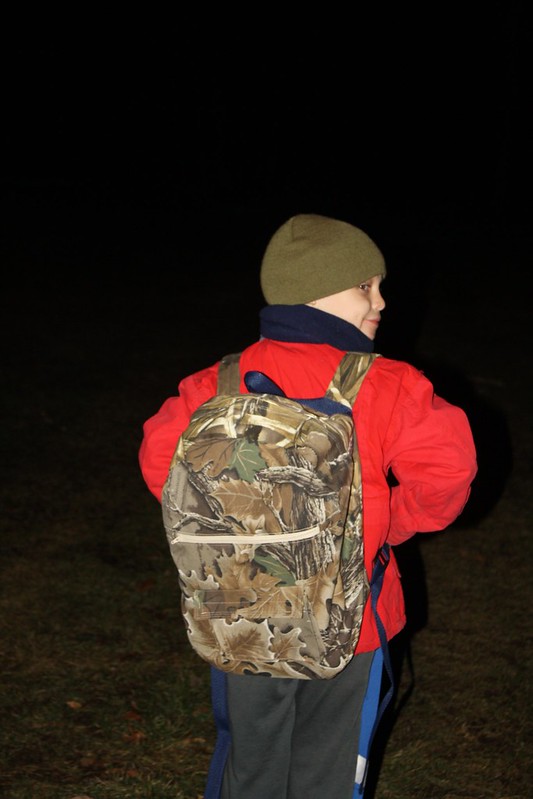
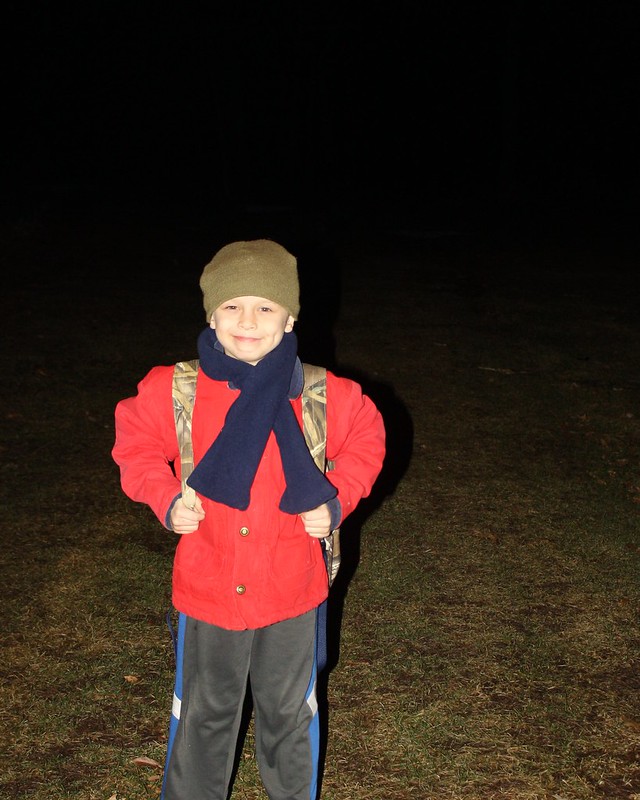
The challenge of this project was Mr. G needed a new book bag for school and it had to be big enough for all his things to fit inside and it had to be cool enough for an older kid.


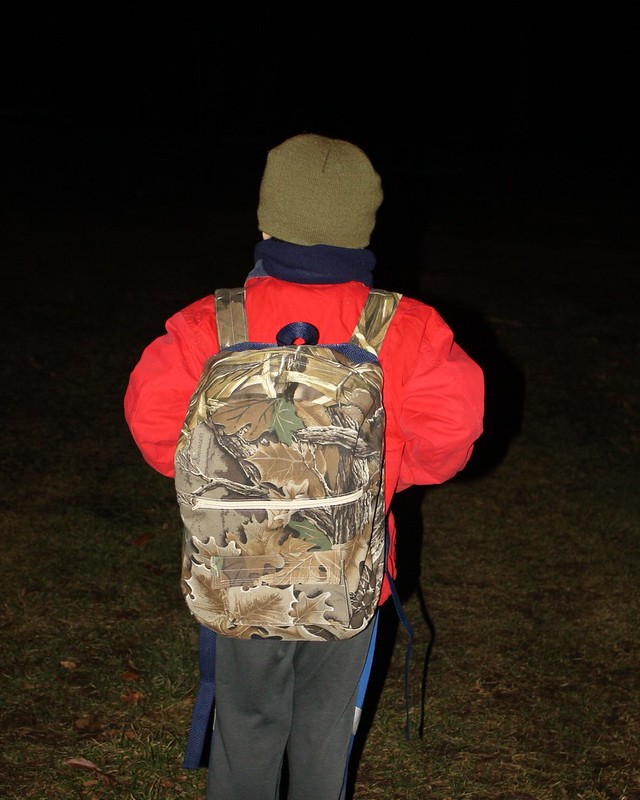
For the mods of this, I first enlarged the front panel of the book bag by 2". (the other pieces I measured as I went) I then added a zipper pocket and cargo pocket on the front of it. The zipper was simply put in between the top/bottom panel of the front pieces. The cargo pocket was from the Oliver + S Field Trip pants but I made it 2" longer than the pattern piece. I also used hook and loop tape to keep it closed.


I sewed the lining of the front panel almost the entire way around to make this a working front pocket. I also stitched the top of the zipper panel to the lining panel to close the pocket off. Not hard at all it just some thinking. ; )


Yep, it's plenty big enough for all those books in the inside!


It also has a lining pocket (as in the pattern) on the inside for his pencils and small things.


I did try to make the book bag look the same as his old one on the back. The straps are padded as well so it's comfy to wear with all those heavy books inside.


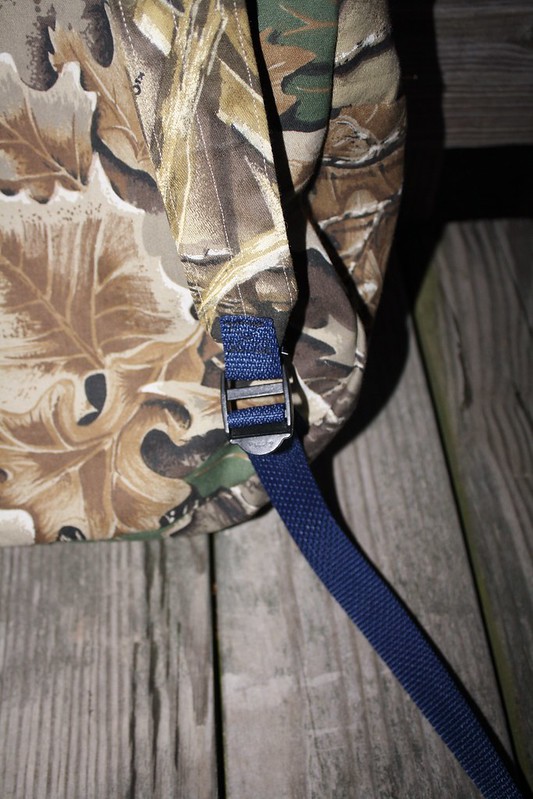
I did reuse the adjusters from his old book bag onto the new one. They still are good and I didn't see why I shouldn't reuse them. (that and I couldn't find any at the store, all sold out! Who else would be buying these suckers this time of year??)


It did turn out pretty good but the best part is he loves it!

Thanks Shelley for having me and hosting this Challenge!

Thank you Sharon! How you can sew so much and respond to blogging requests is beyond me. I'm sure there must be 30 hours in every day in Sweetpea'n'Pumkin-land. The (very small) competitive part in me is waiting for you to hit the "technical" section of the race (that'd be the Travel Quilt and Playtown Houses) but I'm not sure it'll slow you up too much.

Thanks also to everyone who's sewing along at whatever speed they spin best at. The Flickr pool is looking fantastic. When I get back from my holidays I'm going to have to start an Excel spreadsheet to keep track of the projects completed. The list is getting sooooo long.

Monday 20 January 2014

LEGO convention 2014

We're off on holiday tomorrow but I thought I'd share one last thing that I made this week before I go.


P got a new shirt for going to the annual LEGO convention. This was the last yard of my LOVE bricks Spoonflower order from last year. (other LEGO fabric creations here, here, here, and here) Sadly it's no longer available on Spoonflower. Thankfully A's Jump Rope dress still fits her OK and while she's hardly worn it at all since last year the idea of "event" dressing seems to have taken hold and she was very willing to wear it today.

I'm not going to allow myself to rant too much about the Burda pattern the shirt was made with, but I'm amazed that, given it was the first shirt pattern I ever used, I continued with sewing at all. You know those letters to my teenage self that people are fond of writing? As I was sewing this dreadful pattern I was composing a letter to my novice sewing self circa 2009 explaining how one day I would learn how to set a sleeve in with gathering stitches (none suggested here) or clip the seam allowances of a collar to help it attach smoothly. This beginner rated pattern gives no such help at any of the difficult stages. Rant over, I could go all night. Next time, I'll omit the back yoke and add sleeve tabs and patch pockets to the Sketchbook pattern.

So a sad farewell to my stash of LEGO fabric, a gleeful farewell to Burda whatever-your-number-is and a fond, temporary farewell to you dear blog reader(s).

.... and in very exciting news, I've lined up my first ever guest poster for later next week.

Friday 17 January 2014

What he (mostly) did not wear.

With her pink wallpaper-esque dress A was all set for the theatre, but what would P wear to see Angelina Ballerina?....


Not this outfit is the answer. We've had a pretty cool start to summer so I was happily imagining making the Art Museum trousers and vest and a new long sleeved Sketchbook shirt so that P would have some formal duds that didn't show too much wrist or ankle. He is growing like a weed!

I'd made the vest and was almost finished on the shirt when the heatwave hit. I finished making the trousers knowing that it would be cruelty to force this outfit on a child in this weather. To be honest we've mostly been in the nuddy when we've been indoors at home lately so I don't even have any modelled photos.

But for cute-ness' sake, here's a photo of P from two years ago when he went to see Angelina Ballerina:

He wore those mouse ears all the way into the city on the train with his dad.
That shirt was a Burda pattern which I'm about to revisit but I far prefer the Oliver + S Sketchbook shirt.


The fabric is a quilting cotton which I found in the country town quilting shop near my folk's place. When you're in a country town and it's hot and the quilting shop has air conditioning and a toy bucket why wouldn't you hang out there?


My one stuff-up (there always has to be one, right?) was to put the buttonhole placement template on upside down and mark the buttonholes wrongly. The bottom-most button definitely looks too low, but since I'd never button higher than the one that's done up in the picture above it doesn't really seem to matter.


I stole (from someone, I forget who) the idea of cutting the back yoke crossways so that the stripes didn't have to match.

 
Obviously I idolise the Oliver + S patterns but here's why. The instructions for bits like these sleeve plackets are awesome. Liesl includes tips that are missing from other patterns (hello Burda shirt) that makes it so much easier to get a great finish.
 
And that's why, once I'd worked out what a welt pocket was (which I learned from this discussion thread on the Oliver + S forum), I knew there could only be one pattern designer to teach me how to sew them. Enter the Art Museum pattern.
 
 
I had a sneaking suspicion this vest could end up as an exercise-in-sewing-for-me kind of thing. That is, it might get flatly rejected. So I used a very cheap linen and some left over shirting for the lining. I was amazed to find linen on sale at $3/metre, but the more I look at it I'm not surprised. It has a slightly knobbly curtain like texture up close and turns vaguely purple when ironed with heat. I'm doubting the veracity of it's linen-ness.
 
However it behaved well and my first ever welt pockets were sewn.
 
 
It's incredibly cute on, and when P tried it on over a T-shirt I told Flipper that I might start a new trend with kid's waistcoats. He shot me down by saying that the hipsters who dress their kids in straw Panama hats were already onto the waistcoat trend. Damn those hipsters, first they stole our single speed bikes and made them ridiculous and now our kiddy couture...
 
Anyway, on to the trousers. Yep these are not pants, these are trousers. To the British that might seem obvious and I apologise to them for having said a rude word (ooh-er) but to me it's a line between casual and a bit more dressy.
 
 
Hanging them up like that I can't believe how long they look! I cut a size 5 in width lengthened to size 6 at the hem and they're perfect. They are quite a slim fitting trouser so I imagine a straight size 6 would have looked OK as well, but I'd measured my kid so thought I'd do it right for once.
 
And, again, you can add welt pockets to the rear
 
 
We're up to our fourth consecutive day of temperatures over 42degC (105degF) so all these garments are in the wardrobe. But I quickly made a pair of navy Sketchbook shorts and here's what the kids wore to see Angelina Ballerina after all. (apologies for crappy phone photo)
 
thats' some serious sunshine coming in left of picture!
In weather like this there's nothing nicer than surfing the net and looking at northern hemisphere blogs and all that lovely snow! Stay cool everyone.


Sunday 12 January 2014

The bit after the Happily Ever After...

There are just a few hundred things I'm meant to be doing but they're all boring or troublesome, so of course I made a list of all the boring, troublesome things that still need to be done, then I made another Oliver + S Fairy Tale dress!
 

I found this fabric as a remnant long before A hit her pink, ballerina phase (we're solidly in that now and I'm holding my breath waiting for it to pass) and I found it too hard to resist so it was added to the stash.

I knew I was on a real winner with the pattern after making this one. The fit was perfect and she simply adores that blue "Cinderella" dress. Since my Christmas Tutu went down like a lead balloon I was looking for some redemption.


This dress would be pink, it would be "poofy" and it would be made just in time for next week's trip to the theatre to see Angelina Ballerina. I was going against all my own ideas of style and tastefulness and making something that I just knew she'd love.

I had planned a standard "view B' but then hit a snag wondering how my vertical bodice stripes would look right next to the gathered skirt. The stripes would never match but they're wide enough to look like they probably should. Then I stumbled across the solution in a 2013 sewing summary by Katy of Designs by BellaBug


Katy had photographed her dress with the sash wrapped across the front. It looked fantastic and was the ideal solution. Only I still wanted that BIG bow at the back, so I made an extra sash section that was gathered and stitched into the side seams just like the back sash is.


I'm happy to say that A is delighted with her dress and is "saving" it for Angela (sic) Ballerina next week. That hasn't stopped her putting it on at every possible moment, during and after it was sewn.


The only modification I made was to add one inch in length to the skirt. The armhole facings are kind of redundant given that the dress is lined, but I can see why they're there as it means the bodice construction is the same for both the sleeveless and tulip sleeve versions. It also allowed for a peep of some more fuschia pink cotton on the inside.

The kids were getting excited about the ballet show and, predictably, were fighting about something. It would seem we only have one pair of bright pink mouse ears and P was adamant that they were his and he would be wearing them (more on that in another post!).

Oliver + S to the rescue again with a free downloadable pattern for a felt bow and tips on making fabric covered headbands.

You've got to believe me, I was so far out of my beige-brown comfort zone now I figured in for a penny, in for a pound... Cutesy matching hairband was made. .... and adored!

I think the temporary tiger tattoo on her bicep really works with this outfit, right?!
Then, due to a complete failure to drink and party on New Year's Eve, the Flipper and I found ourselves awake, sober and bored on new year's day so we went to Ikea. P got a new desk and swivel chair (that's better than the show rides!) and A got a toy chest and wardrobe. Flipper and I came up with a new premise for a reality TV game show: Ikea vs the Chef. Co-habiting couple race against each other to prepare dinner or assemble Ikea furniture.

Not only was my Stuva wardrobe build beaten by Spaghetti Meatballs (too easy and should have been handicapped) but it turned out I'd bought the wrong size frame. After attaching all those draw slider thingies I was NOT returning it and so another trip was made to get the bigger frame and A now has two wardrobes.


And when you look inside it appears that one would never have sufficed!


I guess it also shows that I really must stop making dresses and get on with those boring, troublesome jobs after all.

Sunday 5 January 2014

2014: Begin as you do not intend to continue


Here we are at the start of a new year, and the first thing I've sewn is something for myself.

It's not really my intention to sew clothes for myself. I have a wardrobe full of lovely, too small clothes that don't get worn but are too good to throw out. I do not want to come to terms with this body shape, but in the meantime, for the sake of decency, I need to dress it.


But even that's not the real, honest truth. The truth is that I bought this fabric cause I liked it. I knew full well that neither of my kids would ever wear it, but I bought it nonetheless. So, putting aside the idea of a cushion cover (I know, it would be perfect for a cushion cover, I agree!) someone would have to wear the fabric and that would have to be me.

I was also thinking that I had the Diplomat dress fit right and it would be wasteful not to use that carefully twice drafted and adjusted pattern one more time.


This time I made the sleeveless, shorter view and I think I finally nailed the zipper!. I added length to the hem but not as much as I'd have liked as I was working with a remnant and used every last scrap to get this much dress out of it.

The fabric is undoubtedly linen, but since it's a remnant that's still a guess, and it behaved beautifully at the armhole facings and the zipper. It's quite a heavy weight fabric and is probably intended for cushion covers after all. I'm not really a florals kind of person and the printed flowers and the furnishing weight were making me think of a grandmother's sofa.

The colour, on the other hand, is very me. I think it's best described as "unwashed camel".

So now that you've got the mental picture of the inter-breeding of a sweaty ship of the desert and a settee, a picture of me wearing the dress will seem like welcome relief.


We certainly haven't had the hot summer weather that I was imagining when I cut this dress and it was far too chilly to wear it like this for more than a minute or two. That's OK by me, cause there's not enough dress there for me to feel really comfortable in it, and, in leaving the sleeves off it just doesn't quite sit right around my upper chest. I think I'm finished with the pattern now though and I don't imagine I'll be bothered to try changing it again.

Instead I just wore a cardi all day and felt great about everything!

That's better!