Thursday 28 September 2017

Buttoned Up Button Down Shirt

Ever since I've been officially contributing to the Oliver + S blog, Liesl has suspected I may have some hidden cameras installed in her studio. Too often to count it has happened that I've been working on something only to email Liesl to ask if she wants me to write it up as tutorial for the blog. And the answer has come back along the lines of  "um, no, 'cause that's exactly the kind of pattern I'm currently developing. Are you spying on me again?".  I could rattle off many examples and it's become quite funny - especially 'cause I'm never on trend or ahead of any idea in the sewing world. Maybe I really do have cameras planted ;)

So when she politely declined my offer to share how I'd split the Sketchbook shirt collar to make it into a two part collar and collar stand, I was excited... Was there a new kid's shirt pattern in the works? Yep!!


The Buttoned-Up Button Down Shirt is the ultimate shirt pattern for kids with all those little quibbles we'd had about the Sketchbook Shirt resolved. That one has the simple to sew but less perfect single piece collar while this one has a very crisp two piece collar. That one had a super simple style of sleeve placket, this one has a perfect tower placket. And where the Sketchbook is a boxy, short and more casual cut, this one has the longer silhouette of a shirt designed for being tucked in to trousers.

I still think the Sketchbook pattern is a great pattern to cut your teeth on when sewing a shirt for a kid, and the shorts are just fabulous. Where this pattern comes in to play is where you want a more formal, classic shirt and when you're feeling like a bit more of an involved sewing experience.


This shirt was sewn for the pattern test. P is 9 years old and measured a size 8 in all circumference measurements but a little over the next size up in height. I've sewn the size 8, adding 1" in length to the shirt and 1" in length to the sleeves.

Of course it needs to be said that my son has extraordinarily long arms for his age/height/species and on most normal children you wouldn't need extra sleeve length. I think I could have easily added a second inch to these sleeves. They look a bit short in these pictures and three months later they're probably unwearably short unless rolled up. As a reference I would add as much as 3 to 4 inches in length to the sleeves of the School Bus or Field Trip t-shirt patterns, so this shirt sleeve length seems to be well proprtioned, bordering on generous, for the pattern size.


This great shirting cotton was bought on the same rummage through Phillips Shirts fabric store back in mid 2016 when I bought my Hermes-esque fabric.

When we were out at my parent's place and P started playing chess with my dad I insisted he put his "chess shirt" on and I snapped a few pictures of the shirt in action! To keep the shirt from looking too dressy I'd edgestitched and topstitched everywhere using a denim-blue thread that matched the rooks on the shirt. The buttonholes are all blue as well except for the very bottom one on the front which is white. I always feel so clever when I remember to do one contrasting buttonhole :)


The instructions for the two piece collar, the cuffs and the sleeve plackets are top notch. No handsewing required and such a neat, crisp collar result. The more formal View A has no topstitching and a single open chest pocket, whereas this View B version has two breast pockets with tidy, hidden buttons on the undersides of the flaps.

To attest to the power of wearing a proper chess shirt while playing chess, as I was snapping away he managed to put his grandpa into check....


So that's my week of shirts on the blog. There's been quite a bit more sewn since these, so I need to do more catching up around here. I have a pretty hilarious garment to share with you next week so stay tuned!

Wednesday 27 September 2017

Recital Shirt - View A

This shirt wasn't commissioned like the View B pattern test that I blogged about yesterday. But there I was, with a free evening and piles of fabric and lovely patterns looking at me and suddenly I found myself in a cutting frenzy.

I had some perfect shirting fabric picked up a year earlier at a Phillips Shirts fabric sale and I knew it would suit the View A of the Recital Shirt very nicely. And well, that was already printed, traced off and sewn through once...


View A differs from View B in that the front pleats are absent, so the princess seams are more apparent. Also the tuxedo winged collar is replaced with a regular mandarin collar and the option of putting in a ruffle. Otherwise the sleeves and back are the same.


This shirting cotton is quite narrow and I had bought an arbitrary two metres (or maybe two and a half from memory) with no plans for what to do with it. It was a very tight squeeze to get the shirt cut out and so there was no fun to be had trying to perfectly pattern match the back yoke or get tricky in any way like that.

But after my shifty, squirrely linen it was an utter delight to sew this perfect shirting cotton. I don't have a great close up photo of the pattern but it is ropes, hooks and pulleys and has a very Hermes vibe. I thought with the Hermes thing going on and the lightness of the cotton, the ruffle collar, while not usually my style, would be fun to add.


I like it open like this, but I have to confess that if I button it up the look is a bit too much like an old fashioned lamb chop for me. Does anyone still use those frilly paper things on the end of lamb cutlets or does that only exist in the lexicon of cartooning nowadays?

I think I may be about to show off the wrong sleeve placket... The other one, the one I didn't photograph, has a freakishly lucky bit of pattern matching where the placket is a perfect continuation of the pattern on the sleeve. You'll just have to take my word for it. Or you could invite me out to a fancy lamb restaurant and I'll wear my shirt and show you.


It wasn't until I was about to start cutting that it dawned on me that a vertical stripe pattern and the curved princess seams might make for a weird looking shirt. But I think it still works. In fact a finer stripe could look really cool with the change in direction of the fabric along that princess seam.


I've been quite generous in the size I chose here (straight size 12). There's a few months between taking my measurements for the first pattern test and getting this second version photographed and I've been on a bit of an eat-less-muffins regime. It would be an interesting exercise to size down and really fit this shirt using a fabric with a bit of stretch. But then I don't wear shirts much at all and certainly wouldn't have use for an ultra-fitted shirt. So, it would be an interesting exercise in fitting, but not one that I care to be bothered with right now.

I've got one more shirt to share with you tomorrow and then I'm drumming my fingers waiting for the new Liesl + Co patterns to arrive as I keep finding and buying great fabrics for making Flipper a shirt. I guess it will be his turn next.

Tuesday 26 September 2017

Recital Shirt - View B

I was delighted to have been asked by Liesl + Co to help pattern test their new patterns back in May and immediately said yes. Then I set to trying to find how I could affordably get 36" digital patterns printed....

For the record my local copy shop franchisee quoted $98 + GST for a job that Creffield did for about $14 and with such expert service and understanding of the importance of not scaling etc that I was blown away and will sing their praises very loudly. Add in that they did it while I waited, and they have a coffee machine, and they have a coffee table covered in cycling magazines (possibly only this West Melbourne store, but hey). Heaven!

Anyway I digress. Oliver + S pattern testing. YES PLEASE!


The Recital Shirt is one of the latest offerings from Liesl + Co and it's a classic button up shirt with a bit of a twist. It has princess seams at the front allowing for easy custom fitting and comes in three different cup sizes: A/B, C and D

With no measurable difference between my upper bust measurement and my full bust measurement (thanks, I guess, to lots of push ups and back exercises and no boobs), I was in the  A/B pattern camp. And my measurement put me in the size 12.


Since I was pattern testing I made no alterations to the pattern before cutting and sewing. But, you know, I've worn this quite a few times since making it (without letting anyone know it was me-made or an as yet unreleased pattern) and I don't think there's anything I would change.

The back has some lovely darts that give it a nice shape, and while my size 12 is comfortably loose it doesn't look like I borrowed my husband's shirt.


Forgive my awkward modelling, these were the fit photos for Liesl and I just can't be bothered taking any more of me prancing around in someplace more interesting. Actually, this is pretty much how I photograph everything these days, so who am I kidding...

The View B has some wonderful deep(ish) pleats at the front giving it a bit of a tuxedo shirt vibe. My fabric was some $3/m linen from Eliza that I pulled from the stash and while I love it for a shirt it was very shifty and my pleat sewing is seriously lacking in precision. My Recital Shirt is more Jazz Improvisation than Symphony Orchestra but that's cool with me.


And it obviously wrinkles like a mother. :)

Hanging on a coat hanger after being ironed it looks really great, and the insides are lovely and neat too.


The method of attaching the collar was one I hadn't seen before and I was really impressed with how it turned out. Especially for the lack of any hand sewing! The same technique is used for the cuffs and once I'd got my head around how it was done it was easy.

The other new to me technique was a tower placket for the sleeve cuffs. Again, very well explained in instructions and diagrams. The sleeve length on Liesl + Co patterns is a delight for me and my arms which never seem sufficiently covered by ready to wear shirts.


The other cool thing is that the pieces of this shirt can be mixed and matched with the Liesl + Co Classic Shirt. So, if you've already done all the work on fitting that one around the bust, or just prefer the plain, unseamed front, but you like the back darts of the Recital Shirt, you can have both!


I liked this one so well that as soon as I found a bit of extra sewing time I cut another one to make View A. I'll show you that one tomorrow....

Saturday 23 September 2017

The Littlest Production Animal - Genoa Tote in competition

For a few years now I've decided that visiting the Royal Show with children is much more entertaining if you enter something in competition. That way you have to walk right past all the rides and junk food stands to go see mummy's whatever-it-was-that-she-entered. Of course once you're in the Art, Craft and Cookery area the kids end up making pom poms or flower crowns and being amazed by all the decorated cakes, art, textiles, toys, hats, woodwork..... It's great.


Previously I've entered something that was already made and seemed to fit a category, but this year I didn't have anything in mind. At least not until I saw there was a competition class just for tote bags, called "amusingly" Totes Amazing! competition class.

Then, when I saw on Instagram that both Jane and Nicole were going to enter, and both were planning to use the great Genoa Tote pattern by BloglessAnna I had my answer.

I threw my hat in the ring with another Genoa Tote, and in doing so helped to fuel the great Royal Agricultural Society of Victoria Genoa Tote-Off of 2017 or #rasvgenoatoteoff2017


Being a bit canny, I think, to what floats the boat of agricultural type people I thought I'd give my Genoa Tote a bit of a production animal theme. So I'm celebrating that humble little food producer, the honey bee.

I have a Japanese embroidery magazine (Stitch Idees Vol 7) that has sashiko honeycomb stitching on a tote bag and I've always really liked it. Time to make one! That bag has dark brown stitching on a yellow background - a bit bright for me and not anything that I had to hand...


I rummaged in the stash and found this remnant of rust brown denim (previously made into Art Museum trousers) and wouldn't you know it, it was a perfect match for the leather straps that Anna had kindly gifted me when she first released the pattern.

In an extra lucky moment I had just the right amount for a medium sized Genoa Tote. I ruled up my honeycomb and set to stitching...

I decided I needed a honeycomb patterned fabric for the lining and found a great cotton drill at Spotlight.


The honeycomb pattern is in a light bronze/gold metallic print and in another moment of it's-amazing-how-my-stash-can-always-come-to-the-rescue, I found I had just the right amount leftover of a fine, gold cotton voile that I had used to line a dodgy leather bag back here.

Damn, and if it didn't match the printed lining fabric perfectly too! Feeling lucky.


My previous "successes" (we don't mention the number of entrants in a category now, do we?) at the show in the textile competitions (first place for this, and for this) meant that I had to enter the Open Category. While Jane and Nic would battle it out with their totes in the Novice Category.

A bit of self applied pressure had me line my pocket so that there are no exposed seams on the inside of the pocket. The cotton I used is so light, that I interfaced one pocket piece and then lined with non interfaced and it worked perfectly. I also fully enclosed the tab for the key clip so there's no peek of an unfinished side. Easy changes to the pattern that are entirely unnecessary unless you think you are entering into competition with "true ladies of craft" (add your own crashing thunder background noise when you read that).


Of course I may have to admit I have turned, or at least, am turning, into one of those such ladies as we visited the show today to learn my Genoa Tote won first place. :) Congratulations also to Nic and Jane on their beautiful entries and rightly deserved ribbons. I think these bags all need to go out for post show drinks after we collect them!

Much to their delight, the kids entered for the first time and took out a second place in the Anzac Biscuits and a Commendation for some Choc Chip Cookies. We're all feeling pretty clever.

Details:
Pattern: Genoa Tote by BloglessAnna
Size: Medium
Notions: Leather straps, rivets and key clip all from BloglessAnna via PatternFantastique. Embroidery thread. Metal zip from my stash.
Fabrics: Stashed denim, Cotton drill lining from Spotlight. Stashed cotton for pocket/key clip
Modifications: Embroidery and lined the pocket and key clip tab

Tuesday 19 September 2017

Building Block Dress her way

In a curious coincidence, last week was the first anniversary of the release of the Building Block Dress Book and last week was the first time I really used the book in the way it was intended.

I handed it to my daughter and said pick your dress. Whatever you pick, I can sew it!


We had another Saturday ballet matinee coming up and I was in the mood to use up some of my cotton stash for a new pretty dress. Maybe it was also wishful thinking that spring would come if I would just sew some spring-like garments.

The Building Block Dress Book takes one basic block pattern and then guides you through alterations to every aspect of it such that you end up creating a truly unique dress. Previously I'd used the pattern block and turned it into T-shirt dresses (here and here) by using knit fabric and omitting any closures. Those dresses have both been in heavy rotation.

Applying herself to the task, A sat down and pored over the book then finally declared she liked a dress example with scalloped yoke and hem facing.

Image from Oliver + S with A's dress choice shown on the far right

I rummaged through the fabric stash and presented her with 4 or 5 choices for the main fabric (yep, I wasn't going to let her loose in the fabric stash unsupervised). She picked a quilting cotton that I had 1 metre of and had probably earmarked for making her a blouse about 4 years ago.

Then I hunted for a suitable contrasting solid. The blue from my Lisette dress was a perfect colour compliment, although a bit limp and drapey as a fabric. Still, I was determined that this was to be a stash fabric make so it had to do.


And I set to work on the pattern: the silhouette is unaltered from the basic pattern block. I drafted a size 6 with size 7 length, then retraced the bodice and drew in my curved yoke, cut my tracings and added seam allowances.

For the skirt I wanted the scallops to be about the same size as on the bodice, but of course I also wanted them to continue across the side seams and the centre back seam apparently unbroken. That took a fair bit of measuring and adjusting to get it just right. I thought that was the hard bit done....


But then came the sewing.

Just to sew the two curves each of the front and back bodice was one solid evening's work. There were twenty more on the skirt.

Man, it sucked. Each scallop is the joining of two tight, opposing curves that requires lots of clipping and pinning and careful stitching to avoid puckers. It took forever.


To finish the dress I'd decided on a full lining and invisible zipper. Here I confess I sewed from memory and didn't reference the various parts of the Building Block Dress Book where the instructions could be found. I sewed the dress in the same way I have sewn the Fairy Tale dress (many times now).

I used a lightweight cream cotton from the stash for the lining and then decided that it needed some tulle, so I did end up buying some fabric after all. One metre of light green bridal tulle was enough for a double layered tulle underskirt.


It was all getting pretty last minute by this stage and so I confess that none of those seams are finished. The scallops are all edgestitched, but I should get in under there with the pinking shears and at least trim the raw fabric edges. Or maybe, since it's lined, I'll just ignore the seam allowances and trim stray threads if and when they dangle below the hemline! :)


When she first put it on I wasn't entirely sold on the fit, but then as she moved around (and twirled and twirled - the pictures were taken after attending the ballet hence all the posing) it looked better and better. While I probably do prefer the fit of the Fairy Tale bodice, the twirly part circle skirt on this pattern is a complete winner as far as she's concerned.

Of course the whole point of the Building Block Dress Book is that you don't even have to use the pattern, just use the ideas of pattern manipulation and the techniques shown. So why not put a part circle skirt on the Fairy Tale bodice? Or why not add some waist darts or even princess seams to this bodice to alter it's fit? That is what the book is all about.


The armholes are finished with a bias facing cut from the last little bits of the green floral fabric. The facing is then handstitched to the lining. I think without sleeves I should probably have enlarged the front armhole ever so slightly, and I could have lowered the front neckline just a little - as she sat to watch the ballet it pulled back a bit and was tight across her throat. Solved in 6 year old fashion of course by hefting all her skirts out from under her and not sitting on her skirts at all.


It was certainly a fun challenge and I like the idea of working through a lot of my fabric stash with the "you design the dress, I supply the fabric" team approach. With 60,481* possible variations on the basic block dress I think we'll be kept busy using this book for lots of future ballet attending dresses.

*yep, they crunched the numbers. That many different dresses without even changing fabric!

Details:
Pattern: Building Block Dress Book  - basic silhouette. - sleeveless, bias facing. - scalloped yoke and hem. - no collar. - full lining with tulle underskirt. - invisible zipper
Size 6 width, 7 length
Fabric: Quilting cotton (American Cottage by Little Quilts for Peter Pan Fabrics) and tencel, drapey, mystery blue stuff. Batiste lining and tulle
Notions: invisible zipper, thread, and sheer exhaustion. All. those. little. f'ing. curves.

Friday 8 September 2017

Forest Path and Finch - more winter sewing

I am absolutely over winter weather. It's officially spring but we've been having some seriously arctic winds and plenty of squalls of rain and hail recently. Enough already!

I'm hoping this was the last of my winter sewing completed...


I had lots of projects to do in June/July, then had an enforced "week off" from sewing. Of course that turned into about three days of tidiness and inactivity, and then I couldn't help myself and went on a big tracing and cutting binge. The end result was this huge pile of cut out projects:


There was P's jacket and undervest, A's impossible jacket, my Lisette coat , a top secret project for me and then this cape for A. All are now finished, and as I said, I am over winter sewing!


The cape is the ever so cute Forest Path Cape by Oliver + S, and if you know the pattern you might have already spotted the alteration: I added a collar.

Previously I made a size 4 cape and I love it, but I always thought it might look better with a collar or a hood. Having just recently made the Sunday Brunch jacket with its darling little mandarin collar I wondered if that collar would fit the cape. It does. Perfectly!


I made the size 6 cape and used the size 6 Sunday Brunch collar and didn't need to do a thing else. Just sewed the collar in before attaching the facing for the cape. Easy! I added a hanging loop and a cute bit of Daiso adhesive cotton tape as a label. By stitching the label on through all layers it also helps to keep the facing in place.


The lining is the lining that I picked up at The Fabric Store when I was searching for lining for my Lisette coat. I loved it,. but there wasn't enough left on the bolt for my coat. It came home with me anyway with no particular project in mind and turned out to be perfect for this cape.

The outer wool is that same double wool that was P's School Days Coat. It is all finished now and I think three garments out of the original cut at sale prices made it a very wise purchase. See, fabric hoarding is completely legit and cost effective.


Button hoarding is perfectly understandable too, as my button stash yielded the perfect buttons for the cape. Nothing gilt or fancy this time, just lovely nut/wood buttons in a variegated grey brown that matched the cape perfectly.

This time I haven't handstitched the lining around the perimeter and it seems to be behaving just fine and not sagging out at all. This wool, being more like a coating, is much more stable than either my Woodland Stroll cape or A's earlier cape so I'm sure that's the difference.


And then my pile of cutting out was complete and I immediately figured that A needed a pair of lined wool shorts like mine! I jumped straight into a pattern that has been in my to-make-one-day pile forever: the Finch Shorts by Clever Charlotte. 

I noted Nicole's (treasure trove of pattern knowledge!) comments that the Clever Charlotte patterns tended to run large and so went with size 6 which was a tiny bit below her measurements. Sure enough, they're quite big and the elastic in the back waist is cinched in a fair bit.


Lining the shorts was easy. The pattern already has the waistband and cuffs constructed from inner and outer pattern pieces. I just cut the facing pieces out of lining and made sure to understitch the seams so that the lining rolled in nicely. I then cut the shorts out of both wool and lining and followed my own "reverse the pleats" tutorial to baste the lining shorts into the outer shorts before adding the cuffs and waistband.


This lightweight wool works well for these shorts. It's just crisp enough to hold the pleats but still soft enough to move nicely and feel great, along with the lining, when worn over tights. I think they'll feel nice on bare legs too and hopefully they get a bit of warm weather wear as well. Did I say I'm over winter yet?...

Details:

Cape:
Pattern: Oliver + S Forest Path Cape
Size: 6
Modifications: added collar from Sunday Brunch pattern. Added hanging loop.
Fabrics: Double wool originally from The Fabric Store , same for lining

Shorts:
Pattern: Finch shorts by Clever Chalrotte
Size: 6
Modifications: added full lining
Fabrics: Wool blend and lining both from Rathdowne Fabrics

Buttons: all from Buttonmania via my stash

(Top: previously made Rowan Tee Skivvy, seen here.)


Friday 1 September 2017

Book Week and Bits 'n' Bobs

Last week the kids had their annual Book Week with the parade that involves dressing up as a book character.

Now, as you may already know I'm not one for passing up a chance to make a costume, and I'm absolutely fanatical about books, more books, great books and reading. This year I was pretty busy and so the costumes were kept simple, but we stuck with the reading theme (no superhero characters that happen to have a merchandise colouring book tie-in will get past me as book characters. No sir.).


Marisa recently posted a lovely dress for her daughter on her blog, ThirtyNine, and in the comments section a discussion of books for reading aloud to kids kicked off. The conversation continued via email between Inder, Rachel, Marisa and I, and I'm happy to say I've found quite a few new recommendations for books to read. Coming from different parts of the world we all have very different experiences of being read to and which books floated our boats back then, and which still do now.

One that I recently saw on a shelf in a bookshop is The Phantom Tollbooth (by Norton Juster). It looked vaguely familiar and when I picked it up and read the dust jacket it all came back to me. This was a book from my childhood. The main protagonist is called Milo, and as that's my nephew's name I instantly bought it.


Well, once the kids and I had read it together we were never going to give it away. So, I bought another copy for Milo, whose birthday was last month and posted it off, along with another outgrown coat (his biennial sewing gift :) ).

In the story Milo travels to two cities, Dictionopolis and Digitopolis in search of twin princesses, Rhyme and Reason. It's full of verbal puns and number games and I often had to show the kids the writing on the page for them to get the joke.

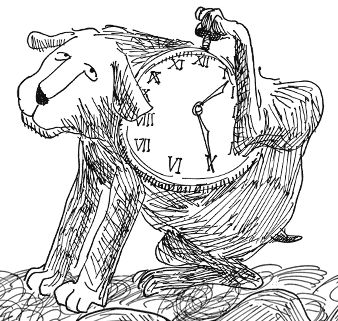
The best joke of all was my son wanting to dress up for book week as Tock the Watchdog....


For Tock is a Watch Dog, whose job it is to make sure that time is valued and appreciated. When he first encounters Milo and asks what he is doing, Milo offhandedly replies that he is killing time and Tock becomes apoplectic (and his alarm goes off)
“It's bad enough wasting time without killing it.”
Norton Juster, The Phantom Tollbooth


Well there is no greater time waster than my nine year old boy, so, loving the irony we went ahead with a costume.

The grey tracksuit that was first an elephant, then a mole, and is in regular use as pyjamas, could serve duty as a dog suit. Luckily, I had kept these small and probably otherwise useless remnants of the same fabric, and from that came a hood with ears, and a tail.

The hood is the largest size of the Cozy Bear Hood from Little Things To Sew, just with some ear modifications. The tail was just a tube closed at one end, turned and stuffed then attached to waistband elastic.

Cozy Bear Hoods - bear style


I was very happy that A was willing to not dress up as a character, but to wear a T-shirt that my brother had given her for Christmas last year. It cracks me up.

"Read or Die"
And to get in the right frame of mind she practised her "Read or Die" laser eye death stare on our new pet dog.


Her pants are the one sthat I made back in early July and which have been worn a lot but not yet been documented....

On an afternoon off work I went through my wardrobe and did a big clean out of things that didn't fit, that I didn't like or just that never got worn. I was never going  to repurpose fabric, I have to much to be bothered with that and most of the garments might be perfectly OK for somebody else. So a lot of it went to the charity shop. The only thing that was chopped up was this trial run of a dress, as I knew the skirt portion would be perfect for jeggings.


I used the Oliver + S Playtime Leggings as the base pattern, size 6 maybe? I forget. Anyway I didn't have enough fabric length for the full leg, so I added a cuff at the bottom.

At the top I decided I wanted pockets, so I used the pockets from the After School Pants pattern in whatever size I had drafted, maybe size 4?  The way the Playtime leggings are constructed is that the top of the waist is folded to the inside to make the waistband casing. That wouldn't work with my  additional pockets, so I added a waistband of ribbing.


Which, had I thought about it, meant I didn't need a good few inches of height at the top of the pattern and could have moved them on the fabric and got the hem length afterall. Anyway, I like the cuffs, so lets call them a design feature. I took some off the top but with the added waistband they are still higher rise than the pattern intends.

It doesn't show well in these pictures but I used the twin needle to double topstitch all the "jeans" seams. That way the seams still stretched. They've turned out to be very practical pants and dressed up with a fancy coat they look ok!


With Book Week done for the year it must soon be time to start thinking about Italian Day...

My friend Morag has put in a request for last year's outfits to appear on the blog (previously only on Instagram). So here's what you can do with two sombreros, a plastic laundry basket and some cardboard - why you can make it into a flask of Chianti Classico and a round of Parmiggiano cheese!