Tuesday, 29 December 2015

Gift Sewing Part III - Little Drummer Boy (and dad)

My one and only nephew has never escaped a Christmas without something handmade by me. This year would be no exception.


My brother and his family live in Germany, so we only get to see them once a year, if that. Two years ago his "thing" was astrosaurs (apparently they exist) and now, I'm told, he's a veritable child prodigy on the drums.

I figured a drum kit would be a fun stencil to cut and paint. Google images provided the silhouette of a drum kit and then I made up the Beatles-esque font myself.


There's a fun and free way to get a couple of words in any font you like. If you use myfonts.com you can search for a font that suits your purpose, type in your words as a tester and then just right click and Save Picture.

The all caps font that I liked didn't have the variation in height of the Beatles logo, so I just fiddled a bit with my M and L in paint.net 'til I got it looking right. I traced the image onto freezer paper and then set to with the scalpel.


Saving all the little cutout bits and getting them back in the right places is fiddly, but kind of fun too. Paint away, let it dry, peel the paper off then iron the heck out of it to make sure the paint sets and is wash proof. Easy!

I'd been stuck for what to give my brother for Christmas, until I decided he could have a T-shirt too. Same drum kit image, only seeing as he's not the star of his own show anymore.....


...he got the Roadie's version.

I couldn't possibly cut the stencil all over again in miniature, so this one is T-shirt transfer paper. I had no end of trouble with our new home printer bleeding across the T-shirt transfer paper. Eventually I printed this at Flipper's work. Technically the printer there is a laser printer and the transfer paper is intended for bubble-jet printers. The image was sharp, but annoyingly the background is very slightly yellowed. For a last minute gift that was kind of a gag I was satisfied.


Both were received very well and worn almost straight away with the sizing being just right. Milo also inherited the Darth Vader stencilled T-shirt that I'd made P back in 2013 (previous astrosaur link), along with other clothes and the second School Days wool duffel coat that's been handed down to him. They don't get a lot of wear in our climate and so it's as good as new and will be worn a LOT back in Berlin.

and that makes me a happy Christmas gifter!

Details:
Patterns: Oliver + S School Bus T-Shirt & Liesl & Co Metro Men's T-shirt
Sizes: Size 5 with 6 length ('cause it was drafted) and size XL (likewise!)
Modifications: None, but I would take half an inch off the neckband of the men's T-shirt if I could remember to next time.
Fabrics: Leftover knits from the stash
Paint/transfer: Setacolour fabric paint in black. Canon T-Shirt Transfer Paper

Wednesday, 23 December 2015

Vogue V1307 - Summer Happy Pants

Or are they Hammer pants? Or clown pants?
Don't know. Don't care. They're so darn comfy. It's like wearing pyjama pants that are fancy enough to step outside in:


 I picked up this pattern in the recent Vogue pattern sale at Spotlight. I'm trying to learn to see past cover illustrations and decide if a pattern could work for me. Certainly not in neon green animal print, but maybe the shape?...


 I figured in a black rayon they would be cool, swishy, slightly fancy but also very easy to wear in summer. You know, for those days when it's hot but my legs are a day away from being groomed and fit to be seen.

I've found only three other mentions of this pattern in blogland. One lady who made a pair (The Mahogany Stylist) and two who, in their pattern opinion pieces, voted it the ugliest pattern released that season.


It's not easy to photograph the details of black pants, and perhaps that's a good thing...  The yoke ends up being four layers on the front and two on the back and it would seem that my lining yoke is sewn on slightly short as the outer yoke is billowing a bit.

I began by hand sewing the lining yoke to the main yoke/pants seam allowances but it was late at night and I was getting a bit fed up with these slow to sew pants, so I stitched in the ditch around the yoke. Worked perfectly but perhaps I needed to worry less about the top waistband rolling out and more about the lining not pulling.


 The pattern instructions suggest making a muslin of just the yoke pieces to check the fit. I did that and in calico it seemed the yoke would be good if maybe a touch on the tight side. I cut the pants out with no alterations to my size based on waits and hip measurements.

Something weird happened as I sewed and the pants yoke ended up growing, or perhaps I was shrinking. At the front there are two layers forming the front and pocket, one layer for the facing and another layer for the lining. I cut all the layers from my black rayon as it seemed thin enough not to need to bother with lining. Then there is some interfacing around the upper waist edge to help further prevent any stretching out. Four layers of fabric plus interfacing and somehow the pants were growing?....


 I ended up bringing in the back yoke with a 3/4" sewn dart (1&1/2" reduction) at the centre back and two 1/4" darts (1/2" reduction) on each side.

The pants are sewn on to the back yoke before it's linined and finished, so there's the opportunity to play with adding darts or adjusting the centre back seam. I made the same changes to the yoke lining then called it a night.


An invisible zip on the left side closes the yoke. Under the top of the zipper is a button loop and button just to make it easier to zip closed the pants by buttoning the top edge first.


Seemingly I don't know when to call it quits and go to bed, 'cause in my second night of late, late night sewing I decided I definitely did need to topstitch the cuffs at the bottom. I think it was worth the extra lost sleep.

I was feeling very pleased with them and after finishing them last night I wore them for most of the day today. Maybe it was due to the change in undies, or the weather, or who knows, but today they felt even more baggy and low riding in the front. I may need to run a strip of elastic inside the top edge of the waist just to give them a bit of lift.


With the pleats all pressed they can certainly pass as fancy pants. Fit for a night on the town, but mostly I think I'll be wearing them (slightly) low slung, loose and easy with t-shirts and sandals. Perfect for the hot summer ahead.


In Xmas sewing support news I've finished all my gift sewing. I've two projects still to share here but there's a possibility of the recipients seeing a blog post, so the blog will wait until after Christmas. I hope you all have a wonderful time. I'll be lounging in my pants!

Details:
Pattern: V1307 view A
Size: E (will drop one full size if I make them again)
Fabric: Black rayon from Spotlight
Alterations: Small back - centre seam plus darts

Saturday, 19 December 2015

Gift Sewing Part II - Nick's new bag

You never know if a handmade gift will be appreciated, or even used at all. But I'm happy to report that this Messenger Bag that I made for my brother in law has had continual daily use in the three years since it was made. So much so, that it has worn through and the interfacing is peeking out through holes in the canvas.

He casually mentioned how worn it was when he was visiting at Halloween and also reported that it had been the perfect daily bag - just the right size, ideal pockets etc. OK, hint taken. You need a new one, right?!


I didn't get allow him any design input, except that we had agreed it might be made from the leftover blue canvas from P's original Messenger Bag

That fabric was gifted to me by a local canvas shop that makes tarpaulins and awnings etc. I'd wandered in and asked for offcuts of something akin to Kevlar to patch the knees of my toddlers jeans. The guys kindly gave me a narrow length of this insanely thick canvas that I'm sure is intended for external building use. From memory I swore back then that I would NEVER use the remaining parts, yet for some reason I didn't throw them out and here I am two and a half years later...

There wasn't enough of the canvas for the whole bag, which was certainly a good thing. Some heavy weight grey denim for the front and side pockets was tough enough but still easier than more layers of that blue stuff. that was also leftovers (from here) and bias binding made from leftovers too (this dress)


The strap buckle happened to be in my stash as well. I think it had been salvaged from an old bag that was turfed out during the last major wardrobe clean out. I didn't think of it, but by using a buckle that creates a loop the strap ends up much shorter than when you use a sliding buckle where half the strap length is still functional.

I had to cut another piece of denim for the strap and join the pieces on an angle before refolding and edgestitching them.

There's a couple of other modifications which I've made before. Firstly a front closing buckle and strap and secondly a redrafted and slightly enlarged interior pocket flap (comparison of original and my size is seen here).


You know how some people get known for a "thing"? Say, they once commented that their favourite animal was the cow, and suddenly everyone gifts them cow related gifts and their house becomes a shrine to the knick knack novelty cow.

Well, apparently Nick's "thing" is the elephant. So, for the only purchased part of the whole project I hit up Spotlight for some heavily reduced $4/metre elephant quilting cotton for the lining.


But hang on, SPACE INVADERS I hear you say.... Yep, couldn't resist adding a Galactica cross stitch shooter and a few bullets to the bag front. Here's the blog post with the full fleet and a downloadable pattern if you're keen.

I knew the canvas fabric didn't wash too well so I drew the pattern out on graph paper then punched holes through each grid corner and pencil marked the fabric.


Nick's previous bag had a nice, dorky name tag up the side of the strap which read "Uncle Nick's Bag". I don't know if that's a design feature that he had liked or not, but thought he may have become used to having his name on his bag, so this one got a name tag too. Cross stitched to match the Space Invaders theme.


While the total cost for making the bag may have only been $4, now that it's finished I'll be spending some money on new sewing needles, new pins, and some of those Clover sewing clips. At least this time around I did own a thimble and that saved me a trip to casualty to retrieve pins embedded in my fingers!

I hope he likes it!

Details:
Pattern: Messenge Bag from Little Things To Sew
Size: Large (adult)
Modifications: Enlarged front pocket flaps. Addition of closure strap and different strap buckle style

Thursday, 17 December 2015

Gift sewing part I - teacher gift

Tomorrow is the last day of the school year and P has made a gift for his teacher.

He's had simply the loveliest teacher this year. She's young and impossibly beautiful and seems to have these kids focusing and following on her every word. They are like puppy dogs who want to please. It's adorable. She got married half way through the year and if she hadn't, I'm sure she would have had proposals from most of her class by now.

Last year I saw these amazing plants that ParrishPlatz' daughter made for her teacher and noted it away as a wonderful idea. P is pretty keen on carnivorous plants too, so with just a little bit of help he made his own....


First he drew a sketch of how he wanted it to look. The plan was for one pitcher plant and two Venus fly trap stems. He made some measurements as to how high the pitcher plant should be and we started on that first.

The diameter of the pitcher plant was limited by me having only bought 10cm of the felt. I cut the shapes and then he formed the end of some wire into a loop to give the lid some structure, and the plant a "backbone"


One light green and one dark green shape were stitched around the neck and lid enclosing the wire loop, then the tube was closed by stitching the free edges together. He used a blanket stitch for this, and mostly got the hang of it - a few missed stitches and quite a lot of needle unthreading. Luckily with felt it's possible to double thread the needle and still have it pass through easily enough.


The Venus fly traps have a figure 8 of wire in the "mouth" parts with the wire exiting through a small hole in the green felt. A running stitch holds the inner and outer layers together.

I made the stem tubes for him on the sewing machine and then turned them right side out. A second piece of florist stem wire was needed to join on and make the stems long enough and then P stitched a little bulb for the base of the plants.

The stem wire is inserted into some florist foam that I trimmed to size and wedged into the flower pot. When A and I were out gathering the supplies we searched high and low for nice pebbles for the pot. We couldn't find any that were suitable, but did spot these little felt balls that make the perfect pebbles. P slapped some fabric glue onto the florist foam and stuck them down, and the three packets we'd bought was exactly what was needed to cover the base.


It took him quite a few sessions to make this, and I won't lie and say it was all peaceful crafting. At this time of year the kids, and perhaps me too ;), have pretty short fuses. Everyone is a bit tired and crabby. There were a few occasions when he put off doing any work on it in favour of afternoon TV watching. Then there was a bit of exasperation and annoyance with himself when stitches went awry, or the thread got tangled around the wire.

I was very happy to re-thread needles, provide design advice and generally help out, but I made it very clear that he should be able to say that he had made it himself.

And once he'd finished, he was so absolutely delighted. He kept saying how impressed he was and that it really was remarkably good, and how good he felt to have made something so good, and how good it would feel to give it to his teacher and how A should come and look again to see how good it is...


The kids played around with the stems, bending them this way and that. "Hilariously" they both lost digits to the aggressively ravenous Venus fly traps.

He signed the bottom of the pot and we wrapped it up to deliver to school....


It was fun to send a preview photo off to Jennifer and her kids and thank them for the great inspiration. There's a good photo of the shapes needed to form the plants on her blog. I hadn't actually referenced that, and we ended up doing ours a bit differently. I thought briefly about documenting it as a full tutorial. But really, the whole appeal of a kid-made teacher gift is that it's unique, slightly shonky and completely adorable.

It's the idea that was the winning bit, so thank again to the Parrishplatz gang. There are so many funny, beautiful and clever craft idea on her blog from personalised snow globes through to family crest beer drinking tables! It's one of my all time favourite blogs. Check it out!

Monday, 14 December 2015

Lisette Traveller dress - well travelled.

I've been wearing this dress quite often since I made it, and being linen it always then looks too wrinkled for photographs so I don't get around to taking any....

On Sunday it was our annual end of year French class party. I recalled that on the same day last year I took some wrinkled, slightly tipsy, sun wearied photos (of a pattern testing skirt), so I figured that's almost a tradition. Why not photograph the dress exactly as it mostly ends up looking: wrinkled! (and yes, I've just come from a looooong lunch!)


I took longer to make this dress than anything I've ever made before. It's also the first time I've ever made adjustments to the fit of a pattern other than just blending from one upper size to another lower half size.

Last spring I cut a muslin and basted it together. It was obviously just too big all over, so I redrafted the pattern and cut my muslin down one size and then ran out of enthusiasm and put it aside.

This spring I decided it was time to re-tackle the shirt dress. I seem to be continually gaining weight (boo), so I was nervous that I'd need to go back up a size and I knew I would give up altogether if that was the case. Luckily not. It was still more than roomy.


I tend to get this little puddle of loose fabric in my upper chest in a few things I've made and it makes them look sloppy. I wanted the dress to sit better at that point, but there was no way I could lose any of the shoulder room across the back. I definitely wanted a summer dress with sufficient ease to bend down, pick things up and generally be able to move.

The Instagram brains trust came to the rescue and I ended up making two darts on the pattern piece. each dart took 1cm out at the seamline. One came from the front shoulder vertically down, and the other from the front armhole horizontally inwards:


That eliminated my fabric puddle nicely. It did mean that the centre front of the dress got a very slight bend to it where the pattern hinged, but not enough to be an issue. Also the back shoulder was then 1cm longer than the front but it was easy to ease the difference when sewing the shoulder seam. Especially with the final version's linen fabric.


I was nervous about it being too fitted and restrictive, but it turns out there's still enough shoulder and back room to move freely. I was hoping for a dress that would look reasonably fitted in the shoulders and chest and then be loose and easy wearing from there down. I think it's worked well. It's certainly very easy to wear.


Of course I became obsessive about matching the pattern of the fabric at the side seams and across the front and front placket.

I also cut the pockets to match as close to perfectly as possible - the pocket is created with a tuck which rules out having it match at both the top and the bottom. Sadly, I didn't think enough about the pocket placement and I suspect they are a bit wider placed than would be ideal. Still, given you can barely see them for the pattern matching, perhaps it doesn't matter! :)


Since I'd put all the effort into fitting the pattern I figured I needed the best buttons, so I headed into Buttonmania for a button consultation with Kate. That's definitely the nicest way to buy buttons. We found these amazing buttons that are made up of layers of blue and white, and then cut on an angle. One side of the button is considerably thicker than the other, and the layers are then exposed on the surface.


The added benefit of the wedge shape of the buttons is that they're very easy to do up, yet resistant to popping undone.


The fabric is a linen from The Fabric Store and while it's quite a hefty weight linen, it still feels soft to wear.


I used to have a fabulous plaited leather belt, but it died in storage while I was travelling. This one is cheap and nasty, although I still like it better than the fabric belt that I made with the pattern. I've been thinking that my newfound macrame skills should stretch to plaiting a leather belt. That might be on the list for 2016...

With the shirt dress ticked off I was feeling successful enough to buy some fancy fabric for my Frocktails dress. Now that will take some fitting. Real, grown up, lady sewing style fitting....

Maybe the kids need some more clothes after all......

Details:
Pattern: Simplicity 2246 Traveller dress (Lisette)
Size: I don't remember anymore. 14 top 16 bottom maybe....
Modifications: shrunken pec adjustments (damn, I used to be able to bench press!)
Fabric: Heavy linen from The Fabric Store
Buttons: Buttonmania

Thursday, 10 December 2015

Schneidernmeistern Twist (It) - In (perfect) English please!

I've learned a new german word and sewn myself the perfect, easy wearing blouse in the process.

Exhibit: the Twist (It) blouse by Schneidernmeistern - now available in English!


I was way over committed with other projects, but when Monika put out a call wanting some native English speakers to proofread her pattern's translation, well I just couldn't help myself.

I've always liked the idea of being a proofreader. That doesn't mean I catch every mistake in my own writing, but I sure do spot other people's mistakes easily!

I shot off a reply to Monika's request and admitted my fastidiousness when it comes to language in sewing patterns. She replied that "from one korinthenkacker to another", she was delighted to have me on the team. Turns out the German language has a curious word for what we would call a Nitpicker. You might be able to guess, as I did, what the second half of the word means. But I had to look up "korinthe" which are translated variously as currants or raisins.

So this little raisin shitter set to work...


Principally I read the instructions and nitpicked through any spelling, grammatical or punctuation errors, of which there were very few. Well done Annika from Naeh-Connection for doing a great job of the translation.

Then I wandered off to the fabric stash to find a suitable fabric. The pattern is designed for a lightweight, woven fabric with a soft drape. I had this striped, embroidered cotton which I had no memory of what it was purchased for. That makes it free to be used, right?

The blouse is cut from only one pattern piece placed on the fold. Because of this you do need an apparel fabric wide piece of fabric. The narrower quilting cottons would require the top to be pieced - but the instructions cover how and where to do this should you need to. A Nani Iro double gauze would be sooo fabulous for this top, but definitely too narrow.


Stripes show off the blouse's design nicely, as one or the other of the front or back will end up on the bias.

I chose to have my bias at the front with the centre front seam creating these chevrons from my stripes.

You can see at the back, the stripes are horizontal....


And then if I do some weird half dance, half pointing out a cobweb move, you get to see the side seams and how the stripes run down the sleeves...


The shoulders have a perfect little dart that lets the blouse sit nicely. The neckline is then finished with a facing. There is the option of cutting the back and front necklines the same, and then the blouse could be worn either way. Different facing pattern pieces are provided, depending on whether you choose the reversible or regular necklines. The back of the pattern is slightly wider than the front, so I chose to make mine have a defined front and back and drafted the higher back neckline.


You can see that there's quite a bit of room at the sides of the bust so I imagine those with a bit more up front could still find this to be an easy top to wear. For me, it would have been bordering on too big, except that I chose such a nice, light, drapey fabric. We're anticipating a long, hot summer, so a loose, cool top like this will get plenty of wear.


So, this pattern gets the nitpickers, korinthenkackers and pilkunnussija* stamp of approval!

Details:
Pattern: Schneidernmeistern's Twist It blouse
Size: L (44-46)
Fabric: lightweight (gauzy?) embroidered cotton from The Fabric Store


*Finnish and too rude to translate here - thanks Haus of Harridan for that one

Thursday, 3 December 2015

A million dollar free skirt

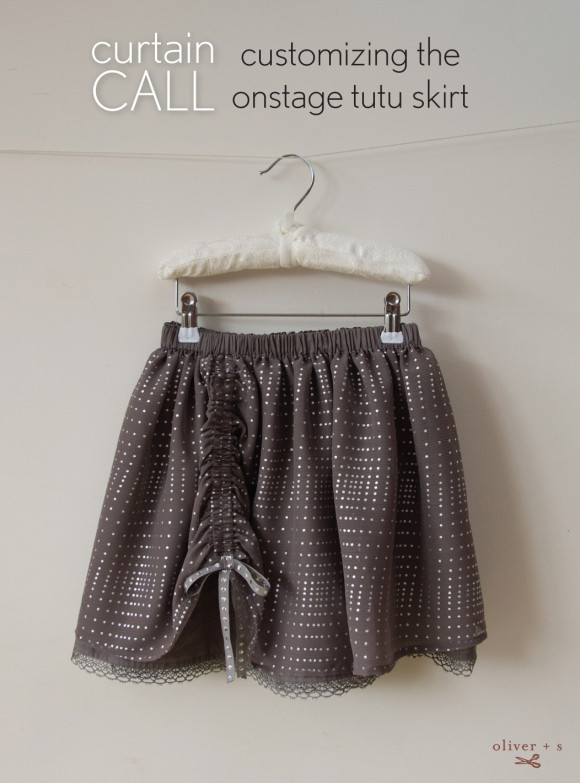
Hello. I'm over at my blogging home away from home, Oliver + S, where I've tinkered with a free pattern of theirs. You can click below to go take a look at the tutorial:


As I was sewing the layered skirt from Sew Sweet Handmade seen here, it occurred to me that the idea of a drawstring casing could be applied to any skirt.

The Oliver + S Onstage Tutu is the perfect candidate, as it's designed to have a light overskirt made of tulle or similar fabric. I had just a little bit of fabric leftover from my fancy Weekend Getaway dress (blogged here)...


...and I'd always thought it would be perfect as a fancy miniature skirt.

Then I had an exquisite little card of France Duval Stalla ribbon and lace that was gifted to me by the lovely Helena. I'd already used a bit of the silver dot ribbon on the bottom of these grey pants, and I discovered to my delight that the ribbon and the lace went perfectly with my leftover fabrics.


I was still scarred by cutting my dress to get all those blasted lines of dots square. So this time I just sliced the straggly edges off my remnant to achieve a rectangle that was as wide as the remnant allowed, and about the right length.

The cotton underskirt has a single seam at the centre back. The pattern (which is FREE if you didn't already catch that bit) has a neat way of reversing the seam at the top so that the fold over waistband is still perfectly neat. Genius. You could pay good money for a skirt pattern with less impressive instructions than this one.

My overskirt is pieced with a seam at each side as that was how the fabric remnant forced it to be.

 
Needless to say, she adores this skirt. We tried to get some decent modelled shots before the deadline of the Oliver + S submission, but it was insanely windy and most of the photos looked like this:


Oops!

Still, that there is a completely free skirt. Fabric and elastic from the stash, free pattern and some gifted trims. When I can be as Christmas thrifty as that with my leftovers then surely I can reward myself with some more fancy fabric, right?!

I'm thinking Santa really needs to know about this metallic wool at Tessuti:


 It's been just over a year now that I have been officially contributing to the Oliver + S blog and it's truly such an honour. You can see all my previous projects for them here with links to each blog post.
So, yes, the disclaimer would say that I receive payment for my contributions and thus I'm probably biased. But I was hooked way back when my supply line was still very tenuous. :)

If you've not tried any Oliver + S patterns then you can help yourself to a few free ones and then get yourself a serious habit!