(honestly, I'm doing so much un-fun shit right now, I need this more than you do!!)
I hadn't let on, but back in 2018 I was approached to contribute an original design to a new book on how to use Kraft-tex vegan leather.
You can imagine my first reaction was holy cow, YES! Quickly, followed by a wailing But-I-don't-design-I-just-make!!
But there it is! That's my bag taking up most of the front cover of the Kraft-Tex Creations book.
There's so much you can do with Kraft-Tex. You can cut, stitch, paint, print, fold... Pretty much everything you can do with leather AND everything you can do with paper in one medium.
I decided I'd like to use the ability to cut and wet shape the Kraft-Tex. And so, my bag is made from a flat piece of Kraft-Tex, cut with a stencil, reinforced at the base and handles with stitching, then wet moulded to shape.
There are lots of other great projects in the book that make use of all the different ways you can tool around with Kraft-Tex. I'm looking forward to making a few myself as I'm going to keep a copy of the book for me.
But how about you? If you'd like to win a copy, there's a widget at the end of the blog post and I'll give away two copies: One to an Australian entrant and another to an international entrant (I'm footing the postage bill, so that's as generous as I can be!). There's also a third copy that I'll give away locally on Instagram so you can go there and throw your name in the hat too.
On the cover of the book they styled my bag beautifully as a knitting bag. But the book includes instructions to sew a little cloth inner bag to make it a functional handbag.
At the end of 2018 I decided it went well with my Frocktails dress so it had a little hush-hush secret outing before the book launch.
I've also used it as a day to day handbag, and I can vouch for it's strength! One day when I decided I needed some groceries and this bag was all I had with me I used it to carry a dozen eggs, a litre of milk and a packet of butter home from the shops. It held up just fine!
Kraft-Tex is available in Australia from Kraft Kolour, but you might also find it elsewhere online. This project uses the full width of a roll, but only about 2/5ths of it's length, so you'd get plenty of other projects made from one roll of Kraft-Tex.
I'm very excited to have created something for the book and I hope you can have a play with Kraft-Tex and create something yourself. Or maybe try my bag?!
If you haven't noticed already I'm quite a fan of their patterns, which I guess is what lead to me buying the Seashore Sundress pattern twice by mistake! I'm on a mission to use up all the odd sized bits of fabric I have and I thought there might be enough of the chambray I'd made my Soho Shorts from to make a skirt for A.
I pretty much let her pick the pattern from my Oliver + S shelf but I confess to having guided her towards the 2+2 skirt. I hadn't made it for such a long time.
In fact here's the last time... You ready for a pretty funny flashback?....
She'll kill me when she sees that photo, but it cracks me up. So the last time I made the skirt was the size 18-24m for my 20 month old. And here I was tracing off a size 6 with 8 length. Wow, time flies.
I suddenly had the urge to make the top again too, so I traced off both, then went hunting for some fabric remnants that would fit the top pattern. Now, it's confession time... In three goes at making this top I haven't once done it "right". Every time I've used a knit, and cut the back pattern piece on the fold (omitting the inch and a half that is the button placket and overlap). It makes it more of a t-shirt than a blouse. But it's a pretty T-shirt alright.
I only had enough of the chambray to do the patch and not the bias neck ties or the bias sleeve facings, so they were cut from the fabulous Zonen09 beetle knit remnant (previously used here). And in doing that I perfectly finished off that remnant with nothing to spare either. So satisfying.
I stitched the inside of the pleats down to about halfway so that there's a guide there for ironing them, but to be honest she has been grabbing this skirt straight off the clothesline and putting it back on immediately each time it's been washed. It's yet to even make it to the ironing pile (where things are known to dwell for a long, long time)
She was very keen to show you the side placket of the skirt. There are two hand sewn snaps and then the button to close. But to be honest, there's enough give in the elastic waist and I think the plackets could easily be omitted and the side seams sewn straight through if you were feeling like a quicker sew.
There's plenty of growing room in this outfit and I like it enough that I could jump straight back in and make another, but next up was lots of swimwear for our upcoming summer holiday.
Meanwhile, let's see who gets the Seashore Sundress pattern: Flipper helped out by plugging the numbered comments into a random number generator and it came up with comment number 4, which fits very nicely with the 2+2 theme of the blog post!
Congratulations Jessica. I'll email you directly for your address then post it off.
Details: Pattern: Oliver + S 2+2 blouse and skirt Size: 6 with length of 8 Modifications: I cut the blouse back on the fold (remove 1&1/2" for the 1" placket and 1/2" overlap) Fabrics: Cotton chambray remnant and Zonen09 Beetle knit originally from Maaidesign
My last handmade thing to hit the bog for 2017 is a new dress for A.
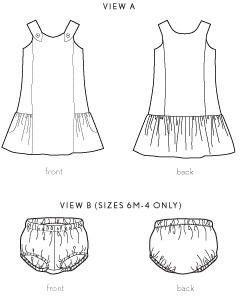
The Seashore Sundress is one of the earlier Oliver + S patterns but one that I've never made until now. You know what I'm going to say next, right? Why, oh why did I wait? It's such
a lovely little pattern!
I waited so long in fact that she has outgrown the smaller size range (6m to 4 years) and we're straight into the bigger pattern with a size 6. She measures with the width of a six but the height of about a size 8 so I added 3/4" in length to the body of the dress and another 3/4" to the hem of the skirt. I think it came out just right!
If I'm honest, the main reason I never sewed this dress is that when it's hot enough in Australia to wear a dress like this, then it's unwise to have so much skin exposed to the sun. But then there are days when it's so jolly hot you don't even go outside, so a pretty, bare shouldered dress is OK after all.
The fabric is a very light, semi-sheer cotton that I bought from The Fabric Store quite a few years ago. I think it may have been intended for the Fairy Tale dress pattern as there was more than my standard 1m-cut-for-kids-clothes, but I liked the look of the scalloped print matching with the Seashore moniker.
Little pockets -yay!
Of course the fabric did give me the challenge of matching the print across all those seams. I was confident I could do the horizontal line part OK, but to get the curves to be at the same point in their wave form across each seam would be impossible. The solution to trick the eye away from the slight mismatch of the waves was to throw in some flat piping along every seam.
For the smaller sizes (size chart here) the pattern also comes with a cute pair of bloomer style knickers to wear underneath. Given the way this kid cartwheels non stop, and seems to be upside down as often as she is right way up, I should probably try drafting up the pattern and making her a matching pair!
In my quest to own every Oliver + S pattern in paper form I had accidentally bought the paper Seashore Sundress pattern in the smaller size range twice. After I realised my mistake it took many months of searching to track down the paper pattern in the larger size.
I think that pose says "Get to the point, mum!"...
So, I have a Seashore Sundress (6m to 4) paper pattern to give away as a little New Year's gift to a lucky blog reader. I'm happy to post it to anywhere in the world. Just leave a comment below, and to help you think of something to say, how about telling me about the pattern that you left on the shelf for ages but then fell in love with - or at least the most recent one of those as I seem to do that very often. (Please make sure you leave an email address so I can contact the winner regarding postage)
Every now and then a crafty, internet event comes along that I am really happy to take part in.
A long time ago I was asked (or possibly I begged, let's not split hairs) to help pattern test for Sanae Ishida's upcoming book - Sewing Happiness
I'm not going to kid myself that I'm "introducing" Sanae to anyone. You already know who she is. You may have already seen her books, or followed the American launch for Sewing Happiness, or maybe you're a Secret Valentine Exchange devotee. In short, if you read my blog and don't know Sanae, you simply haven't been paying attention!
But here I am, and I'm super excited to take you inside the book, oh, and to give you the chance to win a copy for yourself!
Sewing Happiness is unique among craft books that I've seen to date,
in that it is as much a biographical tale as it is an instructional
sewing pattern book. In the same way that really good travel writers can
tell a great story at the same time as making you desirous of
travelling to wherever it was they found themselves, Sanae gives us the
tale of how she arrived in sewing-land and makes us want to join her
there.
Ok, so how she got there wasn't entirely pretty, but that's often the
case with travel writing too, and I found her story to be very honest
and quite gripping. I read the story parts of the book in one evening,
curled up on the couch and the feeling was very much that of having a
companion there, telling you their story.
What are these little cushions? This was my pattern test for Sanae, back
when the book was in its infancy. They are little tooth fairy pillows,
and my brief was to sew one and check the instructions for the others.
Of course, as soon as I saw the patterns I couldn't decide which to
make, so I made the four of them.
One of the over-riding tenets of Sanae's book is that things you make don't have to be perfect; so when her wolf looked a little like a fox, and quite a bit like a dog, it didn't get redesigned, it got renamed! The Dwox (dog/wolf/fox) tooth fairy pillow is my son's favourite, and kids totally get that kind of logic!
Of course I had to test them for an international audience, so out came the left-over-foreign-currency money bag:
The Australian 50cent coin was the only one that didn't fit, so with my brief note to Sanae that tightarse Aussie parents might be disappointed, my pattern test was complete and I eagerly awaited the book's completion...
The book is divided into four seasons (my tooth pillows are from the Summer chapter), and while the story shifts focus with the seasons so do the projects. I suspected I would enjoy reading Sanae's story, but I'll confess I was unsure about just how much I would use the patterns in the book. We've all been there, right? Thumbed a book, decided there's one or two projects of interest, but we could probably make them without guidance anyway, then put it back on the shelf...
Fast forward a year and Christmas was fast approaching. I had my new copy of the final book (and a spare for you! - hang in there) and I thought Sewing Happiness might give me some inspiration for making gifts.
As if to prove to myself that sometimes the seemingly simple project is exactly the one that you do want a pattern for I chose to make the Triangle Eco Bag (also a Summer project).
This is a delightful tote bag that's perfect for taking to the market. It's infinitely more stylish than those green supermarket branded things I carry and I think I need to make one for myself now! This was a gift for P's teacher - the first of the teachers to declare their love of purple which sent me scurrying to the fabric shop to fill a purple coloured hole in my stash.
The bag is cleverly folded and sewn from a rectangle. The maths is all laid out to give you the correct dimensions before adding seam allowances. That meant my fabric, which was slightly too narrow for the proposed bag size, could be easily measured and cut to produce a bag about 90% of the intended size.
The absence of a pattern sheet and strict rules works well here. Whatever your fabric allowance, it's easy to measure up the right rectangle to fold the bag and have it come together perfectly. My fabric had a horrid, plastick-y backing and so I simply sewed a lining face to face with the outer fabric, turned the rectangle through a small hole, then continued as per the instructions. The hemming allowance was already included so I didn't need to make any changes to my fabric dimensions in order to have my Eco bag lined.
While it's a simple concept, the bag really is lovely and P and I were both delighted with the gift.
A few other projects in Sewing Happiness were starting to catch my eye, but I knew that my daughter would adore a felt flower crown...
I found the perfect little flower centre thingies at L'Uccello where I also bought a couple more squares of nice, wool felt. In the floral crown instructions (Fall chapter), Sanae says that the feel of wool felt is so lovely that the synthetic stuff is just never worth troubling with, and I completely agree.
This one is a hand sewing and glueing type of project. The examples in the book are stunning, but every floral crown will be different. The colours can be bright or subtle, the flowers sparse or thickly clustered. The pattern gives the petal and leaf shapes and then instructions on how to create the flowers and the twisted wire headband. The exact design is left entirely up to you, but the images are wonderful inspiration and could be copied if you want the perfectly tasteful versions shown.
I wish I'd taken a photo that showed the back of the crown as it's bare of flowers and I covered the wires in some leftover, metallic grey bias binding from my Koos jacket. It gives it a fabulous magic-twig appearance!
While I could recommend Sewing Happiness just as a pleasant tale to read, I can also put my hand on my heart and say that it is a really good craft book too. All of the projects would be achievable by people with some sewing experience, and most of them by people with absolutely none. But more importantly, the cynical page thumbing type (me, and maybe you?) will also find plenty of projects to make, to gift and to cherish.
Ok, So here's the thanks for your blogpost reading persistence, and a chance to win not just a signed copy of Sewing Happiness, but also a 45 Euro gift card from 1000Stoff (seriously great fabric!)
Enter to win using the Gleam widget above, and then check out all the other blog tour participants listed at the bottom of this post, as there will be multiple giveaways running throughout the Winter Tour.
...As you read that sentence, I'm off on vacation for the end of summer school holidays. I probably have a beer in one hand, sausage in bread in the other (it is Australia Day after all, barbecues are compulsory today) and my feet in the river. It's definitely not winter here. Sanae was going to call it her World Tour, but predictably, humility won over and she renamed it. I'm claiming it back for her. It's a World Blog Tour alright!
And because today is Australia Day I have a second giveaway of a copy of Sewing Happiness which will be posted from my place to a lucky Aus/NZ resident. If you're resident in this little bottom half of the world then you can enter both the international giveaway above and this next one as well.
I've been very flattered to be in such great sewing company and I strongly encourage you to check out all the other Sewing Happiness tour participants.
Thanks to Sanae for involving me in her book right from the beginning, it's a real gem, and to both Sanae and Lara (of 1000Stoff) for their generosity in making these great giveaways available. Good luck everyone!
I had just given my Japanese sewing books a good working over for Kid's Clothes Week (here, here and here) when the call went out to join a Japanese Sewing Week. Never one to let life get in the way of sewing I was IN!
If you're new to my blog then hello. I use this space to document what I've made - hopefully in order to prevent ever making the same mistakes twice (you can guess how well that works). You may choose to skip to the giveaway at the end, just look at the pictures or read every word. Mostly I stick to sewing talk but sometimes get distracted by native Australian fowl, or some such....
My daughter has been wanting a "real, proper nightie" for some time now. I have a strong pyjama making history (this being my 18th pair) but never yet, a nightie. And still, I haven't sewn a nightie, as these are, you guessed correctly, pyjamas. :)
But they're white and lacy and she adores them. (to the point of constantly rolling around or prancing and generally making any decent photography almost impossible!)
The pattern is pattern 19 from Girl's Life by Mayumi Yamagata (ebay link) published by Bunka Books. I picked up my copy in a local secondhand bookshop when it was closing down.
The patterns are for girls from size 100cm to 150cm but each pattern only covers the smaller or larger half of the size range. There are quite a few patterns that would make fantastic school uniform dresses, a couple of pretty dresses, a pair of shorts, some overall shorts and a jacket. And, of course, the nightie and pyjamas. The nightie was in the larger size range, so the pyjamas were chosen instead. I've made size 110cm for my 4&3/4 year old.
This pattern sheet caused me to pause... It's organised by size rather than pattern. So first, you work out which are the markings for the size you want to make. Then you find the mass of those type of lines. This is the size you want, but every pattern in the book is there, one on top of the other. The individual patterns are numbered along each line, so you need to do a sort of dot-to-dot to trace off the correct pattern. Of course don't forget to add seam allowances.
The pintucks are created on the fabric first and then the front of the blouse is cut from the pintucked fabric. I misread the diagrams and didn't add the required 1cm seam allowance to the front neckline. Oops. It's not entirely clear from the cutting diagram, but you DO need to add a seam allowance to the front neckline.
My other gaff was in not realising that the notions called for 1cm lace all around, EXCEPT for those bits at each side of the pintucks. They should have been a smaller, half centimetre lace. That meant I ran out of 1cm lace just shy of the second trouser leg. As the law of Blog Tour Sewing would have it, the extra lace I bought doesn't quite match the original. You wouldn't have noticed, but like I said, I confess in order to try not to make the same mistakes twice!
The pyjama pants have a nice, comfy waistband incorporating two channels for 5mm (1/4inch) elastic. No idea why that feels much nicer but it does.
Now you can reach out to try and win some fabulous prizes through the Rafflecopter widget below. Three lucky winners will receive either 2 japanese sewing books from Tuttle Publishing or a $40 fabric voucher from Urban Sew. Great sewing books and gorgeous fabrics! Go for it.
This should be the point where I stop, and direct you to another participating blog. However, just as I was sewing the last hem of these pyjamas there was an announcement that blog participants who sewed from a Tuttle publishing book could be in the running for a prize for themselves.
Ok life, step aside again, there's more sewing to be done!
In almost no time, this darling little skirt sewed itself together. It's pattern C (double layered skirt) from Sew Sweet - Handmade Clothes for Girls by Yuki Araki. I'm a huge fan of Yuki Araki's clothes designs for girls, having a few of her other books. They are always such lovely designs and very nicely fitted. This is the only book of hers that I have in English (thank you Tuttle!) and I enjoy reading the notes about fit, styling and her own daughters that are scattered throughout the book.
It's a simple skirt, being two rectangles gathered to a waistband. My original intention had been to put the patterned skirt under the plain skirt, but when I'm trying to sew and ignore demands (like kindy pick up time) I am prone to errors. Still, we both like it better this way!
I created my "ribbon" using some satin turned into a narrow tube. By using lightweight fabrics for the skirt I could do french seams for the side seams and fully enclose the waistband seams so it's nice and clean on the insides.
She wasn't drawing on my pattern books, but writing me teeny, tiny notes in her fairy sized notebook.
That must be enough from me! Check out today's other Japanese Sewing Week participants:
If you sew anything from a Japanese Sewing book then join in the party by using the hashtag #japanesesewingweek. And don't forget to check the Japanese Sewing Week roll call over at Made by Sara for each day's links.
The mornings have become quite Autumn crisp, the skies are blue and it's just perfect weather for cycling.
Oh, and perfect weather for leggings. The last lot were getting a bit tight so I whipped up more Oliver + S Playtime leggings for A. This time in size 3 with size 4 length. Perfect!
They've all been worn and washed quite a few times each over the last couple of weeks. Curiously, the pale mint ones on the far right have shrunk further and are now only just long enough compared to all the others.
To go over the top, and since she loved the last one so much, I made another one of these tiered skirts from this Japanese pattern book. Nothing better than easy do-it-yourself dressing on cool Autumn mornings.
Now, courtesy of my losing track of my pattern stocktake, here's the winner of the Garden Party dress pattern!
Congratulations Brittney. I'll email you for your postal address and then post it off.
Speaking of posting things, this dress is about to go off to northern England to live, and this one recently departed for Tasmania. I have a limited number of local recipients for outgrown girl's clothes. Heavily worn or the occasional store bought garments go to goodwill, but there are some special Oliver + S clothes for which it seems only right to offer up to other Oliver +S enthusiasts. It's fun imagining them being enjoyed all over again. What do you do with your outgrown sewn clothes?
Easy for me to say, but I'm wondering if it isn't becoming increasingly difficult for you to respond.
I seem to be having some issues with Blogger and I suspect it might be affecting how you can leave comments on the blog. (or maybe you have all wandered off to look at something else, and I'm being vain and not realising it!).
Can you help me out?
I tried an HTML patch that changed the page refresh times, and I think it might have even made things worse...
Could you do me a huge favour, and spare a minute to leave a comment on today's blog post. Make sure to include the internet browser you're using (or tablet/phone etc) and which ID you're signed in as. In the example above I'm at home, so it's Internet Explorer (IE) and I use my Google ID.
Now, in case it doesn't post, be sure to highlight and copy what you've written. If, or when, it fails to post you can paste the same content into an email. Either click on the mail icon at the top of the blog, or send it to lightningmcstitch at gmail dot com
As a bit of an incentive, I'll give away an awesome paper Oliver + S pattern to one person who leaves a comment. Whether it arrives by email or on the blog I don't mind. It's your effort that's being rewarded, not the success of the comment posting!
The pattern is the beautiful Hide and Seek dress which I recently made here. It's size 6m to 4 years, uncut and as new. Happy to post to anywhere.
Can't think of anything to say, well, everyone has a haircut story, right?
Only a week after having her hair trimmed into the nice, angled bob that she's been sporting for a while, A decided that she and her toy koala needed a bit more off. She hacked at the front part of the bob (and koala's fluffy ears) and so I saw my chance to whiz her back to the hairdresser and get the short, Mia Farrow cut that I've been thinking would be super cute.
When I was her age I had a very similar haircut and she's sold on the idea of looking just like mummy. Before it grows out, I want to recreate a dress I had at the time and play along with the When We Were Young series
I eventually grew my hair quite long, and so here's my hairdressing horror story:
With my long hair ready for a new style I went to see my uncle's family who were all hairdressers. I won't say exactly how old I was, but you might guess the era anyway...
I pointed to a picture on the wall and requested the haircut to be just like that one. The picture probably looked like this:
My cousin set to work, snipping and trimming. I became a bit concerned at how this was going to eventuate into the style I wanted, but I didn't say anything, as he was the hairdresser and I presumed it would work out at the end.
Eventually he put his scissors down and reached for the mirror. That was when I realised he'd finished. That was it. He looked quite proud of himself as he showed me the sides and back. I burst into unexplained tears.
The picture next to Farrah Fawcett looked a lot like this one...
He'd done a perfect job of it, it's just that, not only was it not the haircut I wanted, I didn't even look like that model.
I looked more like Adam Rich (aka the chubby kid from Eight is Enough):
I'll draw the winner of the pattern in about 7 days. Thanks for your help. As much as I use the blog as my own record of what I've done, I really enjoy hearing from you, and I know how infuriating it can be when a blog comment fails to post.