Showing posts with label Fairy Tale. Show all posts

Wednesday, 2 March 2022

Everlasting Fairy Tale

This dress has already been on the Oliver + S blog and Instagram, but how about a bit more of the story of the pattern here?...

It all started with the fabric. 


It's a simple cotton sateen from Super Cheap Fabrics, and yep, on sale (that shop is NEVER not on sale) at about $13/m. So, for the princely sum of about $25 plus delivery I could make a party dress. Sold!


Happily, when A saw the fabric she agreed: a birdy party dress would be fun. Actually, I was kind of starting to imagine the dress for myself so I wouldn't have been too upset if she'd not liked it!

The go-to party dress pattern her whole life has been the Oliver + S fairy tale dress. Let's revisit them!

First ever in a sheer, crinkly poly chiffon all underlined with cotton voile (and then lined as usual with more cotton) - November 2013


The second one followed soon after, in January of 2014, in time to go and see Angelina Ballerina on stage...


A year later, she spied the remnant of fabric in The Fabric Store, and so her birthday dress was another Fairy Tale - February 2015


Sewing up this pattern you can see that it looks good at every stage of construction. It looks good before you add the collar, before you add the sleeves, before you add the belt or sash... So while sewing one version I would find myself dreaming of another. This fourth dress was my all time favourite and definitely made to please me, but boy did she love it too.


Later that same year (2015 was evidently my year of the Fairy Tale dress) we went to The Carnival of the Animals and needed animal themed theatre clothes. Obviously a zebra Fairy tale dress, right?!


I got lucky with her 6th Fairy Tale dress and didn't even make it. We fell in love with this gorgeous spotty ombre dress by Melanie and scored it as a hand-me-down. She really loved that one and wore it until it was far too tight!

So those birds had to be made into a Fairy Tale dress. A quick muslin of the size 12 showed it wasn't going to be. 

So I took all the Fairy Tale styling and used the bodice of the Bistro dress (size 0) as my block to build my own fairy tale.
Adjustments as follows:
- moved bust dart up and reduced size
- omitted back bodice darts
- raised neckline and redrafted collar to fit and for shape
- moved side zipper to centre back
- gathered rectangle skirt with the deep fairy tale double fold hem
- sleeveless armhole reshape and finished with facings


Sunday, 27 September 2015

Carnival of the Animals: Part I - The Zebra

The sewing around here has definitely taken a wild turn with lots of animal print, and here's why: Tomorrow night, the kids and I are going to the Playhouse to see The Carnival of the Animals.

It's opening night and kids are invited to dress up as an animal. So, I let the kids pick which animal they'd like to be, and then set out to make some theatre worthy clothes to represent their chosen animal.

First up is our little zebra ballerina:


The brief for this dress was exactly that; a zebra ballerina dress. It had to be obviously zebra, and as sticky-outey as possible in a dress that isn't actually a tutu. Beyond those requirements she gave me free rein.


The dress is my favourite party dress (one, two, three and four), the Fairy Tale dress by Oliver + S. I'd like to say I could make this dress with my eyes closed now, but I always seem to press the waist seam allowances the wrong way and then attach the zipper before realising my mistake and ripping it out again. The instructions are perfectly clear, I just seem to like making the same mistakes over and over.


Even though it was sewn twice it's still an invisible zipper that I can be happy with. I couldn't possibly try to match the patterns at the back after cutting the fabric to centre the front pattern. But I can't complain about how the bodice part lined up as it looks every bit as good as if I had tried. Freaky sewing luck strikes again!


Initially I searched online for a zebra fabric. There are a few quilting cottons that looked OK, but I was holding out hope for something that had a bigger print rather than tiny repeats of an irregular stripe. I was also hoping for a luxe or shiny looking fabric.

Most local fabric stores I tried were devoid of shiny zebra print fabric until I stumbled on this stuff on Sydney Rd. The selvedge has "100% pure silky italian style" written in a font that's reminiscent of African stick figures. There's nothing silk-like or stylish about it, it is pure ethno-polyester and it is perfect! Since I've made this dress I've seen a zebra print cotton sateen in Spotlight, so maybe the shiny zebra is an upcoming trend.


To get as much "poofiness" in the skirt as possible I chose the cheap, stiff net stuff rather than the nice soft bridal tulle. Then I used three layers of it rather than one as per the pattern.

Gathering that much netting to the skirt was not easy and it took a lot of patience not to snap the bobbin threads. I've heard dental floss is good for gathering this kind of thing and I wish I'd remembered to try it. Once I'd sewn the lining to the dress at the waistband the seam allowances wanted to stick up too much. I ended up sewing the tulle seam allowances down to the lining. Bit like understitching them. Exceedingly fiddly to do but it worked to keep the skirt lying nicely.


The lining is a simple white voile cotton from the same shop. I think I spent a total of $25 on fabric. I overbought on the pure silky stylish zebra fabric so that I'd have enough for the skirt panels. However the fabric was wide enough that I could cut the skirt in one piece and not have to match panels of print. Sadly that means I have quite a bit of zebra fabric leftover. I may have to "lose" it somehow. :)


The dress is mostly view B, but without the giant sash and bow. I would have been happy to have no belt but A requested the little belt and bow like her other Fairy Tale dress. It's a size 5 but with about 3" added to the skirt length to bring it down to knee length and balance out the big print on the skirt.


We were all going to have animal masks to match our outfits (yep, I'm getting in on the animal dress ups too!), but I found trying to glue this fabric to anything was impossible.

Instead, I turned to the wonderful tutorial by Marie-Michelle on the Oliver + S blog and made a Dior Rose to attach to a headband.


Those little rose buds were fun to make. I made it more time consuming than necessary by doing it all by hand, but I caught up with some TV watching while hand sewing.

There was a sneak peek of this dress on the Oliver + S blog as we're having a monochrome sew along. I've got some more black and white things cut out and I'm starting the sewing. But there will be more animals to introduce first....

Be sure to come back soon for Carnival of the Animals: Part II


Monday, 23 March 2015

Another fairy tale ending - courtesy of my fairy-freaky-sewing-luck godmother

There's something about the Oliver + S Fairy Tale dress. While you're sewing one, you're already imagining the next....

I was under birthday girl orders with this one, and so in my head I was imagining something much simpler, more refined, more, well.... more me to be exact!

Some blog readers may remember this fabric:


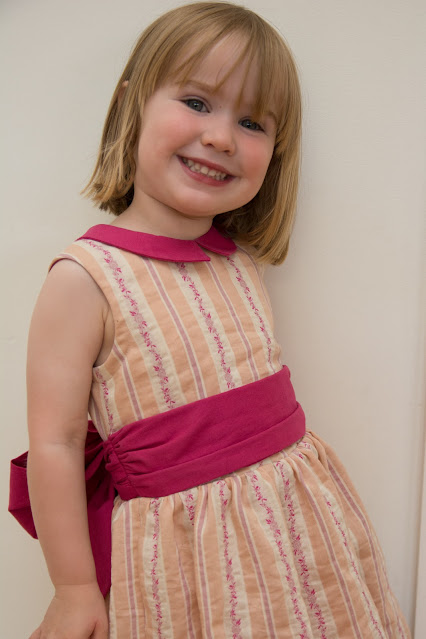
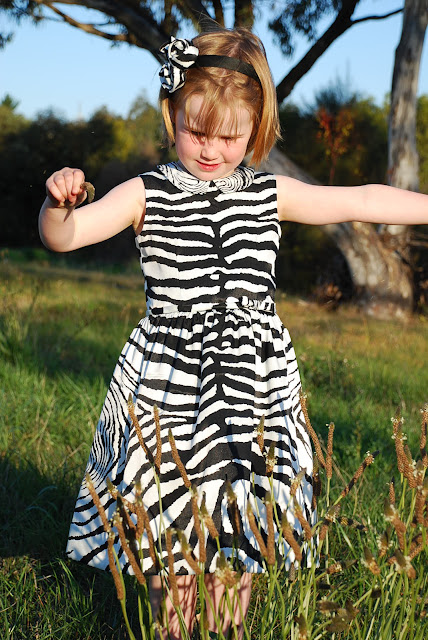
It's a nice quality stretch sateen cotton that I bought ridiculously cheaply and then couldn't work out what to do with. The stripes and the border print effect of the thick stripes necessitated a straight bottomed skirt. I wanted to keep it for myself but didn't have a pattern that it would work with.

Then, there was discussion on the Oliver + S forum about how to pleat the skirt of the Fairy Tale dress. The original poster came up with her own lovely solution (her blog: Bright Up My Life) and linked to this Alexander McQueen dress


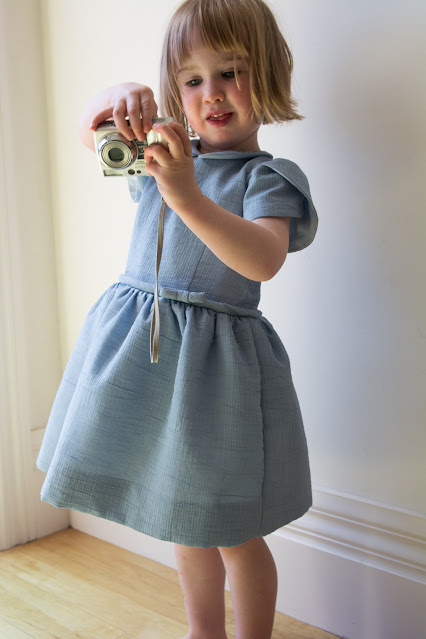
Oh my, do I like that dress. So I was decided. I wanted a pleated skirt Fairy Tale dress with the pleats offset to each side. And here it is:
 
 
There was a little bit of planning that went into the dress and then bucketloads of good fortune. The planning went like this:
  •  I wanted box pleats with approx. 1 inch deep folds.
  •  I wanted a longer skirt in order to balance the three wide stripes at the bottom.

So I set to with my notebook to work out how wide the skirt would need to be to accommodate the pleats. I measured the bodice pieces, removed the seam allowances to get the minimum skirt width and then added my pleats, coming up with a sizeable number.
 
Would my fabric be wide enough?
 
 
Jackpot! By taking out the side seams and cutting the skirt as one rectangle my fabric was exactly the 56" I'd calculated I'd need. Obviously, a wise person would measure their fabric before getting carried away with an idea and investing any time in the maths, but hey, I like to live fast.
 
The only other bit of planning was to decide that the pleats shouldn't be too close to the side seams (which I'd eliminated anyway) and so I arbitrarily measured them in about 1/2" off each side.
 
So, how lucky was I that the first box pleat landed almost perfectly under the bodice dart?! Complete fluke!
 
 
Initially I hadn't planned any waist detail but since the box pleat was a millimetre or two off the bodice dart it looked as if it should have been perfectly aligned, but wasn't quite. Best solution to fudge things and break up a seam in stripes is piping.
 
The length of fabric I'd purchased had just one of the three stripes at the top end, so I used that to make some straight grain corded piping and tucked it into the bodice/skirt seam.
 
 
I toyed with the idea of sewing the armholes without the facing that the instructions suggest, but since I was having such an undeserved run of luck I thought I'd better not start trying anything clever.
 
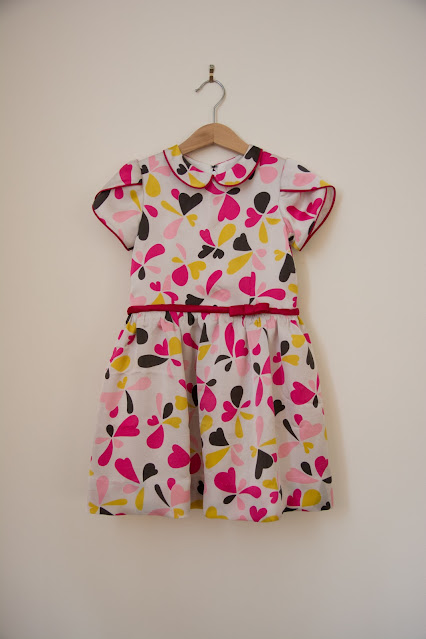
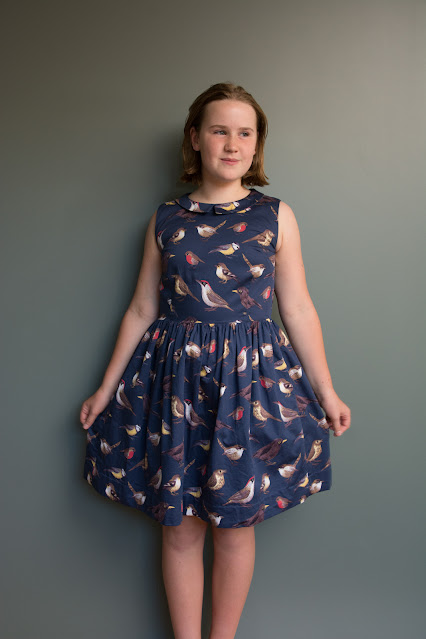
So the rest of the dress is as per the pattern, although I left the collar off.
 
 
For my own records it's size 4 with probably about 2 inches extra length at the skirt hem.
 
I cut the lining (white cotton batiste from ClearIt) and the tulle (double layered again) to be the same width as the outer skirt but then just gathered them evenly rather than pleating them.
 
 
I was getting pretty excited by this stage. Normally my enthusiasm for a project is inversely proportional to my daughter's, but I must have been heavily dusted with the lucky Fairy Tale magic sprinkles as she LOVED it!
 

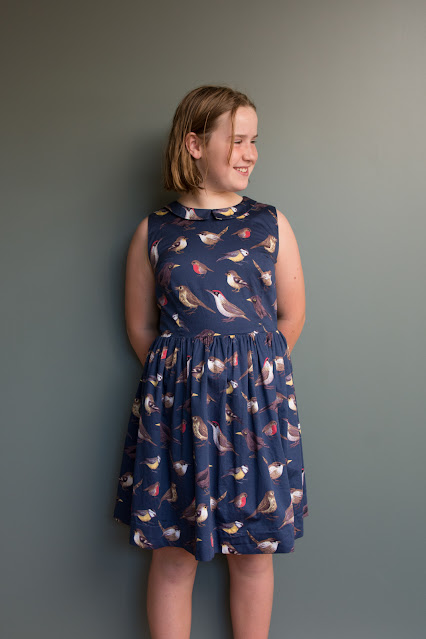
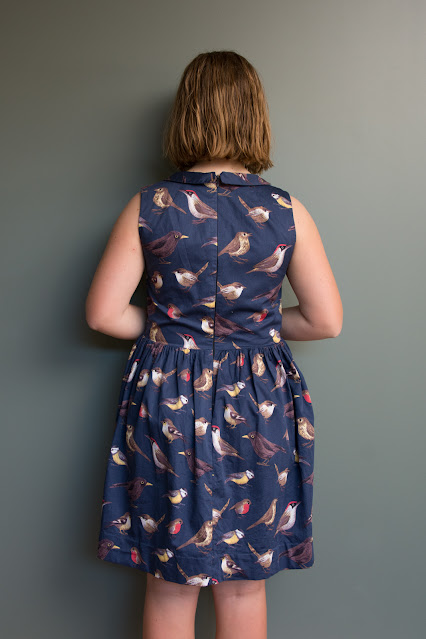
I was surprised to learn that this pattern hasn't been as big a seller for Oliver + S as some others. Frankly I'm baffled, 'cause what you get here is a lovely fitted (or not so if like me you just pick a size and don't mind if that bodice is a bit roomy - see pic above) bodice with a fullish skirt. The options for collars, sleeves and waist trim make it incredibly versatile and the only remotely challenging aspect is inserting a visible zip. Trust me, if you've never done that before then this is the pattern company that you want to have walk you through it.
 
 
This dress hadn't been intended for an Oliver + S blog post as I was sure Rachel would be all over the Pleated Fairy Tale idea. Turned out she'd been busy and so I was up for the feature.
 
It would seem insufficient to suggest people scratch out some sums and then wing it, so I set to and worked out how to get those pleats perfectly on the bodice dart for every size.
 
If you like a bit of maths with your sewing, or are just happy for someone else to do it for you, then hop over to the Oliver + S blog by clicking the image below.


If anyone does use the measurements I've set out I'd love to hear how it worked. I made up a couple of test runs in a few sizes using strips of interfacing and the stapler. I think I got all the sums right.....

Am I allowed to say that I think this may be my favourite of all the dresses I've ever made, and I really wish it was my size? Well, I just did!

Sunday, 8 February 2015

As she wished

When we were at The Fabric Store and rummaging through the remnants I showed a piece of fabric to A and she was instantly smitten. This was to be the birthday dress.

Kid's Clothes Week crept up on me, and while it wasn't on theme with the upcycling idea, I decided to take most of a week to sew a dress...


The pattern, of course, is the Fairy Tale dress by Oliver + S. It really is the perfect special occasion dress. I had envisaged a simple collarless, sleeveless version, but the birthday girl wasn't going to let me off that lightly.


She wanted the curved, Peter Pan collar and the tulip sleeves (view A). Just like her previous Cinderella dress which she had adored. (happily that dress has been handed down as it was getting indecently short and rather tight). Her previous Fairy Tale dresses were size 2. This one is a straight 4. What happened to my 3 year old? It seems I lost a year of sewing there.

I had recently received this beautiful Fairy Tale hand me down dress from the other side of the world and I was very impressed with the piping. I figured if I had to sew the collar and sleeves I needed something to break up all those abstract flowers.


At the back of the neck it was a tight corner to pipe around and I went back and had a look at Melanie's version to assure myself it could be done. The fuchsia satin (which is a better colour match in real life than it looks in these pictures) was relatively thick and perhaps not the best choice for piping, but with lots of snipping I got there and I'm delighted with how it worked.

While the accent fabric was sturdy, the main fabric was as slippery as a wet, buttered fish. I didn't keep the cardstock that the fabric came with but I'm pretty sure it's a silk and it wanted to bend and stretch in every conceivable direction.

I used my new invisible zipper foot, and that, along with the brilliant Oliver + S instructions meant I nailed that zipper first time. And then I nailed it again the second time when I realised I'd pressed the bodice/skirt seam allowances up instead of down and had to unpick a bit and redo it. :)


The cute little bias strip belt and bow is perfect for breaking up the pattern and covering the skirt attachment. Given the satin was thicker than ideal, turning that sucker was not easy!


And because a birthday party dress has to have "poof" I used two layers of tulle. The pattern suggestions the super wide American stuff which is ever so soft, and I think a single layer would be a bit of a non event. For the record, it would be perfectly OK to get the narrower width cheaper stuff because you don't use so much that the extra width matters, and the skirt is lined such that even scratchy tulle wouldn't touch bare legs.

Other than the piping at the collar and sleeves, the only modification I made was to cut the skirt (and lining and tulle) as one big rectangle to avoid any side seams. Saves time too and I think I'd always do this from now on.


It's just gone through the wash to get the pencil marks off and then I'll wrap it and give it to her for her birthday. Modelled photos on a big 4 year old to come soon!

Sunday, 12 January 2014

The bit after the Happily Ever After...

There are just a few hundred things I'm meant to be doing but they're all boring or troublesome, so of course I made a list of all the boring, troublesome things that still need to be done, then I made another Oliver + S Fairy Tale dress!
 

I found this fabric as a remnant long before A hit her pink, ballerina phase (we're solidly in that now and I'm holding my breath waiting for it to pass) and I found it too hard to resist so it was added to the stash.

I knew I was on a real winner with the pattern after making this one. The fit was perfect and she simply adores that blue "Cinderella" dress. Since my Christmas Tutu went down like a lead balloon I was looking for some redemption.


This dress would be pink, it would be "poofy" and it would be made just in time for next week's trip to the theatre to see Angelina Ballerina. I was going against all my own ideas of style and tastefulness and making something that I just knew she'd love.

I had planned a standard "view B' but then hit a snag wondering how my vertical bodice stripes would look right next to the gathered skirt. The stripes would never match but they're wide enough to look like they probably should. Then I stumbled across the solution in a 2013 sewing summary by Katy of Designs by BellaBug


Katy had photographed her dress with the sash wrapped across the front. It looked fantastic and was the ideal solution. Only I still wanted that BIG bow at the back, so I made an extra sash section that was gathered and stitched into the side seams just like the back sash is.


I'm happy to say that A is delighted with her dress and is "saving" it for Angela (sic) Ballerina next week. That hasn't stopped her putting it on at every possible moment, during and after it was sewn.


The only modification I made was to add one inch in length to the skirt. The armhole facings are kind of redundant given that the dress is lined, but I can see why they're there as it means the bodice construction is the same for both the sleeveless and tulip sleeve versions. It also allowed for a peep of some more fuschia pink cotton on the inside.

The kids were getting excited about the ballet show and, predictably, were fighting about something. It would seem we only have one pair of bright pink mouse ears and P was adamant that they were his and he would be wearing them (more on that in another post!).

Oliver + S to the rescue again with a free downloadable pattern for a felt bow and tips on making fabric covered headbands.

You've got to believe me, I was so far out of my beige-brown comfort zone now I figured in for a penny, in for a pound... Cutesy matching hairband was made. .... and adored!

I think the temporary tiger tattoo on her bicep really works with this outfit, right?!
Then, due to a complete failure to drink and party on New Year's Eve, the Flipper and I found ourselves awake, sober and bored on new year's day so we went to Ikea. P got a new desk and swivel chair (that's better than the show rides!) and A got a toy chest and wardrobe. Flipper and I came up with a new premise for a reality TV game show: Ikea vs the Chef. Co-habiting couple race against each other to prepare dinner or assemble Ikea furniture.

Not only was my Stuva wardrobe build beaten by Spaghetti Meatballs (too easy and should have been handicapped) but it turned out I'd bought the wrong size frame. After attaching all those draw slider thingies I was NOT returning it and so another trip was made to get the bigger frame and A now has two wardrobes.


And when you look inside it appears that one would never have sufficed!


I guess it also shows that I really must stop making dresses and get on with those boring, troublesome jobs after all.

Wednesday, 6 November 2013

Fairy Tale Sewing

I finally did it, and, as often happens, I'm wondering why on earth I didn't do it earlier. I made the Oliver + S Fairy Tale Dress


When I bought the pattern A was only wearing pants and had no interest in twirls or dresses. I'd read all the lengthy discussions in the forum about fitting and darts and muslins. I figured it could wait...

Then I got the pattern out to draft the belt and bow to add to this dress and amazingly I bothered to draft the whole pattern in size 2.

A little while later Once Upon A Sewing Machine invited me to pattern test their wonderful Ruffled PJs (how my kid loves those pyjamas, I just can't tell you!) and that required me to measure my little tacker properly for the first time. What do you know, she was exactly the size 2 measurements.

Could I do away with making a muslin and just jump straight in? Well, when I found this sheer blue/grey fabric at that $3/metre shop the answer was yes, yes, yes!


Once I started sewing the fairy tale really started coming true. It fitted, it was fun to sew and the possibilities for the pattern just seemed endless. This is another of those patterns that, through the excellent instructions and the pattern itself, will cause you to be seriously impressed with what you can sew.


My main fabric is very sheer and I thought about hairline seams and what to do. Quite a bit of thinking for me, since I tend to cut first think later most of the time. I could do hairline seams, but what about the collars seam allowances, they'd show through? And what about the waist darts?

The answer, in the end, was to cut extra copies of everything out of the cotton lining (probably a batiste or similar) and treat one layer of sheer stuff and one layer of cotton as the single main fabric layer. I think it's an answer someone in the forum had already come up with (but of course I'd forgotten to check there), and Nicole then did exactly the same thing, so I was feeling very confident it would work.

I'd like to say it was a dream run sewing it up, but like most good fairy tales there was a sticky bit in the middle when I sewed the invisible zipper on such that the dress would have to be half upside down and inside out in order to close. No great problem, I mean it's not like I lost one really good shoe at a party. A bit of unpicking and slowing down to concentrate and then all really was happily ever after.


When I had sewn just the bodice and skirt I held it up to have a look and suddenly I was wanting to make a sleeveless, collarless version. Then after adding the collar I thought the one after that should be sleeveless, but with a collar. I set the sleeves in and obviously then wanted one just like that without the belt...

It's easy to see how Rachel at Nest Full of Eggs has managed to make ten of them! (well, no actually, it's easy to see how she could conceptualise ten of them, making them all is quite an extraordinary achievement)


Having the sheer fabric underlined with the cotton made it easy to hand sew the hem and make it truly invisible. This was my first time playing with tulle* and I decided to use two layers as the poofiness of a single layer just didn't seem sufficient. This is the nice, soft stuff but I guess a single layer of the stiffer, scratchier stuff would be fine as there's a lining layer to protect little legs.

*excepting my handmade bridal veil I wore on my bike helmet on the morning of my wedding day - who'd waste a perfectly good Saturday morning with hair and make up appointments when there's a bunch ride to join?!


My happy cup of joy was really spilling over when A was watching me sewing it and becoming increasingly excited about it. She absolutely LOVES this dress. Obviously she'd prefer if it was purple, or pink at a stretch. But with some persuasion, and the help of some theme branded Band-Aids she's come around to the idea that Cinderella wore blue and so will she (and "Cinderella has an ouchy on both her knees just like me too").


I'm not sure this is how Cinderella poses for pictures,....

But I am certain that this:...


...is how she does her bench dips to keep her triceps toned.