


I wore it last night, in a room full of beautiful women, wearing beautiful fancy outfits, that they too, had made.
Edit: this is a long one. go get a cup of tea and settle in, or just skim through the pictures if you prefer :)

The event was Frocktails. As you can probably surmise, that's cocktails, in frocks. An incredible group of makers gathered to drink, nibble and talk fabrics and patterns into the wee hours. I had met only one person there in the flesh before, but in a room full of sewers you can never feel lonely, right?
Formal, fitted dresses was a whole new ballgame for me, but this was definitely the occasion to inspire me to give it a crack.
Enter Pamella Roland Vogue V 1233
 |
| Vogue 1233 link |
Just like how paying for race entry used to make me ride the most technical mountain bike courses, when really, I'd felt like getting off and waiting in the car. I figured that by paying for Kate to make the belt I would be obliged to follow through and make the dress.
of course, she also had the most perfect buttons...

I've never been fond of yellow gold. I avoid gold jewellery and knew that I wasn't going to play up the goldness of the fabric. The fabric has both gold and silver metallic threads (more like thin tinsel strips really) through it and I wanted a button that was silver, with a bit of gold.
The sheaf of wheat and the word "country" was just icing on the cake! They are etched, reportedly from a famous German button house, and cost more per button than some garments I've made.

Kate also found the perfect buttons for the lower part of the dress. These are very flat and just a simple burnished silver.
The dress closes with a full button placket, but those buttons below the waist go into a hidden placket. It's neat and I'd never sewn this kind of placket before, but it's not entirely functional...

You see, the edge of that placket is just pressed, and if you sit down it opens up. I ended up handstitching the full length of the placket about a 1/4 inch from the edge. With the texture of my fabric it was easy to take just little pick stitches of the outer fabric and not have them show, but with a smoother fabric it could be problematic.
The ideal fabric for this dress would probably be something a bit stiffer too. I was worried that without some fitting and structure my fabric could easily look like old curtains. Kate suggested horsehair canvas and while I'd never done that before I figured this was the project to try it on. I shot off a few help me emails to those that I thought would be horsehair canvas dab hands. Turns out they're just naturally smooth, firm, gorgeous women whose dresses look like they're boned and supported, but aren't. Lucky ladies, huh.
I did what I usually do and made it up as I went along.

I guessed that including the horsehair in seams would be disastrous, so I cut all the bodice panels in horsehair without the seam allowance, then hand basted them to some thin cotton and underlined the dress panels.

It was starting to feel pretty hefty, a bit like Queen Victoria's corsets, and I watched the weather forecast nervously. A hot night would certainly require a plan B or I'd be fainting!

I dealt with the bust dart by cutting a wedge out of the horsehair, and sewing the dart into the underlining. I've since learned this is exactly what you're meant to do. How lucky is that!
I stopped the horsehair at hip height and then cut a facing shaped piece that was about 2" wide for the hem. That left the bottom part of the skirt unsupported and it looks a bit wavy and limp because of it. But really, this dress was becoming like a quilt!
Fitting the bodice wasn't too tricky, thank goodness. I made a few 1cm dart reductions to the pattern tissue to get rid of the fabric puddle just above my bust that I've noticed seems to be my trouble spot.

The only other bodice adjustment was the centre back neck. I shaved off 1cm width at the top of the centre seam, tapering out over about 8cm, and then after I'd attached the collar I still had a little horizontal wrinkle. I unpicked about 10cm of collar, hoicked the centre neck up into the collar by a centimetre or so and then restitched the collar.
Thankfully, all the rest of the bodice seams required no adjustments at all.

But then came the sleeves. The sleeves as per the pattern are just wrong. They are too full, too high and too short to look anything like the picture on the pattern cover. Sadly I hadn't paid attention to that when I cut the muslin and it was only after I'd set one sleeve in that I realised how horrid they were.
On the left is the original pattern sleeve. On the right I've pinned out width - 1cm at the top of the sleeve cap and about 3cm at the hem. I baulked and only removed 2cm at the hem in the end, but I should have stuck with the pinned version.

This was my altered sleeve pattern piece:

With that compromise, the dress was done.
On a makers high, I decided I needed a brown clutch that would match my shoes.

I'd never sewn leather before either, but if you read my blog, or have even read this far into this one post, you know what happened next.
A $25 gift voucher from a friend (for The Fabric Store) bought me exactly the right amount of leather, some lovely gold fabric for piping and the inner yoke and a zipper. With 30 cents to spare!
The pattern was one I already had;
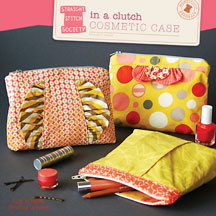 |
| Straight Stitch Society - In a Clutch |

The lining bag, with the bottom left open for turning, was then put over the outer bag, right sides together and the top edges sewn. However that was a lot of layers of thick leather and the whole thing became a twisted mess and there was no way I could neatly edgestitch the whole circumference.
Adding magnetic snaps into the inner yoke before sewing the lining closed allowed me to neaten it up enough to pass for a respectable clutch in a dark room.


I don't usually wear any makeup, and I was perfectly prepared to accept that as a dark art which I had neither the tools nor expertise to master. I went into the city and had my eyes done at MAC. I took the fabric with me and some images from the web and the lovely young woman instantly got my silver/gold/bronze idea.

Sometimes it pays to have your eyes shut in photos!
Katie did my hair for me and I was delighted with what felt like my everyday ponytail, but had quite a bit of added glamour. Thanks!

I had a wonderful time. I met so many amazing women. Sometimes I looked so long and hard at their dress I forgot to make a note of who the woman wearing it was. Other times I got so engrossed in conversation with a new friend that I forgot to clock what she was wearing.
I'm looking forward to the official photographers photos and the who's who list of Frocktailers. Meanwhile, a million thanks to Kat and the team behind organising Melbourne Frocktail 2016

Details:
Dress pattern: Pamella Roland Vogue V1233
Fabric: Silk/cotton/metallic tweed and acetate lining from The Fabric Store
Belt and buttons: Covered belt and buttons from Buttonmania
Size: 16
Alterations I made: as detailed above
Alterations I wished I'd made: 2" more skirt length - it should be just below the knee and I never thought for a minute I was tall enough (5'7") to need to add length. Muslin the full thing next time dummy.
Extra length on the sleeves.
Again?: Not like this, cause how many safari cocktail frocks can a girl have. BUT, imagine the bodice, with an invisible zipper up the back, front seam closed and a scooped neck, or Peter Pan type collar. Maybe sleeveless. I think I have my perfect dress bodice.
Clutch pattern: In a Clutch Cosmetic Case
Fabric: Leather, actetate lining and gold voile from The Fabric Store. Thread and snaps from Leffler Leather
Modifications: recessed the zip into the bag for a more formal look
I'm off on holiday tomorrow. Taking the road bike (kids' bikes and Flipper's mountain bike) and the family off to the mountains for a week. Please excuse my silence. xx
Amazing, so much work and so well executed. It was great to meet you, and see this master piece in the wild!
ReplyDeleteOh thank you. I was quite daunted about dressing myself for a grown up sewing event - I'd be much more at home if it was the kids dressed in handmades! Turned out to be a lovely night. Great to meet you and I hope you can escape the country and come into the city for some liberal mindedness more often. :)
DeleteJust gorgeous!! The fit is great. Frocktails sounds like so much fun!
ReplyDeleteThanks Meg. It was such a motivating force to make me sew something "proper" for myself. Every city should have a Frocktails!
DeleteSuch a fantastic dress! It looks great on you! I'm glad you persevered. It was absolutely worth it!❤️you look stunning!
ReplyDeleteOh thanks Rachel. I was happy that it was something that suited me well. And so happy that the 46 degree temperatures were mid week not the weekend!
DeleteThis is frocking amazing!! And you look stunning. I really love the collar of that dress and you did very well improving the sleeves. The clutch is lovely, too. Awesome work.
ReplyDeleteThanks Marisa. You really should come along next time.
DeleteI'd love to find a good explanation of the shape of sleeves. That's one of the 3d aspects of sewing that my head just can't envisage!
Holy crap, lady! That dress is *almost* as stunning as you are! So incredibly professional, love the fabric!
ReplyDeleteHa ha. You're the sweetest Nicole, thanks. I reckon there's enough of this fabric leftover for a jacket or skirt for you! I bought the fabric recommendation plus a little in case I muffed anything and then I'm such a scrooge-y cutter there's plenty to spare.
DeleteSo gorgeous - you and the dress both! Love the fabric, the collar, the buttons - beautiful job on the bodice construction!
ReplyDeleteThank you Angela. I got lucky with my novice make-do-ness happening to be somewhat technically correct! :)
DeleteYou look fantastic! I am so regretting not going to Frocktails now, after seeing all the photos! Next time! I'm impressed you even made a leather clutch. I have yet to try sewing with leather but really want to give that a go now!
ReplyDeleteYes, you should have come! I really enjoyed making the clutch but I'm disappointed it didn't work as neatly as I'd envisaged it (imagination way ahead of my skill level there). Next time I'm either getting thinner leather, or taking longer about it and using an overnight press in a vice to flatten every seam!
DeleteYou are a stunning woman. I think you chose a design and fabric that highlight this. I was a little curious about the no curtain comment on IG, but seriously, I think you have nothing to worry about. All the work you have pit into making this dress paid off. The bag looks amazing, too!
ReplyDeleteJenya, you're too kind.
DeleteWhen I was choosing between this and two other fabrics at The Fabric Store the young woman assisting me led me to the mirror where I held the bolt horizontally and let the fabric drop to see how I liked it "on me". I instantly laughed and said "Curtains". She set me straight by standing the bolt up and draping the fabric over me. How it's meant to be done I guess. :)
Absolutely beautiful! I love the dress and I think you hit the right note with your accessories.:)
ReplyDeleteThanks Cindy. I forgot to include the bracelet that A made for me. It was cardboard squares held together with green Washi tape and a green plastic Dorothy Dinosaur charm stuck on. She insisted I wore it, and I did. For about half an hour.
DeleteThe whole look is fabulous, well done for persevering.
ReplyDeleteThanks Nicole. I'm glad I gave myself enough lead out time. It's exhausting making things that require alterations as opposed to just child's age plus length if needed - as you well know!
DeleteAh, it's just so lovely! I'm very impressed by your sewing and you really look gorgeous all done up! :*
ReplyDeleteHe he. It happens so rarely these days Kristin. Thanks for the lovely compliment.
DeleteYou look fabulous! All of it! What a fun event!
ReplyDeleteCheers mc. You've just reminded me of the dress I wore to my final year vet school ball. It was also a beige-y colour! - more grey hairs, more wrinkles, more kilos but otherwise nothing's changed!
DeleteWow you look amazing in your dress and your perseverance paid off with a gorgeous dress that firs you so perfectly and then the bag, one of these days I will get to the Melbourne Frocktails.
ReplyDeleteDo come Sharon, it was a great evening with such a broad section of the sewing community there - if only we had a few well dressed self made blokes!
DeleteI made this as well and I agree, the sleeves are just wrong.
ReplyDeleteWowsers!!! Looks fabulous!!
ReplyDeleteHI
ReplyDeleteI usually go to thrift store to find materials or patterns that was already cut which has been abandoned and I rescue them and finish them up. Anyway I found this already cut materianls and lining with this pattern but no manual or instruction for vogue v1233. I was trying to find on line to download instructions. Do you know of any place or you can help me with this please? Thank you for your time and your dress looks beautiful
It would breach copyright to publish instructions and it's not available through Vogue as a digital pattern. Your best bet is to but the pattern second hand. I just saw one on eBay uncut for AUS$14
Delete