Saturday, 13 June 2015

Moon rabbits for a birthday gift

I'm busy working away on some things for P's birthday next week and it prompted me to share a gift that I'd made for a friend of A's recently.

We were in the city at L'Uccello and I asked A to pick a ribbon and some fabric to make a skirt for her friend's birthday. She fixated on the ribbon part and so I got to "help" her choose the fabric!


We ended up with the Cotton & Steel Moonbunnies by Rashida Coleman-Hale. Yep, you've seen this fabric line all over the 'net, right? But it really is cute and I figured there's unlikely to be a little girl alive who wouldn't like a teal and hot pink skirt with moon bunnies on it!
 
The ribbon is a velvet ribbon which matches the pink of the skirt much better than it would appear in the photo. Anyway, once she'd found it and rubbed it on her cheek there was no dissuading my daughter. It had to be that ribbon. And the pattern? the free Lazy Days skirt pattern by Oliver + S.
 
I sized up my own kid in the shop and bought 40cm of fabric....
 
And that left me with just enough left over for a little bow on a headband.


Again, a free pattern from Oliver + S, the bow is usually made from felt. I added a tiny 1/4" seam allowance (all I had room for) and cut two of each part instead of one. I stitched them together then turned them right side out through little openings in the middle. That way I didn't even have to stitch the openings closed as they are covered by the centre piece.

The hairband is then covered with a bias strip that I had leftover and which happened to match perfectly! Once more, the instructions for the bias covered headband is a freebie from Oliver + S!

For a final bit of bunny birthday gifting we found a book at a wonderful local bookshop with a bunny character and one of my favourite illustrators - Maurice Sendak


It's fun to be able to make a sweet little set like this and now I'm getting requests for moonbunnies from A too. But how about these sloths, I think we just have to  have those, they're fabulous! Now, about that pledge not to buy any more quilting cottons....

I've been painting a Yoda ("a green one with a beige coat please mum") to the correct colour specifications, and with one more evening to go before the boy turns seven I need to sew it up. Stay tuned for the next birthday instalment....

Sunday, 7 June 2015

Neat and Lovely Girl's Clothes - coat "y"

I have a tendency to buy patterns and let them cellar for a while, but with this book I was straight in, first with my jacket, and now a coat.


This is coat "y" which is shown in the book in a gorgeous pink/brown colour combination. I had bought this lovely, soft wool coating from The Fabric Store back when A was a tiny baby with the intention of it being for her first coat.

In my memory it was a much paler, greyer green and I was considering pairing it with pink trim, but in digging it out of the stash I found my memory lacking. It's a perfect autumn green and needed a nice strong, autumn colour for the trim.


It might look like she has no hands, but she does! These are some generously long sleeves and since she's the child in the house with normal length arms they seem pretty long on her. In fact, as she moves and runs around the sleeves are actually just right. Nicely long, but not dangly or in the way.

The coat itself is pretty long too. Sadly, the wool is just soft enough that the interfaced facings are holding their length nicely while the rest of the coat stretches a little, giving that annoying little pinch at the bottom front. It almost bugs me enough to make me want to unpick the hem and turn it up a tiny bit more. Almost, but maybe not that much...


I slipped up slightly in my copying of the Japanese characters and ended up interfacing the upper collar not the under collar, so that also doesn't roll quite as nicely as it should. I see these things, and I'm happy to notice them, as if this was my coat I need to have got them right. But hey, it's a 4 year old's coat. I'm not beating myself up over it!

I couldn't quite work out what the pattern was suggesting finishing the cuffs and collar with. It looked like ribbon in that there was no folded under edge. However, with the curves of the shoulder flap and collar I figured it would have to be bias cut. I've never seen or heard of bias ribbon, so I just made my own bias binding.


The size is 110 which correlated pretty closely to her measurements. It's a perfect fit in the shoulders and body and I couldn't have gone any smaller. These are really nice, tailored fitting patterns. Hopefully she'll grow up and longer limbed without getting too much wider and it will fit well next year as well.


The pattern doesn't include any lining but a wool coat needs to be lined, right?! I went with the easy method of just constructing an identical front/back/sleeves out of lining fabric. and basting it all together before attaching the collar and facing. Attaching the facing to the lining is neater, but requires some thought in cutting the front lining pieces and I was feeling a bit lazy.

Also this very cheap, synthetic fabric ($2 bin at Spotlight) was horrid to sew, so I was glad I kept it simple.


But I had guessed right, she loves those flowers and wants another coat just like this one but with the flowers on the outside. Um, sorry darling, but no. I think I shall have to "lose" the remnants of that fabric.

She was very impressed that she didn't have to hold her sleeves when she put the coat on as the slippery arms don't make her sleeves go up. Clever mum hey?! Just don't tell her that people have used slippery linings for centuries, she thinks it's all my idea.


I wish I could play you the soundtrack to this photo shoot. We were at the zoo which is pretty much in the heart of the city, but there was no human noise at all, just the call of bellbirds all around.

Then we went off exploring and I got no more co-operative modelling, just chicken arms, which she finds hilarious! The game is I have to tray and snap a picture in between the chicken arms. I got two, just...


Wednesday, 3 June 2015

Me Made May - of a sorts

me-made-may'14
'I, Lightning McStitch of www.bartacksandsingletrack.blogspot.com, will forget to getting around to signing up as a participant of Me-Made-May '15. However, I will endeavour to wear something I've made each day for the duration of May 2015'

Do you know about Me Made May? If you're a sewing blog reader then of course you do. If you read the Guardian online then you probably do too. It's an individual challenge to use, wear and appreciate those things that you've made for yourself. Here's So Zo What Do You Know with the official introduction and the 650+ commenters who signed up properly.

I thought I'd make the effort to wear something I'd made every day and take notes of what gets worn, what doesn't and how not to create crap filler in my wardrobe. The idea of a photo each day didn't happen as the combination of bad light, bad hair days and bad or non existent photographers was all too much. Also, does the world need to know that I sometimes wear the exact same outfit two days in a row?! Some days I'd feel smashing only to see the phone photo and come plummeting back to earth. And that was not the idea at all!

So, on June 1st with the kids at kindy/school for the morning I put on everything I could recall wearing and took some photos for posterity...

Top row L to R:
1: SBCC Tonic2 in merino - got the sleeve length right on this one. great little winter top and it's brown, what can I say.
2: Lisette Continental skirt. Fabric is a DKNY cotton/linen tweed. Love this. Have fabric for another, must get around to making it.
3: Passport/Diplomat knit dress. Look at that unfortunate pattern placement! Aaargh. Still it's so easy to wear, and, you know, it's brown!
4: Carnaby cape. In this weather I could have just taken a photo of this cape every day for a month! Winter here folks!
5: Diplomat camel/settee dress. With a slip underneath it was OK to wear. Forcing a bit of rotation as this doesn't usually get worn.

2nd row L to R
1: Diplomat dress: A bit big and shapeless perhaps? very easy to wear though with tights and boots and that cape over the top!
2: Lisette Passport jacket: for warmer days when my forearms can bare to be exposed but not so warm I'd be inclined to take it off. The insides are horrid!
3: Girl Friday culottes. Some fit issues on my first ever pair of pants but they saw me through summer. Unblogged as my very elaborate blog post has never been finished...
4: Neptune tee: Not great but a black t-shirt is always useful

3rd row L to R
1: Thread Theory Lazo trousers: Pattern test - pattern yet to be released. Feel great to wear, hard to get a flattering photo so perhaps they actually do look awful. Need to work out pants fitting. Or just "work out" right?!
2: Woodland Stroll cape. When it's not a Carnaby cape day it's a Woodland Stroll cape day.
3: Japanese blouse. It's OK....
4: Modified Bento T: so comfortable and easy to wear.
5: SBCC Tonic2 modified to skivvy, merino. Perfect base layer. Sleeves a touch short on this one.

4th row L to R
1: Camas blouse. Bit big but slightly fancier than a t-shirt, so useful in it's own way.
2: Metro t-shirt with keyhole modification. LOVE this top. it's beautiful merino fleece, so warm, thick enough to hide bumps when worn and the sleeves are delightfully long!
3: SBCC Tonic2: Meant to be the same as the green one in the row above. Who sucks at laundry??? I do. Was worn during the month, washed many times until this last wash when it SHRUNK! the end for you little top!
4: Metro T-shirt in thick, snuggly cotton knit. Extreme snuggly comfort. LOVE this one too. the perfect long sleeve T-shirt pattern for me.
5: Coco. What can I say? Pattern kind of sucks, fabric is superb, very snuggly and comfy to wear with tights and boots.

So what did I learn?
I have a pretty darn conservative color palette, but I'm cool with that. You won't see me wearing pineapples (not that there's anything wrong with that!), so I have to remember not to get caught up with buying fabric that I'd never wear.

Tried and true t-shirt pattern are awesome. More Liesl and Co Metro T-shirts in my future. I'd like to lengthen one to a better fitting A -line knit dress.

Pants are hard. I have many pairs of pants that would fit me if only I got back to being a reasonable (for me) size. Maybe I need a month of exercising for every hour I spend sewing...

Obviously there are summery things I've made and liked that didn't get worn due to the weather. But there are some things that should have had their turn in this rotation and didn't. Either due to high maintenance fabric (if anyone can iron my Lotta skirt to make it presentable I'd love to know how) or just not being my style. Time perhaps to purge the wardrobe of some more things....

I really enjoyed seeing everyone else's daily photos. Including their use of "props", some of which indicated the day of the month and others just indicating they're cool with life (Inder!). Maybe next time I'll play along more socially, or perhaps we need a southern hemisphere summer version of Me Made Month.

Back to regular transmission soon with more kid's sewing and I'm working on an Oliver + S modification that I think will be great.... Stay tuned!

Saturday, 30 May 2015

Neat and Lovely Girl's Clothes - jacket "W"

As a birthday/mother's day gift to me I bought a couple of new Japanese pattern books and half a dozen of the Stitch Idees embroidery magazines from amazon.jp

There was a genuine need to make a washable, everyday jumper/jacket for A and I was taken with a couple of patterns from Neat and Lovely Girl's Clothes....
 
 
I have some lovely green wool that I bought way back when she was born which has always been intended for her first School Days coat, but has now been cut up to make a different coat altogether.
 
But first I wanted something a little more carefree than a wool coat. Spotlight was having a 30% off sale and so this "platinum fleece" was picked up quickly and cheaply and immediately sewn into this little jacket.
 
 
It's delightfully soft and fleecy on the inside, so I was happy enough to relax my fussy standards and not draft a lining. The jacket pattern has a facing, and the pattern instructions appeared to suggest a nice, contrasting fabric. I say "appeared to suggest" as I don't understand a word of Japanese and sew purely by referencing the wonderful diagrams and a bit of guess work.
 
For my facing and the undersides of the button tabs I chose a little leftover remnant of a pink/grey knit that I've now completely used up. It's cute that you just see it peeking out from under the pocket flaps too.
 
 
I confess I chose the pink as a bit of insurance that she would hopefully like the jacket. I wasn't sure that the olive/grey fleck would appeal, but happily she's completely sold on this one. Perhaps it helps that the little buttons came from a wonderful excursion into the backrooms of Buttonmania on a day when the warehouse was open. She could stick her hands into carton after carton of buttons and we collected a great number and paid for them by weight. A wonderful bargain! Luckily I happened to have picked out exactly six of these ones.
 
 
The buttons aren't functional and the jacket is closed with sew in snaps. I followed the pattern and hand sewed plastic snaps under the buttons on the left side (as worn), but it didn't look secure enough and was threatening to hang oddly, so I added a couple of snaps from my snapsetter which are hidden under the centre of each strap.
 
I wish I'd thought to use snapsetter snaps within the button tabs as I constructed the tabs 'cause they close much more easily and securely than the sew in type. Next time.


The collar looks a bit sticky-uppy in that photo, but it mostly lies very nicely due to being constructed of two different pattern pieces. Of course having to draft the jacket, facings, collar pieces, pockets and tabs and add seam allowances to the lot was a days work in itself. But I think the finish is really nice and looking at that sleeve length I won't have to trace the next size for a while!
 
I have become quite a fan of Yuki Araki's sewing patterns. I feel they have a level of tailoring and design that makes them much more finished and lovely than you might perceive or expect a Japanese sewing pattern to be. This book, Neat and Lovely Girl's Clothes was reviewed on Japanese Sewing Books blog and thankfully Yifarn has taken lots of photos of all the patterns. Go take a look, it's a book choc full of gorgeous patterns.
 
 
I don't often think about the cost or cost savings of making my kid's clothes. I just do it because I enjoy doing it. but when a little jacket like that can be made from about $8 worth of fleece, maybe $1 worth of buttons and some leftover bits then I feel pretty happy about my hobby!
 
And I'm pretty happy with my little model! She was totally into the idea of a photo shoot, has been regularly declaring that she loves everyone, that I'm the best mum in the whole wide world and is just generally being incredibly positive. I hate to wonder how long it will last, but hey, while she's declaring I'm the best mum I'm totally on board with her being the best daughter in the world!
 
 
Details: Jacket "W"
Neat and Lovely Girls Clothes by Yuki Araki (sizes 100-160cm)
Size: 110 (no alterations)
Fabric: Platinum fleece and cotton/lycra for facings


Friday, 22 May 2015

A Carnaby Cape for my mum

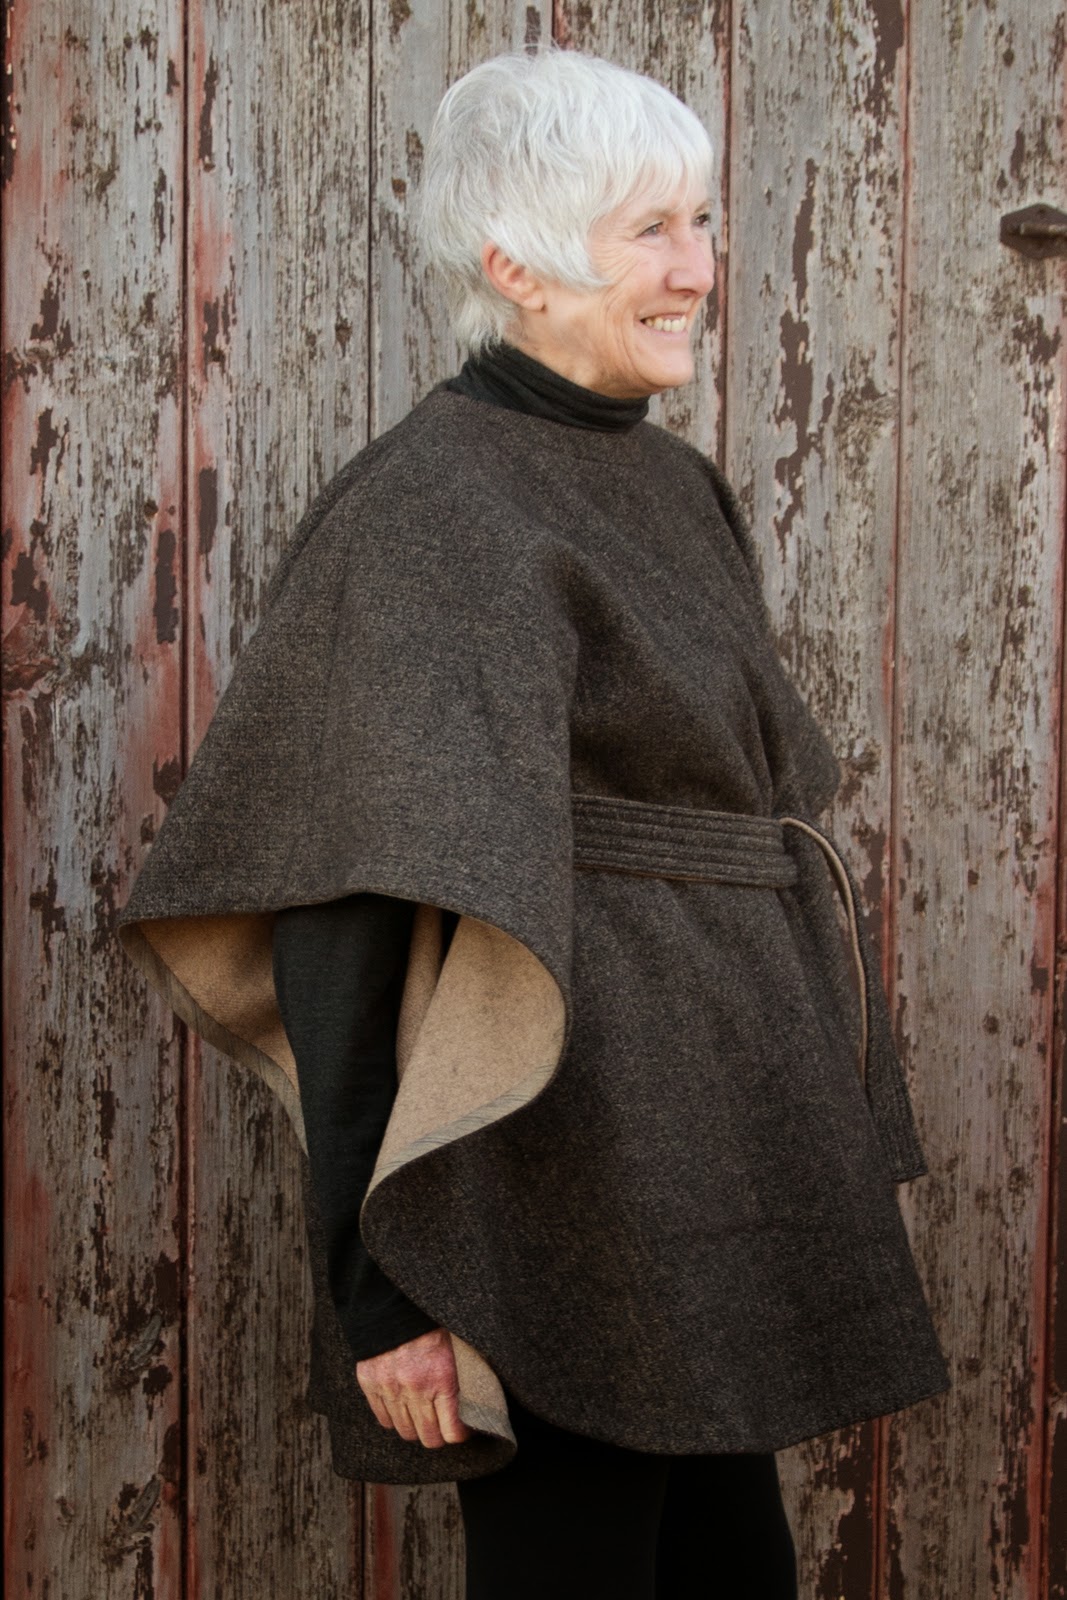
When I found this gorgeous double faced Italian wool coating fabric at The Fabric Store I knew it would be perfect for a Carnaby Cape.

But,... I already have one and so I bought some of the fabric ('cause it was half price!) and stashed it away for a mother's day gift. Well I was a little late due to all that cross stitch, but on the third Sunday in May my mum got her winter cape.

 
Against black clothes it's looking quite brown, but it's really a kind of charcoal grey/brown and the main side has a soft, cuddly face almost like a cotton fleece. The reverse side is a true camel colour and has a slight herringbone pattern to it. It's thick, warm and divine. The kids would happily have kept this fabric just for rolling themselves up in.

To show off the double sided nature of the fabric, the Carnaby Cape seemed the perfect choice.  However, I didn't get my fastidious approach to tasks as a gift from aliens. It was most certainly inherited. So, if I was going to sew for my mum it was going to have to be good enough and there'd need to be some alterations to the finishing of the cape.


Also, due to the two sided nature of the fabric it wouldn't allow for the hem to be left raw as per the pattern. It was going to need at least hemming in some way. I hunted through my stash to see if I had a suitable fabric and discovered that a pewter/bronze striped linen was perfect if I used the reverse side.

Then, with the childhood memory of the phrase "that's lovely Shelley, but it's not your best work is it?" ringing in my ears I set to work. (I'm having a bit of a laugh here as I never had any pressures as a child that weren't self inflicted, but then there were no prizes given out for half arsed efforts either)


So I finished the shoulder seams with bias binding....


.... and all around the front and back facings and button tab too. Don't ask me how, but both times I've made this cape I've managed to get the buttoning side reversed. It's meant to button on the right shoulder not the left. I cut the facings the wrong way up then have to imagine all the instructions in reverse. It would surely be easier to get it right from the start. For reference: Cut the already block fused facing pieces form the fabric right side up!

The buttons are actually the same decidedly brown buttons that I used for my cape (I'd bought 4 when I only needed 2) but when used upside down they are perfectly camel coloured.


The bound buttonholes really are lovely to sew. Knowing that the cape wouldn't be lined like my one is, I paid more attention to the insides and was careful not to use too large a piece of interfacing that would stick out beyond the welts. Again for reference; 6x8cm rectangles of interfacing are perfect.

To highlight the double sided fabric I cut the belt from two 10cm wide strips instead of 1x20cm wide strip. I folded each strips long edges to meet off centre. That way, when I put the two strips together I can offset the joins so that there isn't a weak spot or ditch in the centre of the belt.

By this point I was quite pleased with how the insides were looking, so of course I couldn't leave the edges of the bound buttonholes alone and have them ruin the show...


Yep, I bias bound the bound buttonholes!

I was apprehensive that stitching from the inside might result in some very wonky rectangles on the outside. But since the welts were nicely centred, when I stitched in the ditch to hold the bias binding in place it turned out to be as good a topstitch around the welts as if I'd done it from the cape's right side. Phew.

This wool is a bit heftier than mine and doesn't drape quite as softly. But hopefully, out in the country, in the middle of winter it will be an easy thing to thrown on to brave the cold outside.

And speaking of brave.... thanks to my mum for making her first modelling appearance on the blog. It's kind of a condition of receiving anything handmade that you have to wear it for a blog photoshoot.


She did a great job modelling, don't you think?

 I mean...

....She did a pretty good job. But not her best work ever.... :)


Thanks mum! Happy Mother's Day

Saturday, 16 May 2015

When I asked what he wanted for his birthday....

.... curiously he didn't answer "cross stitch".

But that's what he got!


Gift giving time is always tricky with this bloke. Ask him what he wants and he'll usually answer "world peace" or something equally Miss Universe worthy. The trick is to give him exactly what he really wanted but didn't yet realise he wanted!

....And what child of the 70's could resist a Galactica Space Invaders cross-stitched T-shirt?!


This idea came about when I was browsing Japanese Amazon for embroidery magazines after making this little shirt. I came across a book of cross stitch patterns for Pacman and other video games, but they were much more of the hand held console era, and when I showed them to Flipper he simply said "I'd prefer Galactica"

With those few words I had my mission.


Searching for ready made cross stitch patterns didn't yield any results. So, I grabbed a bit of graph paper, sat out on the back verandah in the sunshine with a sick kid who was home from daycare for the day and got drawing.

I downloaded an image off the 'net and created my own cross stitch pattern. There are 4 main variants of the enemy fleet and the active shooter is a bit different to the reserve fighters. In total there are 33 spaceships, a few bullets and a little Game Over tag on the back. Each ship is about 1 hour's work for me, so starting this a week out from his birthday meant that every spare minute and many late evenings were spent stitching!

 
Thankfully, my parents, who are evidently blog readers and pay attention, had bought me a thimble for my birthday (along with an autographed, no less, copy of Thimbles of Australia). My birthday is just a few days before Flipper's, so my last night of cross stitching was done with a happily thimble protected finger! (and the Giro d'Italia had started so I got to see Gerro take the first pink jersey while sewing until 2am))

After the birthday rolled around, and I'd caught up on some sleep, I decided to digitise my first ever cross stitch pattern and make it freely available to any other insane soul who feels the need for sharing some Free Downloadable Galactica Space Invaders Cross Stitch Pattern love!


The pattern is positioned to fit on an A4 page and still be legible, but the shooters and the Game Over tag should be repositioned from where they are on the page. I used DMC 14ct/inch soluble canvas and the finished fleet ends up about 24cm x13cm.


Details:
Pattern: Liesl & Co Metro t-shirt for men
Size XL - note to self: add about 2cm to sleeve length
Fabric: Stable cotton interlock with rayon jersey for neckband (due to lack of black ribbing)
Extras: Cross stitch pattern as above using DMC25 embroidery thread colour 169 - probably a bit thick and some of the detail is lost. Topstitching type thread may be better

Tuesday, 5 May 2015

We love Jean Paul Gaultier: Culottes for all!

 
If you live in Melbourne and went outdoors at all over last summer, you probably went to the exhibition The Fashion World of Jean Paul Gaultier at the NGV.
 
We did, of course! And can you guess how happy I was when P looked at the mannequin of Jean Paul himself and declared his outfit was cool....
 
 
Well, the Oliver + S Lunch Box Tee and Culottes pattern had just been released so I was all over this idea, and with that teeny bit of encouragement from the boy I was convinced it had to happen. I'm over on the Oliver + S blog today talking a little bit about boys wearing culottes. Here I'm just going to scatter some pictures around while I ramble on about the exhibition.
 
If you didn't get to see the exhibition then stick around, even if you're horrified by the idea of my son in culottes, for more pictures. You can also see the overview and themes of the exhibition at the NGV website by clicking the banner below 
 

The exhibition was an outstanding success for the gallery. On my first midweek visit in November it was nice and quiet, but returning on a weekend in January was bedlam!

Of course there were corsets

 
A great feature of Gaultier's work is his humour, that and a fair dose of sexuality. The kids were fascinated by entire body suits of stretch lace with beading and tiny beads perfectly sewn to represent pubic hair and nipples. Hilarious when you're 6! 


My 4 year old, however, was initially quite freaked out by the mannequins. While some had plain, blank faces. Quite a number of them had video projections of a model's face onto the mannequins blank, white face. Their eyes followed you around the room, they smiled or winked at you, or struck up a conversation with themselves in the mirror.


The intricacy in some of the work is breathtaking. A little beaded nipple might not seem too complex, but how about that cheetah "pelt" above?...

 
All beads!
 
That was one of the garments in a room full of appropriated cultural dress. The fact that almost every world culture was represented, somehow made the appropriation of their cultural costume seem cool rather than wrong!
 
 
I was smitten with some of the more wear-able dresses (wearable if you're Cate Blanchett or Kylie Minogue that is). The blue dress below is divine. The flowers are of the same jersey as the dress and "simply" twisted and stitched into place. Genius.
 
 
But P was definitely taken with the London punk look from the 1980's. I don't know if it was the denim, the tartan, the boots or the mohawks but he was loving it.


So I set out to find some tartan wool to match JPGs culottes as closely as possible. He already had the perfect mariniere top which my mother in law brought back from a Mediterranean cruise - as an aside, I really wish I'd photographed every t-shirt my kids have scored from her travels. Over the last 6 years there have been t-shirts from all over the world with Antarctica being the only continent not yet represented!
 
 
I found this fabric at Eliza fabrics. It was very cheap and very scratchy. I'd always imagined these would need to be lined anyway, so they were, and the look of surprise on his boyish face when his bare legs felt slippery lining fabric for the first time was priceless!
 
 
I cut the waistband in two pieces also so that the scratchy wool wouldn't be anywhere on the inside, and used some cotton for the inner waistband.


The other part of the exhibition that P was interested in was the graffiti art and some incredible big murals by RONE. I didn't get any pictures but there's a blurb here about his collaboration with the NGV.
 
We have some very impressive graffiti art near home (including my workplace building) but the local architect's wall is more subdued and was an appropriate colour scheme for our photo shoot.
 
 
To get the Lunch Box Culottes to be closer to the Gaultier silhouette I took out a lot of the flare of the leg. I dropped a vertical line down from underneath the pockets and of course, that allowed me to pattern match the tartan on the side seam too. I also pinched about an inch out of the width of the back pattern piece. They're a modified/narrowed size 6 with the length of the size 9.
 
 
So what does he think? Well, he loved them to bits until it came time to sit down to dinner. Then, even with the lining he said he could feel the itchiness on his legs. I suspect that may mean they get much less wear than he'd initially thought.
 
I had no expectation at all that he'd like them. I was delighted that he was so into the idea and I really like the look. Which is much more than can be said for Flipper. I suspect he's appalled but is trying not to say anything.
 
I love the idea that when you're young you can wear what feels good and makes you feel good. Doesn't mean he's getting a Mohawk any time soon though!
 

To see more of the exhibition and to hear Jean Paul talking about his work, there's a very charming interview by Virginia Trioli here. His story about his teddy and the invention of the conical bra has probably been told many, many times, but he still sounds enthusiastic and charming.
 
I love the fact that I've learned to sew, as a project like this one combines all my favourite things. A light hearted dig at the world of fashion with a knock off, an out there outfit for the kid, a chance to use another Oliver + S pattern and a family trip to the gallery for the inspiration.
 
 
I sew to amuse myself and I had a lot of fun with this one!
 
If you get a chance to see the Gaultier collection somewhere else in the world (I think it opens in Paris soon?..) then you should go. But I'm sure Melbourne put on the best exhibition!