Sunday, 6 November 2016

Metro Pacman Tee and a lesson in modelling

He can work it to the right,


... and work it to the left


Now, give us a bit more of the right...


...and again to the left...


Oh yeah baby, the camera loves you...


...and that's my cue to run away! :)

Pattern: Metro tee by Liesl & Co
Size:  XL, no mods
Fabric: Pacman print jersey from The Cloth Shop, Ivanhoe.
Spotters credit to @fabrictragic thanks!!

Wednesday, 2 November 2016

Have You Seen Karl Lately? .... In Melbourne


So who is this Karl? He's getting around a lot and seems to be very fond of spending time with women who sew!


Karl is the new pattern from Schneidernmeistern.

"Karl is a cozy, high collar, sweater dress in midi length. The unpretentious design creates a timeless look. Karl has a slightly oversized fit, a funnel neck and a side pocket."

Now, wrapping yourself in a handsome, cozy sweater dress should NOT be what we're all doing in Australia in spring. But, ever the hospitable city, Melbourne turned on the Karl weather and welcomed him with cold winds, squally rain showers and lit open fires. It is a perfect Karl spring!


Thinking the weather would warm up, I had no intention of sewing a snuggly, wool sweater dress for at least six months. But when Monika nicely asked for English speakers to proof-read her new pattern I couldn't help but put my hand up.

I sat on the couch one evening with my Korinthenkacker's pencil sharpened to a vicious point and set to work. There was very little required of the proof read as the instructions, while simple, are very good. A few decimal places that had grown tails (commas in numbers are very Euro and kinda weird!), a couple of typos and I was done.

It was cold, I knew I had a gorgeous remnant of wool jersey, and I had fallen under Karl's spell....


I haven't had a chance to look over the final pattern yet, but I suspect the sizing has changed  a bit as the size I "measured" at no longer exists. My measurements put me in the 48 (depressing, yes) but that seemed crazy to me (denial, you bet). I drafted the 42 down to the waist then out to the 48, but after sewing it up I took it in below the waist to make what is probably a straight 42.

Fitting it all on my remnant of fabric was a serious puzzle, Consequently my sleeves got no seam allowance added - yes you need to add seam allowances to the pattern. Hence the sleeves are probably closer to the size 38 or 40.


But as you can see, even with the major down sizing they're still plenty roomy. My fabric has a good 80%+ stretch and it is an insanely soft, cuddly wool that I picked up as a remnant at ClearIt. The stretch of the fabric is important as the funnel neck has a very neat and clever facing, but no opening. You need to be able to get your head through that hole folks! The sewing instructions set out how to calculate whether you will, or not. Ignore that at your peril!

I would have dearly loved to have been able to cut the sleeves so that the stripes matched across the body and sleeve better, but there was no way of dropping them lower on the fabric. I have added 2cm extra sleeve length, as a good cuddle from Karl would be ruined if his arms were too short!


I didn't think to get a good photo of my side seam and show off the stripe matching, but you know how fussy I am already, right?! :)

Karl is usually a bit taller than my version, aiming to be a midi length dress. Due to my fabric shortage I lost about 14cm length and so I guess I'm wearing Karl's shorter cousin.


For the next few days the Karl pattern is available to purchase at a 15% discount.

Shop for an English speaking Karl via the links below:
Makerist.com
Näh-Connection
Etsy
Kollabora

And check out www.schneidernmeistern.com for more Karlspiration

My contemplating-marxist-theory face perhaps?

Thursday, 27 October 2016

Giving Happiness

There's nothing nicer than making something for someone else, is there?


Especially when you know that even though you're making something you want to make, you're still likely to have a really appreciative recipient. That's why I love participating in the Secret Valentine Exchange (2014 giving and receiving, 2015 giving and receiving and 2016 posts)

I get such a warm, fuzzy feeling from that gift exchange that I'd always wanted to make something each for Sanae and Ute, the organisers. Previously I'd sent Ute a macrame necklace that she kindly modelled here, but before I could decide what to make for Sanae, she threw out an offer to make something for anyone who asked....

Sanae had talked on her blog, in multiple instalments, about working towards a debt free life. In the final chapter she was obviously feeling very generous as she offered a custom illustration for the first 50 respondents.


Embarrassingly, I failed to pay attention to the suggestion that the illustration might include an animal or an inspirational word, or a decorative motif etc. I fired off an instant, begging email request for a family of four bears on bicycles with the word "Together".

No sooner had I hit send than I realised by how much I'd overstepped the mark. I apologised in another email just moments later, but Sanae had already been captivated by the idea and promised she would fulfil my crazy request.


When my family of bears arrived in the post they were accompanied by a solo bicycling bear, another version of the bear family image without the script, and a kangaroo on a penny farthing! I can't describe how lovely these illustrations are...

and damn if I hadn't met my match when it came to overachieving! :)

The time for the Tour de France was approaching and I loved the idea of a handstitched project as a gift for Sanae. When @_measuretwice suggested a #tourdestitch sit in on Instagram I found a virtual companion and the motivation to start.

I knew a blue and white colour scheme would be on target and knew that she was a maker of, and therefore hopefully an appreciator of, cushion covers. A Japanese embroidery book showed this pattern repeat cross stitched onto a cushion front.

I limited myself to 14 inches square, and that took me past the finish line in Paris and into the "fourth week". But it was lovely to have a portable project that could go to lacrosse games, on the train to the city, to the pool and even into the emergency hospital when I was struck down with Ear Pox (not really, just a bog standard, misdiagnosed middle ear infection).


The cushion was backed in plain navy linen, and then the lovely Nicola of the Handmaker's Factory gave me a little sample of someone's shibori dyeing which I used to make my corded piping.


I lined the inside of the cushion cover with some mustard coloured cotton. There's no tutorial for making a piped, lined envelope cushion cover as I ballsed it up quite a few times, and by the time I got the insides on the inside and the cross stitch on the outside I'd lost track of how I had done it.

I felt a little bit guilty about posting an empty cushion cover, but the postage, had I left an insert in it, would have been crazy. I got a delightful email from Sanae today to say she'd received it and had recently bought herself, apropos of nothing, exactly that sized cushion insert. Happy coincidence, huh?!

A much better image of this illustration is here

I got some ridiculously expensive framing quotes for my little illustrations and in the end I did it myself. I bought one of those bevel edge board cutting tools (yes you want and need one too, I know), some matte board and these super cheap Ikea frames.

The illustrations are gathered at the entrance to our kitchen area and they make me smile every time I see them there. The kids have nominated who's who in the group image and P is thrilled that he's been depicted descending the mountain hands free!


There really is no nicer feeling than the one you get from giving. Making, creating, giving, receiving and communicating with someone you've never met - it just fills me up with that sense of absolute delight and crowds out every thought that isn't one of pure joy.

And I'm delighted to think that my handiwork is softening the seat of a chair somewhere and providing comfort to a bottom that may have had a hard day!


Friday, 21 October 2016

Lisette B6168 - musings on muslins

When I got my gorgeous See You At Six rayon from Maaidesign I knew what I wanted it to be, but I also knew I should make a muslin first...

I'd run out of calico, and to be honest I was kind of sick of making things up in calico, only to find it felt and behaved so differently to the final fabric. So I wisely (eye roll) chose a cotton from the fabric stash which would obviously feel and behave nothing like the rayon I was planning to use. Duh.

I decided to sew the dress "as is" only making some arbitrary length additions to the bodice and skirt.


Well, it turns out you need to be darn careful when you try and add length to the bodice of a cross over dress, 'cause the crossing over point will move! - and a certain tipping point, that of indecency, will probably be reached.

For this version I had added a good three centimetres to the bodice length. I took two of those away again for the final version. For the final version I also did my "standard" 1cm pinch out of the flat pattern at the front mid sleeve to get ride of that fabric puddle that I always get just above and to the outside of my bust.


I've tried tacking the bodice closed, but my verdict is that this muslin is not "wearable" at all.

I include it here only because it helps demonstrate how vastly different the same dress, in the same size, can be when made in a completely different fabric. This one is really quite fitted. More so than I'd want in a casual day dress. Yet, when I made the version in rayon it was loose - super loose.


What's with all that saggy fabric under the bust area? That sure didn't happen with the cotton... Obviously not, you say, but you probably know about these things. I'm still figuring this stuff out and amazingly I continue to be surprised by the outcome of most of what I sew. I say "amazingly" not because I should know what to expect by now, but because I am still surprised that I'm oblivious to how much I don't know.

So I was a bit shlumpy wearing this dress for my Maaidesign Blog Tour post, I knew it wasn't right and I decided I had to do something about the front in order to like it enough to wear it. I unpicked the front bodice/waistband seams and shortened the upper edge of the waistband by bringing it in on an angle where the front triangle meets the side parts of the waistband.

Then I fiddled with the crossover and the pleat depth to tighten up the bodice under the bust a bit. I stitched the bodice back onto the outer waistband piece then stitched in the ditch to catch the waistband facing on the inside. It was a much easier fix than I had anticipated.


In hindsight, what I should have done was gather the rayon rather than pleating it. The pleats look great in a cotton or linen, but pleating rayon (as I discovered with these nightmare-to-iron pants) is a mug's game.

Still, at least now it's a dress which feels ok, and while I struggled to photograph it in all the crazy wind we've had lately, it looks kind of ok too.


I think the short sleeve version (with a bit more sleeve width - they're narrow sleeves) with the corrected bodice length and anti-chest-puddle adjustment in a linen would be lovely. Maybe with the passing of time I'll go back for round three....

In the meantime, I've got a brief spiel on the Oliver + S blog about the tinkering with the sleeve length. Have you seen the Building Block Dress Book yet? It's a tinkerer's wet dream! Such a great sewing resource and one that's worth having even if you don't sew little girl's dresses. I can't wait to get stuck into my copy - and I may have 'accidentally' bought a second copy that I think should find a worthy home.... Watch this space!

Pattern: Lisette for Butterick B6168
Size: 16: alterations as described above and here
Fabric: printed cotton from The Fabric Store and See You At Six rayon

Sunday, 16 October 2016

Back to the boy - Zonen 09 fabric love

Once I'd sewn up the boy's School Concert outfit and saw again what a gorgeous, appreciative little clothes horse he is, I couldn't help myself.... I went on a cutting rampage and cut out a shirt, another t-shirt, more jeans and a pullover. All for him!
 

The second pair of jeans and the pullover are yet to be photographed, but it made sense to start with the shirt and t-shirt as both fabrics are by Zonen09 via  the Maaidesign shop.


The t-shirt fabric is a knit panel called Cool Flakes in the Rust colourway. Out of a single panel it's easy to cut a kids t-shirt and there's enough left over to do the front panel of another t-shirt and colour block the rest. With a long torso-ed bloke like Flipper I don't think an adult t-shirt would be possible from one panel. Perhaps a raglan, but definitely not a regular tee. Shorter guys will get more mileage from their yardage!


It's a lovely quality cotton lycra and was very pleasant to sew with. The pattern is the Oliver + S School Bus Tee in a straight size 8, same as the recent white one. This time I used the same fabric for the neckband, for lack of a matching ribbing,  and it behaved perfectly.


The shirt fabric is also a Zonen09 fabric and I LOVE it. I bought it a while ago intending to make P a long sleeved shirt but kept putting it off. I'm glad I did 'cause over time the idea came to me to add welt pockets, split the collar, cuffs and plackets and use some contrast fabrics. Overdo it, that is, but hey, it worked!


The fabric is called Stickly Rockers and what looks like little squiggles from a distance are bugs up close!


It's a lovely blue that is really hard to get to look right on the computer screen, and is obviously not any kind of "normal" blue as it was also really hard to find a good co-ordinating thread to sew with!

The aqua mini check fabric is something I picked up locally and really cheaply, ages ago and have never known what to do with. It looks too much like school uniform fabric to be much use on it's own but I love it here. This is the kind of colour mis-matching that I never think to do but love it when I see others do it.


The pattern is essentially the Oliver + S Sketchbook Shirt with some modifications. I made a size 8 adding only 1" extra length to the body. It is a short style and I knew it didn't need to look like a formal shirt, or ever be tucked in. The sleeves didn't require any extra length (surprise!) but of course at the rate he grows it won't be a long term proposition!

The most obvious change is the addition of welt pockets. I just copied the pockets straight across from the Art Museum vest. For next time (ha, like I ever refer back to my own blog) I'd move them slightly in from the shirt pattern's pocket markings. Also, the pocket bags can be visible if he wears the shirt open so maybe it's better for a more formal shirt which will always be buttoned up.


I cut the sleeve cuff and front placket pattern pieces in half, then added seam allowance on so that I could have my contrast fabric on the inner cuff and inner placket.

I also decided to split the collar so that I could have a two-piece collar and get the contrast fabric snuck in for the collar stand. I know that deserves more of an explanation but I can't show you, and I can't explain why I can't show you (nudge nudge, wink wink).


A bit of corded piping across the back yoke seam.


This was a really fun shirt to sew. The shirt pattern's instructions are great, and all my tweaks worked nicely without any headaches or unpicking. I love how it looks with his Burda 9406 jeans, but it also looks great with a pair of Art Museum trousers (one year on and they still fit really well). I need to take this boy out to the theatre more often before he outgrows his one "good shirt".

Details:
T-Shirt:
fabric: Zonen09 Cool Flakes Rust panel from Maaidesign (link)
pattern: Oliver + S School Bus T-shirt, size 8
Shirt:
fabric: Zonen09 Stickly Rocker blue from Maaidesign (on sale now! click here)
pattern: Oliver + S Sketchbook Shirt. Size 8 +1" torso length. Addition of Art Museum welt pockets. Split collar, cuffs and placket


Wednesday, 12 October 2016

Sofilantjes Down Under Blog Tour


Hello, and welcome to spring downunder. - I know, it's still freezing in Melbourne, and all those blossoms have been blasted off the trees by howling wind, but for the sake of the northern hemisphere audience, it's all sunshine and fresh air, right?!

I'm joining a blog tour today to introduce a Dutch pattern company: Sofilantjes Patterns


I'll confess to being very out of touch with who's who in the indie pattern designer world, so I hadn't heard of Sofilantjes until an email arrived inviting me to participate. A browse of their webshop showed a pleasing array of patterns and quite a number that I could happily have chosen to make for the (hopefully) upcoming warm weather.


Since that upcoming warm weather isn't here yet, I picked my summer-y dress pattern but then chose another pattern as well! I knew A would adore the Amare dress, and it appeared to be perfectly matched to the Aura Bolero. (you can get them as a bundle with the discount code at the end!)

Before we go any further I need to mention my fabric choice, as it did change the dress slightly, and that necessitates a little diversion into geography. :) ...'Lest anyone think I'm confusing my flatlanders!
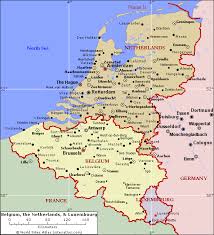
The fabric is a panel from Bambiblauw via the Maaidesign shop. They're Belgian, and Sofilantjes are Dutch, ... well that is, they're from the Netherlands. The distinction being necessary as there are Belgians who speak Dutch too....
I think,... but sometimes they call it Flemish....
There is no such place as Flemland (no matter how funny your dad thought it would be to teach you there was)...
Ok, the clogs and the orange football crowds are certainly from the Netherlands....
The Belgians are the ones who either sound French or sound just like the Dutch but have a flag that looks awfully like the German flag....
It's entirely arguable who makes the better beer or chocolate and I'm guessing they both prefer mayonnaise on their chips to tomato sauce....
If it helps to think in UCI ProTour* terms (this is meant to be a sewing and cycling blog afterall), and it does for me; the Netherlands is the home of Sofilantjes Patterns and the Amstel Gold Race. Belgium on the other hand produces these gorgeous fabric panels, and hosts Gent-Wevelgem, Tour of Flanders, La Fleche Wallonne and Liege-Bastogne-Liege

* The UCI, of course, being run by the Swiss :) .... in French....

Clear?


All of that to say that my panel limited the skirt width and forced me to change up the pattern a bit. The resulting skirt is only about 70% of the intended width. In hindsight I can see a way I could have cut it, and gained width, but would have ended up with two side seams.

I omitted the centre back seam of the skirt to use the full panel width, which required making a keyhole facing where normally there would be a short section of open seam. The way the pattern does it is much simpler and this would certainly be a pattern that most would find quite quick and fairly easy to sew.


I chose the size based on A's measurements and made no adjustments other than adding some skirt length, just to make full use of the border print (and sewed a hem facing for the same reason). As you can see, the fit is lovely.
There is an option for making a cute little peplum style top rather than the dress, or for having a tying bow in the back rather than the belt bow at the front.


The Aura Bolero is the perfect complement to the Amare dress as the bodice lengths suit each other so well. I chose the same size for the bolero as the dress and made no changes. Loving that sleeve length!


There are options for either a gathered or pleated sleeve head. I had to make the pleat a little shallower than the pattern indicated as otherwise there was not enough fullness in the sleeve cap. I'm no fan of a poofy sleeve but think it could do with a little more than even this. Otherwise the shape of the bolero is delightful  and it has instantly become her favourite long sleeved top to throw on over a dress.


In fact, she was so delighted with this outfit that there wasn't a moment's hesitation when I suggested getting changed and ducking out for a quick photoshoot. These pictures were taken in a brief 5 minute interval between rain showers, and a "lesser" outfit may never have been photographed at all!


Now, the poor folk at Sofilantjes probably hadn't read my blog or heard of my nitpicking tendencies, and I'm fully prepared to never be invited on a blog tour again, but I did find the patterns I used to be a bit "raw". When I'd finished sewing I went back through it all to work out where I'd lost some joy along the way. Admittedly there were mistakes that were very much my own, in misreading the cutting layouts for example, but there were also a few wayward illustrations or instructions as well as some typographical errors.

I  was sidetracked by my own grouchiness into an internal monologue about pattern testing and promoting. I won't bore you with it all here, but I think if asked to test a pattern, we owe it to the designer to really test it. Pore over every pattern marking and every bit of punctuation, and make the pattern better through your testing. Likewise we owe it to other sewists to review finished patterns fairly and honestly.


And honestly, these patterns are quite good. They're not perfect, but they are good. They were easy to print and assemble, with the option of layered printing for sizes, and saving on paper where a pattern piece could be cut from a measurement. I appreciated the mix of line drawing illustrations and clear photographs for the instructions. The neatest bit of the instructions was an inclusion at the end of a summary in written steps and a summary in diagrams. Either or both of which could be printed to have at the sewing table and save refreshing the computer screen to view each sewing step.


Mostly what impressed me was the range of patterns available and some of the quite lovely designs. You can check out more of what's being made around Australia and New Zealand using Sofilantjes Patterns by following the blog tour links below

Monday Idle sunshine
Tuesday Horris And Deedle
Wednesday Little Cumquat, Bartacks and Singletrack
Thursday Tea, Dust and Stitches, Brave Fabrics
Friday While She was Sleeping, Mend and Make New


Or, hit up the rafflecopter widget below for a chance to win one and try it out for yourself - I suspect if you visit each blog there are multiple rafflecopters to enter, so click around and up your chances!

a Rafflecopter giveaway

There's also a discount code that you can use at the Sofilantjes Shop to get 15% off all summer patterns from now until the 16th of October. You could even bundle the Aura Bolero with a summery dress and apply the discount code to both.

Discount code for 15% off: DOWNUNDER

Thanks to Sofilantjes for reaching out to me and inviting me to join them. Now, feel free to call me whatever the dutch version of a Korinthenkacker is - sledging is like a national past-time downunder, and I love a bit of word trivia to boot!


Details:
Patterns: Sofilantjes Amare dress and Aura Bolero*
Fabrics: dress: Bambiblauw cornflower woven panel and turquoise quilting cotton.
              bolero: Ponte knit
Notions: 4 buttons for dress and 1 feature button for bolero.
Size: 5
Alterations: dress: Added skirt length (about 5cm), reduced skirt width (by about 30%). Centre back keyhole skirt opening. Hem facing (turquoise quilting cotton)
                    bolero: essentially none.
* the patterns were gifted to me in exchange for participation in the blog tour.