Thursday 30 October 2014

Straw Boater Project: Cruising at a very ambitious altitude.

Tuesday of this week was Italian Day at P's school. We were told there would be Mt Vesuvius volcano experiments, drawing Michelangelo style while lying on your back under the classroom table, playing calcio, and eating; bruschetta, pasta, tiramisu and gelati....

And, of course, there was a need to dress up. I was really mindful (for about 5 minutes) of not taking over and getting over excited about my his first school costume. We talked about what P wanted to wear and searched for some images. Turned out we had almost everything we needed for a gondolier...

Everything that is except the hat. You already know what I did about that, right?!


I'd never made a straw hat before, but I figured a boater would have to be the easiest to start with. It's all right angles and I imagined I would make the three sections and then join them together. Sounded simple in my head.

I discovered Torb and Reiner and gave them a call. No, I've never done this before. No, I don't have time to drive across town for a lesson or to buy a hat block. No, I have no idea what I need or how much of it...

To her credit, Nina, who took my call, was probably not used to this kind of brazen ambition from a complete novice. But I was coming off the back of my first-ever-beading-project-blue-ribbon and in my head I could imagine what I was going to do. She packaged up 10metres of 10mm wide wheat braid and some red grosgrain ribbon and sent it to me express post for next day delivery.

Of course, I foolishly sat on it for 48 hours while finishing my Kid's Clothes Week sewing, and then began the weekend of the Straw Boater Project.


I made a cardboard "hat" for P so that I would have the correct size and the approximate depth of the crown then started stitching....

The advice that I had from Nina was that the straw braid could be brittle and I needed to wet it to shape it. The bit that I figured out for myself was that the best way to prevent those F^*%ng twisty knots in the thread was to run the lengths along a tealight candle in order to wax them. It didn't entirely prevent the knots and there was a fair bit of tugging knots through, some occasionally successful unpicking of knots, and plenty of language of which a genteel boater wearer would not approve.

I realised, perhaps a bit too late, that the lid should not be perfectly round, so started overlapping the braid at the sides more to give it an oval shape. I kept going round and round until the lid was the same size as my green cardboard hat.


The crown was probably the easiest part. Using the green hat as a size guide I pegged out the first round and then stitched until it was deep enough. While the kids rode their bikes at the skate park on Sunday, I sewed. The lid went on top and was stitched in place, at which point it looked a lot like I should be steaming dumplings in it. As an aside, this project was probably the most pleasant smelling thing I've ever sewn. I must have been a horse or a goat in another life!


By the time I was ready to start the brim it was Monday afternoon and the kids were going to swimming. In order to sew the brim without having to hold the crown, I marked the outline of the crown on paper and then pinned the braid to the markings to begin my brim. Once I had the first stitches in place it became fixed in diameter and portable. I sewed furiously while they swam. It was the best location of the weekend as a quick dunk in the pool was all the wheat braid needed to stay supple.


Finally, a very late night stint lasting well into Tuesday morning had the brim attached, the Petersham ribbon sewn in (that's the bit where I wished I owned a thimble) and the ribbon on the outside.

In what must be a glorious hatters version of a hole in one, Nina's estimate of 10m of braid was EXACTLY what was required. There was not even a centimetre to trim off and nothing was missing for lack of more straw. She obviously really knows her stuff! As she had every reason to doubt that I did, she had sent about 3m extra for free just in case. There might come a time when I've forgotten just how much work this was and end up making a miniature one for P's teddy.


Thank you so much to everyone who followed my progress on Flickr or Facebook. Your encouragement was everything to me. It was a long, long weekend and I honestly may have lost the plot if not for the "ping" of my phone telling me that someone else "got" what I was doing.

You'd be horrified if you knew this kid's history with losing school hats. His track record is appalling. I'm delighted to say, that after seeing his mum toil all weekend, he was very mindful that if the hat didn't come home, neither should he. It did. He had a great day.

Ciao!

Tuesday 28 October 2014

Another Metro T Mod

This is going to be a quick-ish blog post as it's after 3am (but the hat is finished - yay!!!)

I've started a regular gig on the Oliver + S blog, doing what I love to do, which is fiddling with their patterns!

 
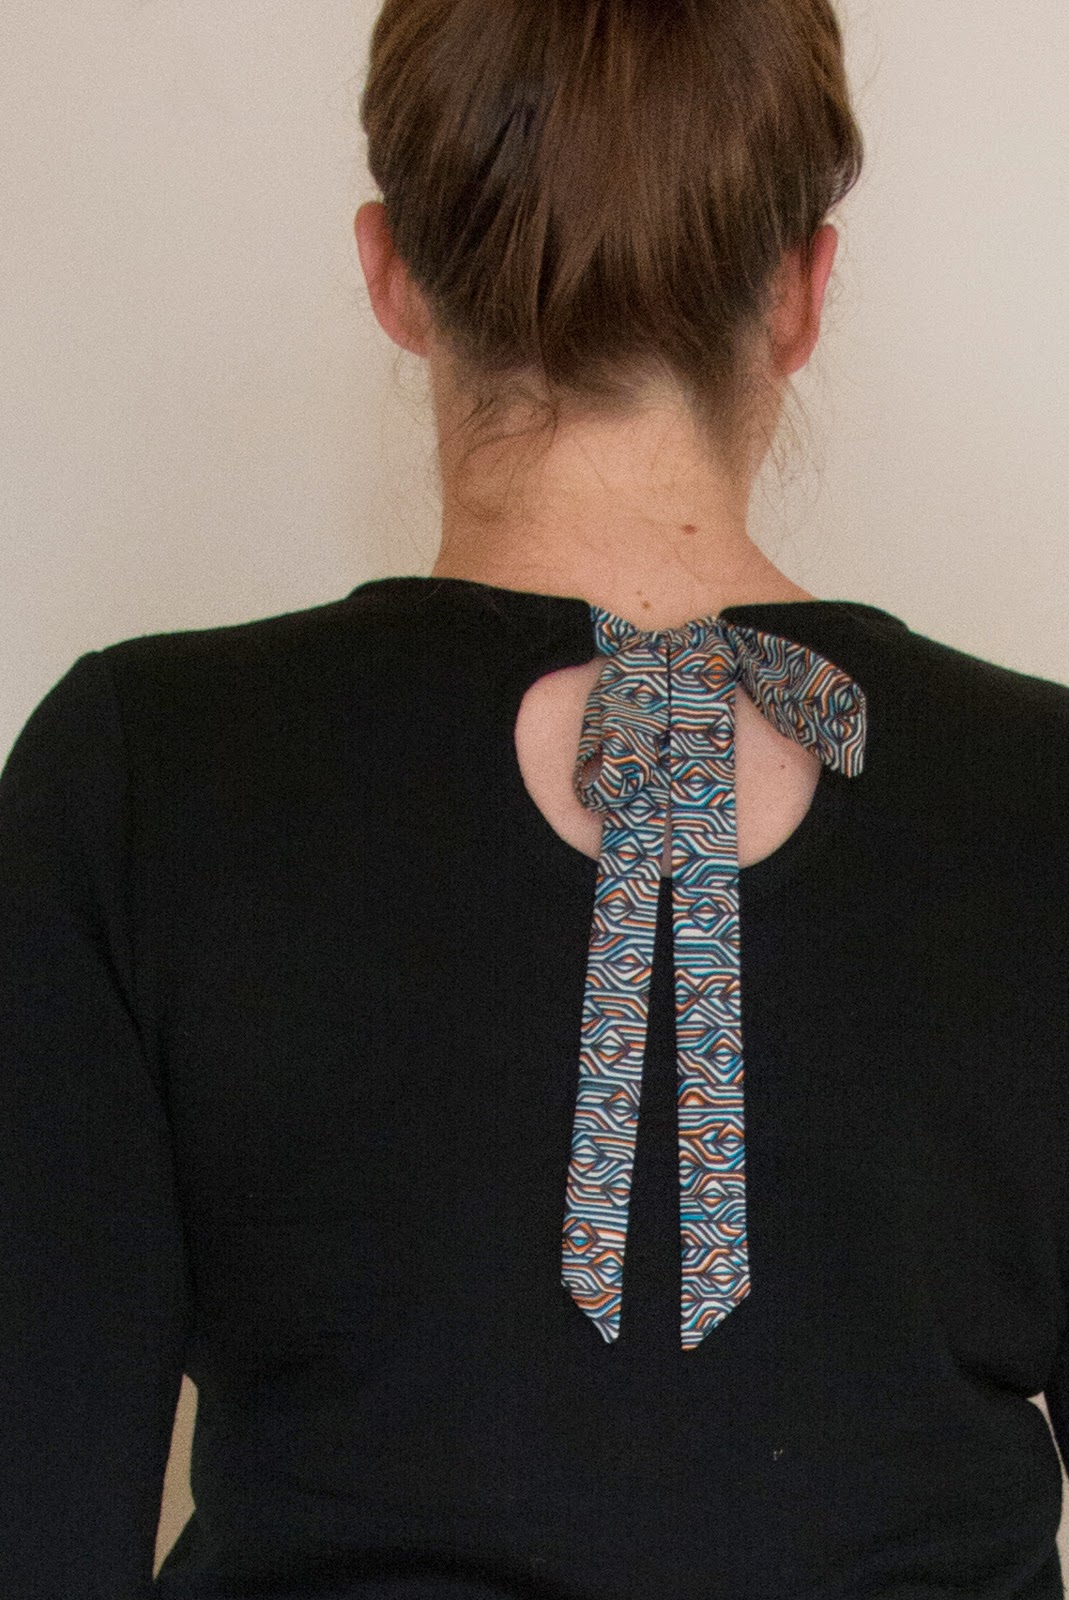
I made another Metro T-shirt with the keyhole modification at the back....
 
 
The front looks like any long sleeve black t-shirt (which, in my city, you simply cannot have enough of!)
 
But at the back, there's my first ever bit of Liberty of London Tana Lawn. A whole 10cm (or $5) purchase. Decadent, huh?


Actually, the luxurious part is that I finally bought some of the gorgeous merino fleece from The Fabric Store for myself. Seemed only fair when A had her Red Peplum and her Pixcell Deer sweater and I had none...

 
With a fabric like this, with less stretch than you'd need for a normal neckband, the keyhole is a practical necessity as well as looking kinda nice.
 
There's a tutorial over at the Oliver + S blog showing how I did it. The trickiest part was photographing a tute using black fabric when you only get to sew after dark. I didn't think about that part...
 
I'll be back soon with some photos of my straw boater. I am absolutely delighted with it! (and I really, really need to buy a thimble)

Sunday 26 October 2014

KCW: Once Upon A Time...

Once upon a time, there was a little girl....


whose mother sewed her a dress using Liberty of London Carnaby jersey knit,


and she lived happily ever after.


The End.

Pattern: Make It Perfect Little Joey
Size 4 - no modifications
Fabric: Liberty Of London Carnaby jersey and navy ribbing

The other KCW news is a secret polo shirt for P that I can't share fully yet...


and a completely insane work in progress.....


Does anyone else do this kind of thing? Tuesday is Italian day at P's school. We have everything we need for a great Venetian gondolier costume, except the straw boater hat.

I'm here to tell you that you can buy a fedora, a trilby, a cowboy hat, all sorts of hats for kids. But not straw boaters. So I'm making one. Never done it before, but that kind of thing doesn't stop me! Follow my progress on Facebook or Flickr. It's one enormous task!

Wednesday 22 October 2014

KCW: Knight Hoodie

When there's a million other things to do, and then Kid's Clothes Week rolls around, that there is the perfect excuse to stop and sew!

I'm working on one or two things which I may not be able to show you before the week is out, so I thought it was the perfect time to share something I'd made earlier.


 I fell hard for this pattern when I saw Sophie sew it up during a KCW past, and I knew P would adore it. It's costume-y enough that grown ups can't help but smile when they see it, yet a 6 year old thinks it's perfect as an everyday hoodie.


I found a lovely, soft sweater fleece and then just happened to have exactly the right dark grey ribbing from when I stocked up on ribbings from the Ottobre Etsy shop. The 2x2 ribbing is the perfect weight for a jacket or pullover. The buttons and metallic silver (plastic) zip were an easy find from Spotlight.


The Charming Doodle pattern comes as a PDF which tiles together nicely and is well illustrated with clear instructions. I'm a stickler for finishes so I was a bit baffled to find no mention of finishing any seams. I know knits don't fray but it just doesn't feel right to leave them alone.

I sewed the hoodie on the sewing machine, but finished all seam allowances with the overlocker. The only spot this was slightly tricky was the hood seam where the armour is. Tricky, but still worth doing, especially as when the hood is down this seam will be somewhat visible.


The other part that had me wondering if I should deviate from the pattern was the lack of any facing or zipper shield. As I was sewing I was thinking that the quality of the finish was definitely going to fall into the category of "costume". I really needn't have worried as it doesn't look bad at all. There is now a teen and adult sized pattern and I'm pleased to see that a zipper and hood facing is used to finish the front.


Obviously, P loves it. I sewed a straight size 6 and the fit is perfect. Leaving off all the armour, this could also be a great pattern for an everyday windproof fleece hoodie. The muffler style raised front collar would be ideal for cold, winter walks to school.
 
But with the armour, I guess it's a little bit on theme with Kid's Clothes Week storybook theme...

kid's clothes week

I'm amazed, and a little disappointed, that I haven't found the time to really embrace the theme for this season. I am nuts for books, and adore throwing some literary references into my sewing. I've had plenty of ideas and really enjoyed imagining some book themed clothes. They just aren't going to get made this week.
 
Perhaps the best thing about the Knight Hoodie is this: Even a bit-of-a-hippie mum who won't normally buy any weapon toys is prepared to bend the rules when it comes to a blogpost featuring the Knight Hoodie. It's just too much fun not to co-ordinate with a sword!


Tuesday 14 October 2014

The blog post where we all got lucky....

I don't usually rate my chances when it comes to blog giveaways. I don't use Facebook enough, or instagram at all, in order to do the rafflecopter ones to any great degree. But when the entry is just by leaving a comment, and I wanted to comment anyway, then I'm in. Plus, there's no way of NOT commenting when it's Supergail sewing an Oliver + S pattern in some gorgeous fabric.

The short of it; courtesy of Chio at Llama Fabrics I won 3 yards of fabric of my choice. I'd pretty much sworn off quilting cottons, but I'd heard only great things about the Art Gallery line of cottons.

I very quickly received an email from Chio, and when she didn't seem horrified at having to post to Australia, let me package up my 3 yards however I liked, and posted them so promptly, I thought I'd better make something right away!


This first Art Gallery fabric is Wild Beauty (in Saffron) by Pat Bravo. The pattern (of course) is the Oliver + S Garden Party dress, size 3 with size 4 length at the hem. The only change I made was to add piping to the yoke and waistbands. I just happened to have some teal green batiste that matched nicely.
 
 
I already had a very similar looking pattern to this one in a Japanese sewing book, so I thought long and hard about purchasing this one. That was a waste of brain time. As always, an Oliver + S pattern is worth owning. It's lovely to sew, the instructions are very clever and perfectly written and the result is a really nicely shaped party dress. I'll be curious to sew the Japanese pattern for comparison one day (only I have to add seam allowances to that one. Boring).


We found the perfect little button for the back. I might be alone in saying this, but I really like thread chains. It's a series of hand ties that I do in surgery all the time, so the technique is familiar and I'm pretty quick at it. They look really sweet and delicate. Although, looking at that picture I probably should have started at finished at the same point. Next time...
 
And now for my Wild Beauty modelling her dress.... We got pictures of empty space where she had been, pictures of her tongue sticking out, her legs in the air. It's not easy as you probably know! (right, Tara?)
 
 
The fit turned out to be perfect. I'm glad I chose a bit extra length as I've just had to retire quite a few dresses that were getting indecently short. As I was sewing it looked as if the bodice might be too big but it's just right for a bit (or a lot) of movement yet not looking shapeless or boxy.
 
 
And yes, the Art Gallery fabrics are very nice to sew. The wind is making it look stiff in that picture, but the fabric really does drape nicely and is much more like an apparel cotton than many quilting cottons (which shall remain in the stash until I work out what to do with them!). If you're ready for some pretty sewing, go check out the fabrics, there were so many I liked I really struggled with picking just one.
 
I didn't only pick one though... I figured with a yard and a half each, both kids could have something new.
 
 
For P, I chose Spirodraft (in Carbon) by Katarina Roccella. The pattern is NOT the Sketchbook shirt, surprised right? This time I did do a comparison with a very similar pattern from a Japanese sewing book. This is "boy's shirt" from Happy Homemade Vol II. I have the earlier English translated version. You may now find the same book referred to as Sew Chic Kids.
 
Here's a little sanity test for you: look at the picture below and imagine cutting a clothing pattern from the fabric...
 
 
If you thought "ooh, that looks like a fun challenge", then you too are f'ing nuts. We should be friends! :)
 
The layout and cutting was definitely most of the work (oh, and the pattern tracing and having to add seam allowances). When it came to the sewing, the diagrams and instructions were sufficient (and that's as much as you should expect from Japanese patterns). The instructions suggested hand basting the inner yoke at the shoulders then topstitching. I avoid functional hand sewing at all costs (decorative and pointless, sure I'll go there), so I did pull out the Sketchbook pattern after all and use the yoke instructions from that.
 

Otherwise the only difference in the shirts seemed to be the collar. This one has a separate collar stand and a more generous shape to the front collar. It was my first time sewing a two piece collar and I really like it. I didn't get any modelled photos but this straight Size 6 fits P perfectly and is a touch longer than the Sketchbook. This one could be the go to boy's shirt pattern for the next little while.
 

I found these perfect grey buttons with a tiny splash of blue, and while I didn't get a clear photo of it, the bottom most buttonhole is sewn in matching blue thread. Remembering to do little "pro" things like that makes me ridiculously happy.
 
Thanks again to Llama Fabrics and Probably Actually.


Tuesday 7 October 2014

A simple skirt, some exciting news and a dress to give away....

Sometimes you just want to sew something quick and simple, that's guaranteed to get worn:


A simple tiered skirt from this book in size 90cm. It was to replace a hand-me-down pink tiered knit skirt that she'd been given by a relative and that had become obscenely short.

The pattern is written for a woven fabric, but I'd seen Lucinda do a very similar skirt in knit. Hers is from Happy Homemade Vol II and my vague memory allowed me to think I was making the same skirt. Looks like I need to make another!

The pattern is just a series of rectangles, so no tracing needed, and it's a pretty easy sew. Plus, if you're nervous about hemming knits, how cool would this look if it was made from a few different leftover t-shirts.

It is getting regular wear, I just have some model compliance issues that need sorting. :)

On to the happy news:


I decided to enter the Red Deer Pullover (that wasn't getting any wear) in The Melbourne Show, and it won first place in the Novice Sewn Garment category!  I figured it was OK to enter the novice category as I've not been sewing knits for more than 2 years, or using the overlocker for more than a year and I'd never sewn a bead before in my life.

It's quite fun having something hanging at the show. I've always loved looking at the Arts & Crafts section (the decorated cakes are insanely good) and I think I'll continue to put something in, even though now I'll have to be in the Open category and that's where the ladies-who-can-smock (said with a trembling voice) reside. Given that we're heading into warmer weather, this may never get worn before it's outgrown, but A was especially proud of seeing it at the show and was very happy to "visit" her jumper.

And so, to other things that have been outgrown. Some were loved and worn, some were hardly touched. All are in still in good working order, nice and unstained. Over on the Oliver + S forum there's a little giveaway thread started up. I've scored a beautiful ombre dotty Fairy Tale dress (on it's way in the post) and so it's my turn to clear out the cupboards. Go check out the thread as I've listed a few things there.

But here, I'm offering up a dress from the same book as the skirt I started the blog post with. It also happens to be the first garment that was shown on this blog!:


The size is 90cm and while it still fits A through the shoulders the skirt has become awkwardly short on her. In the photo above she had just turned three. Six months later she's fairly tall for her age, so I'd guess it would fit a shorter 3+ year old, or very comfortably fit a two to three year old.

Just leave a comment below if you'd like it, or, if you're an Oliver + S devotee, have a look at the other garments up for grabs over there.

Thursday 2 October 2014

Green Banyan Jeans

Since it's been school holidays and P has been conscientiously NOT wearing navy pants, it became apparent he had almost no other pants that still fit.

It turns out I've sewn six pairs of navy pants and four pairs of navy shorts and no other bottoms for him all year. Time to rectify that and revisit (first pair here) the Figgy's Banyan Pants


I'd liked the baggy up top jodhphur-esque fit of the Banyan's, although I'm not as convinced that denim is the right fabric. The pattern is begging to be sewn in linen I think.

Anyway, green denim was at hand, and my current way of thinking is that denim always needs topstitching to look right. So I went a bit mental....


I used a bronze-y coloured shiny thread leftover from this dress and a more subtle mushroomy grey thread which you can just see on the pockets and as a little detail around the fly and between the pleats on one side.


I used two strands of thread to get enough visibility and I think it's a nice balance of subtle colours with a bit of detailing to make 'em look pro.


For more oomph on the back pockets I used that stitch on the sewing machine that goes forwards and backwards over the same stitch a few times.

I love playing around with back pockets. It seems that as long as they're symmetrical then any pattern can look good. I need to start a little gallery for myself (should probably use that Pinterest thingy) to remember pocket patterns that I've seen that I want to copy. Just need to work out how to subtly photograph people's butts.


For these non school issue pants I used the little clothing label that came with the pattern (love that).


It's a curious mix of jeans sewing with a naval shore leave kind of pattern vibe. He loves them


And how cute is the top that my mother in law brought back from a recent Mediterranean cruise?! My kids wardrobes are now almost entirely sewn by me with the exception of the T-shirts from around the world. On any given day the kids could be wearing a T-shirt from Madagascar or Syria or Canada... I really wish I'd started a checklist of countries at the beginning!


I'm pleased to say that second time around the zip fly was a breeze. I think I came to zipper sewing from the wrong end. The first zipper I ever installed was an invisible zip and so I thought it was all about sewing as close as possible to the zipper teeth. Turns out with fly zips a more casual and less uptight approach works best.

Just the way these laid back pants like to rock too.


Back to school next week and I'll miss the colour this kid brings to my day. He's good fun to have around.