Saturday 29 June 2013

The machines are silent

It's been over a week now that the sewing machine has been silently packed away. The house has rocked instead to the sounds of a family of four all coughing, retching, snivelling and nose blowing in concert.

I took the big hit, going down with flu, to resurface after about 3 days and crawl into town for a conference I was booked to attend. The subject matter: Cardiorespiratory medicine. I don't know if they appreciated me providing the soundtrack or not. If I wasn't asleep under my coat curled up in the foyer I was barking like a consumptive seal. Play that over on a four day repeat, and there was the week gone.

Meanwhile, I've been wandering around my neighbourhood running errands in a flu fug, but still managed to notice some really cool quirks of where I live.

Firstly a shop called  Vo-Le which, from the street, I'd never been sure whether it was a sewing machine supplies shop with some old signs for a previous Table Tennis shop or vice versa.

It turns out to be both! So whether I need cones of coloured cotton for the overlocker in just the right shade of purple, or a bat that will give me a killer, backhand ping pong serve I now know exactly where to go!

Another shop that I had the rare opportunity of going into (it's only open on two days of the week and I normally work on both of those days) is a second hand Japanese book shop. Less obvious a shop for this area than the home machinist ping pong playing Vietnamese shop, but here's a little Japanese shop with the promise of some sewing books perhaps... (can you read a word of Japanese? me neither)

Anyway I found this:

Which looks to me like a Japanese cross stitch magazine. I don't really do much hand sewing but I quite like the idea, and flipping through the pages of this book I'm starting to love the idea.
 

Luckily there are nice illustrations for each handmade lovely-thing and there's even a page with the basic stitches demonstrated and named, both in English and Japanese. The Japanese naming helps as then in the pattern instructions the same characters are shown to indicate where to use each stitch. I think it's do-able...

 
I had also recently had the joy of a little privileged reader voucher to spend at my favourite bookstore. Long gone are the days of browsing bookshops at my leisure. Selecting some popular science, a few novels, a biography perhaps and then one or two of the classics. My last few forays into the bookshop have either been for kids books (we all enjoy that visit) or in some insane attempt to shop for myself in the nanoseconds of good behaviour afforded by my children. The store assistants have been somewhat taken aback by my immediate demanding : Sell me a book, I read anything but it must be well written. Yet at this store they never fail. The most recent off the sewing topic book love that I've had on their recommendation: Burial Rites,

Anyway, I found this book, which was of course twice the value of my voucher but heck it had all those handsewing tips in ENGLISH


As well as lots of cute stencils and drawings in the back. Although no-one does cute like the Japanese and some of the little pictures in my magazine are to die for.

So I'm feeling all rugged up, stuffed up, drugged up and completely unable to move. Perfect for handsewing something. Just as I'm about to reach for the nearest cushion and start cross stitching to my hearts content I stop to take a little look through my crafting anti-dote book:


Amy Sedaris' Simple Times: Crafting For Poor People

Oh. My. This. Is. Too. Funny
and then it's a little bit practical and you start getting suckered in, thinking the kids and I could do this together,
then it's just hilarious all over again.
And if you can get to the "adult entertainment" chapter and still think there's a place for craft in all aspects of your life then you're a more dedicated crafter than I am. (and no, I'm not going to show pictures from that chapter: you'll have to buy the book :) - seriously, buy it for your crafting friend. Hilarious gift)


 Plenty more to giggle at on her website here, or via google images

Of course if I laugh I just end up coughing again..... Hopefully back soon and without having found a crafty use for all the used tissues littering the house at present.

Tuesday 18 June 2013

Bag "x" - Go to gift


 It's my daughter's friend's 3rd birthday soon and so I made her a little handbag.

The pattern is the gorgeous Bag "x" from Let's Go Out Girls' Clothes by Yuki Araki.
Essentially it's a tote bag constructed from 3 main pieces of fabric. Two large rectangles make up the body of the bag, and another equally wide but shorter rectangle forms the outer section.
 
This means there's a main, open tote with a side pocket on each side formed by the shorter panel and the band. The little gathered sash is a really sweet touch. Within this band is a snap that holds the side pocket closed.
 
Because all the pieces are rectangles, it's easy to scale the bag up or down in size. The first one I made, below, is the full size.  


And at full size, it's quite a roomy bag. When I made this one out of fabrics that I had to hand my mother in law spied it and said she'd quite like one as a gift, so I've got some fabric lined up for one that I think will suit her very well. Indeed this bag became a gift for another friend.
 
The only one left in the house is this one which is used to carry one's eye patch around as well as other girly essentials. The kiddy sized bags are 66% scaled from the original pattern and are the perfect size for a 3 year old's handbag-y stuff.
 
It's so absurdly simple to make that it seems silly to need a pattern, but for those of us not inspired enough to dream up patterns like this the pictures are very easy to follow. The only challenge left is to work on my handsewing and do a better job of some legible lettering, although I don't think my mother in law wants her name on her bag, so I'm off the hook after all!
 

Thursday 13 June 2013

Fast, sticky, and moderately successful

I delved back into my Japanese sewing books and whipped this up last night.

 
I'm not all that impressed with it, but in the interests of blogging honesty, it's here.
The pattern is from Girl's Sassy Clothes and I think with better fabric choice it could be truly lovely. I was surprised there wasn't more fullness to the skirt section as it certainly looked more gathered in the photos. Otherwise it's a great top to sew as there aren't any fastenings at all. Super quick!


The flower pattern is from the same book, and while I can't read any Japanese I figured the shaded areas referred to glue. What a sticky mess it was rolling those petals, spraying them with fabric glue then trying to get them to stick in place. I ended up having to use a few big stitches with a doll's needle to keep it all together, and then waiting until the next day to try and peel the velour fluffed glue from my fingertips!
Next time I think I'd just stitch the petals to each other.
 
The fabric was a piece of synthetic, stretch velour that my mother-in-law gave my daughter along with a shoe box on a string. The shoebox teddy sled proved to be very popular and while she loved the feel of the fabric it was not played with enough to stop me chopping into it.

A recalcitrant model today

I made the top in size 100cm, whereas she really would have been better suited to the size90. It's a bit gape-y around the neck line.

Oddly, my unpredictable daughter seems to HATE the flower and simply refused to have it pinned on the top. She happily wore the top all day without the flower. There was I thinking this was the kind of detail that could sell a little girl on an otherwise quite plain, brown and mustard top.

What do I know?!

I'll definitely revisit this pattern, but I might try it in some nice linen, or maybe a pair of shot cotton colours. Mmmmmm.


Tuesday 11 June 2013

So it goes.

When I was pregnant with P (5 years ago this Saturday!) I lamented the dreadful baby clothes available. Everything was pink, blue, white or yellow. I found Nordic Kids in the UK and bought a lot of brightly coloured fun stuff from there (at considerable expense).

Anyway I didn't really sew back then but I could iron a T-shirt transfer on. So I made a few and put them on plain white long sleeve envelope T's.


This first one was for a friend who's baby was, indeed, going to be late.

It would have been perverse to have used this one for my poor baby as no-one could decide on his due date and it was changed at every maternal appointment.

But I liked the literary theme and so I made a few more for my baby P...


This one was another quote from Alice In Wonderland and proved to be quite appropriate for my newborn!
 
 
An Australian favourite it's Norman Lindsay's Magic Pudding. An indomitable pudding who suited my baby boy very well, although he did like noise as well as eating, and even both at once!
 
Finally I went a little French-y high brow with my baby Julius Caesar T-shirt (I'm sure this bought me some cred in mother's group!)
 
 
 Anyway, there was one more that I really wanted to make that my husband veto-ed. Too morbid for a newborn baby he declared.
 
So here we are, 5 years later, and I was encouraged by this post by Cherie of You And Mie, suggesting that Morbid is the new black of kids wear.
 
Like any 5 year old boy P talks a fair bit about war, fighting, guns, bomber planes and so on. Now may not be the right time to start reading him Slaughter House 5 as a bedtime story (how would I explain Billy Pilgrim's interlude as a human zoo exhibit with a porn star called Montana) but the anti-war message is right on theme.
 
So here it is. My Kurt Vonnegut Slaughter House 5 inspired T-shirt:
 
 
The T-shirt is that awesome Oliver + S Field Trip raglan T-shirt that I've been loving so much.
 

I used a freezer paper stencil for the lettering and hand painted my dead bird (and flies!)

(over)testing my flat felled crotch seam a bit there kiddo
Of course, P doesn't get it, yet. I think he's a little bemused that mum's dressing him in a dead bird T-shirt.
 
Still, to me it symbolises the futility of war and the absolute importance of good books!
 
Poo tee weet!

Monday 10 June 2013

Really quite excellent mum!

While I mostly sew things that I like, but that the kids have to wear, I'm not above buying a bit of affection by making something I know will be well received.

Exhibit A: Space Shuttle stencilled T-shirt, declared to be "really quite excellent".

The pattern is the Oliver + S Field Trip again (that's 5 now, and I've finally mastered the neckband!)

I merrily cut into the navy knit leftover from this dress without having noticed that I wouldn't have enough for the sleeves.

No worries, make it a T-Shirt I thought... in the middle of winter.... maybe not.

Luckily I'd kept the leftovers from when I cut up an old maternity long sleeved T- Shirt to make this dress and they were exactly the right length to add to my navy upper sleeves. Extra happy moment cause I could keep the original hems.

The paint I'd have to say I'm not so happy with. I bought Jones Tones metallic 3D paint from Spotlight. The body of the space shuttle is metallic white and I think I applied about 15 layers to get it as opaque as it is. Even then this is a space shuttle with a slight blue tinge, and quite obvious brush marks. I like to think they look like heat retarding tiles (and I think P's buying that for now).

Then I used my freezer paper stencil (now that's fun!) to put the metallic silver over the top, then freehand painted the burners. By now I'd built up a very thick layer of rubbery paint and trying to remove the freezer paper was tricky. The paint almost had to be cut away from the paper where I'd painted over the edge of the stencil.

It'll be interesting to see how it holds up to wearing and washing.


Sewn last night and worn this morning, but there's some serious LEGO building going on so modelled photos were under duress.


Sunday 9 June 2013

P's turn...

Some more overlocker love, and this time it was P's turn.


First up: Oliver + S Field Trip Raglan T in superfine merino. Gosh this feels good.
I chose to leave off the little, rounded pocket as sewing that with super stretchy wool seemed a bit fiddly, but it would help to show which is the front! I really must get some labels...

 
And here's a Flashback Skinny T in cotton lycra.


And another Field Trip, again in merino wool. I realised as I sewed these tops (and another that I'll reveal tomorrow) that I LOVE this pattern purely cause there's no need to set in sleeves.

One of the things I love about sewing with knit fabric is that when I do a set in sleeve (like the Flashback) there's no need for gathering stitches, just stretch to fit and pin. But with this pattern there's not even any stretching or pinning, just panels to sew together. Bliss.

And more kiddo love, .....


 .............he cracks me up.

Wednesday 5 June 2013

Recipe for ecstasy

After posting about P's pants problem I discovered I was getting some blog hits via Google searches and let's just say the folks who were looking for boy's butt crack probably weren't hoping for a review of a sewing pattern that may solve the problem!

So, let me make it clear right here that my recipe for ecstasy may not be what you're looking for, but here it is, and I imagine there'll be an audience for whom the blog is intended who'll be nodding their heads in agreement.

Flashback Skinny T + Overlocker + Walking Foot + Twin Needle + Compliant Toddler = Ecstasy


Straight up size 3 with a bit of extra length in body and sleeves to make it last! (I really should measure first though as I've overdone it a bit)


With ruffles!


And more ruffles! And bless my darling little girl she held her hands just perfectly to cover the jam tart marks from this morning's post-kindy-drop-off secret coffee stop (don't tell P!)

I'm feeling really pleased with my knit sewing considering my first attempt was only quite recently. For all those whose ideas and advice I've stolen or taken, thank you. It seems that tools are everything. I can't say how glad I am I finally bought a walking foot, and the overlocker and I, well it's true love I think.

But mostly I just love this kid....

Sunday 2 June 2013

Sewing for me: Part II

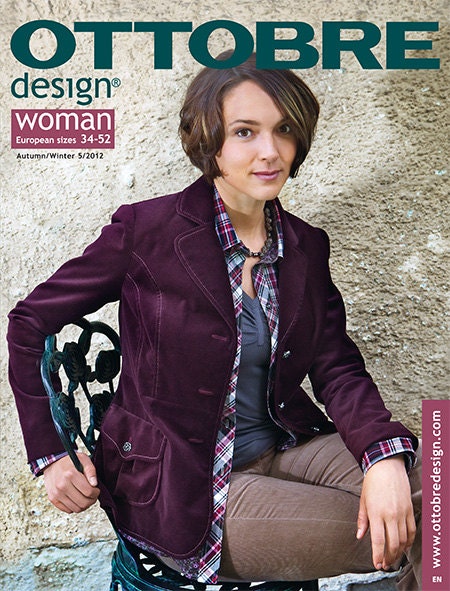
A little while ago, the lovely Jorth gave me an Ottobre magazine.
Now she sews ands knits some amazing clothes and always looks absolutely stunning. If you haven't visited her blog you really should as her writing style is also absolutely hilarious, and recently her knitting exploits have almost reduced me to tears (in sympathy that is, not laughing kind of tears, mind) and I can't knit at all.

Anyway, here was this magazine full of patterns. This one to be exact:


And little ol' me who never sews my own clothes.

Then, along came a huge piece of fabric. I mean, not as huge as some, but too big to be only for kids clothes. I'd bought this heavy weight, blue, knit fabric with a self stripe, on sale from The Fabric Store at the start of the year. I'd asked for two metres, but it was apparent there was a little over three left on the bolt so the lovely salesperson gave me all of it. That would be about 4 each long sleeve T's or dresses for the kids. Or maybe a dress for me?....


How about this one? It's described as being a light jersey which my fabric definitely isn't, but perhaps the weight of my fabric might prevent the dreaded cling...
 
I measured myself fastidiously and fell at the bottom end of the 46 size range. Oddly, there seemed to be an inch or so in each measurement category that was not covered by the size above or below. I decided a 46 it might be. Long ago, when I was slimmer and widely travelled I knew I was a German 40, a French 42 and an Italian 44-46. Memory fades, waistlines grow, and I hadn't really worked out where this Ottobre mob fitted in the Euro size range.... I trusted my measurements.
 
I sewed up the dress on the overlocker. I hadn't used Ottobre before and I found the very brief instructions left a lot to be desired. I ignored the suggested ways to finish the shoulder seam after binding the neckline as I thought it would look a lot neater to bind last, thus covering all the seams. Likewise, the pattern suggested hemming the sleeves then sewing the sleeve/side seams. But surely that would leave a visible seam at the sleeve edge. How ugly. So I finished my hems last as I would normally do. I guess I chose the oft quoted "How would Liesl do it" approach.
 
The main fabric would have been too thick for the binding, so I chose some navy knit leftover from A's "dress H". With the elastic around the bottom it's barely visible, and I wondered if it might be nicer to remove the elastic and wear it as an A-line.
 
Then I tried it on. My god it was huge. The chest had about two inches on each side that could be pinched in, continuing through the waist and hips and the boatneck was a bit big and baggy. It was a big, blue sack. Oh woe. Only the sleeves were the right size.
 
Since I'd used the overlocker there was no way I was unpicking the sleeves to trim the main dress back, so I just ran another overlocker seam up each side, through the armhole and tapering to the sleeve seam about 1 inch from the armpit. I think it worked. The neck is still a bit big, but luckily I've got big shoulders (some kind of luck I guess). In doing this I lost the ever so neat alignment of the stripes at the side seam that I fussed about in cutting it out, but the alternative was the bin, so I got over it.
 
I threw it in the dryer too to try and shrink the neck up a bit but I think I only succeeded in shortening the sleeves and length a little. Darn. Anyway I wore it to a party this afternoon and had a compliment or two, and no-one asked me if I'd made it, which I score as a win.
Cue awkward photos of me, (aargh)


So I'm still not sure about this sewing for me caper, but I have a Lisette pattern cut out and ready to go, and that was a $10 fabric remnant, so how far wrong can I go...

Next up though are some more of those gorgeous Sleepover pyjamas.