Being the adorable, dirty grots that they are, it seems that, to a guinea pig, a woollen tent is a one season, fast fashion item. Regardless of how long it takes me to make them, or at least make them to the right size....
Last years pyramid tents were being sat on top of as much as inside of. I little bit of my old maths brain fired up and suggested a cone would be a more structurally sound shape... then the rest of my maths brain was stumped as to how to make that come about....
Eventually I worked it out, only to discover that the wee piggies had gone and grown! I'd based the new cone tents on a circle base that my daughter nominated as the right size.
Want to see some funny photos of guinea pigs struggling with too small tents?
"It's got my name on it, I'm prepared to have a look inside...
Am I meant o be able to fit in here?...
Should I try going in backwards?...
Sideways?... Seriously humans, this isn't working!"
What about you Albus, do you want to try your new tent?
"I'm prepared to consider it....
...yeah, nah, f*&% that, I'm outta here"
Luckily I'd kept my maths scribblings and so here I'm going to write out my tutorial for a woolly cone tent of any size
Start with the circular base. I'd recommend measuring (!) your pocket pet rather than just eyeballing them when they're hunched up. Make sure they have a bit of extra turning room then nominate your base circle's diameter
For our 1 year old, adult boar guinea pigs (approx 1kg) we nominated a diameter of 230mm
To make the pattern piece for the base, you can use a compass to draw a circle of the correct diameter, or find a plate or something close enough and draw around that. Be sure to measure your final exact diameter.
Then add 10mm (let's stick to mm as it's more engineer-y) all around as seam allowance. Now you have your base pattern piece.
For the sake of all the maths that follows we will ignore the seam allowance. Stick to your original diameter measurement. Here, Diameter d=230mm
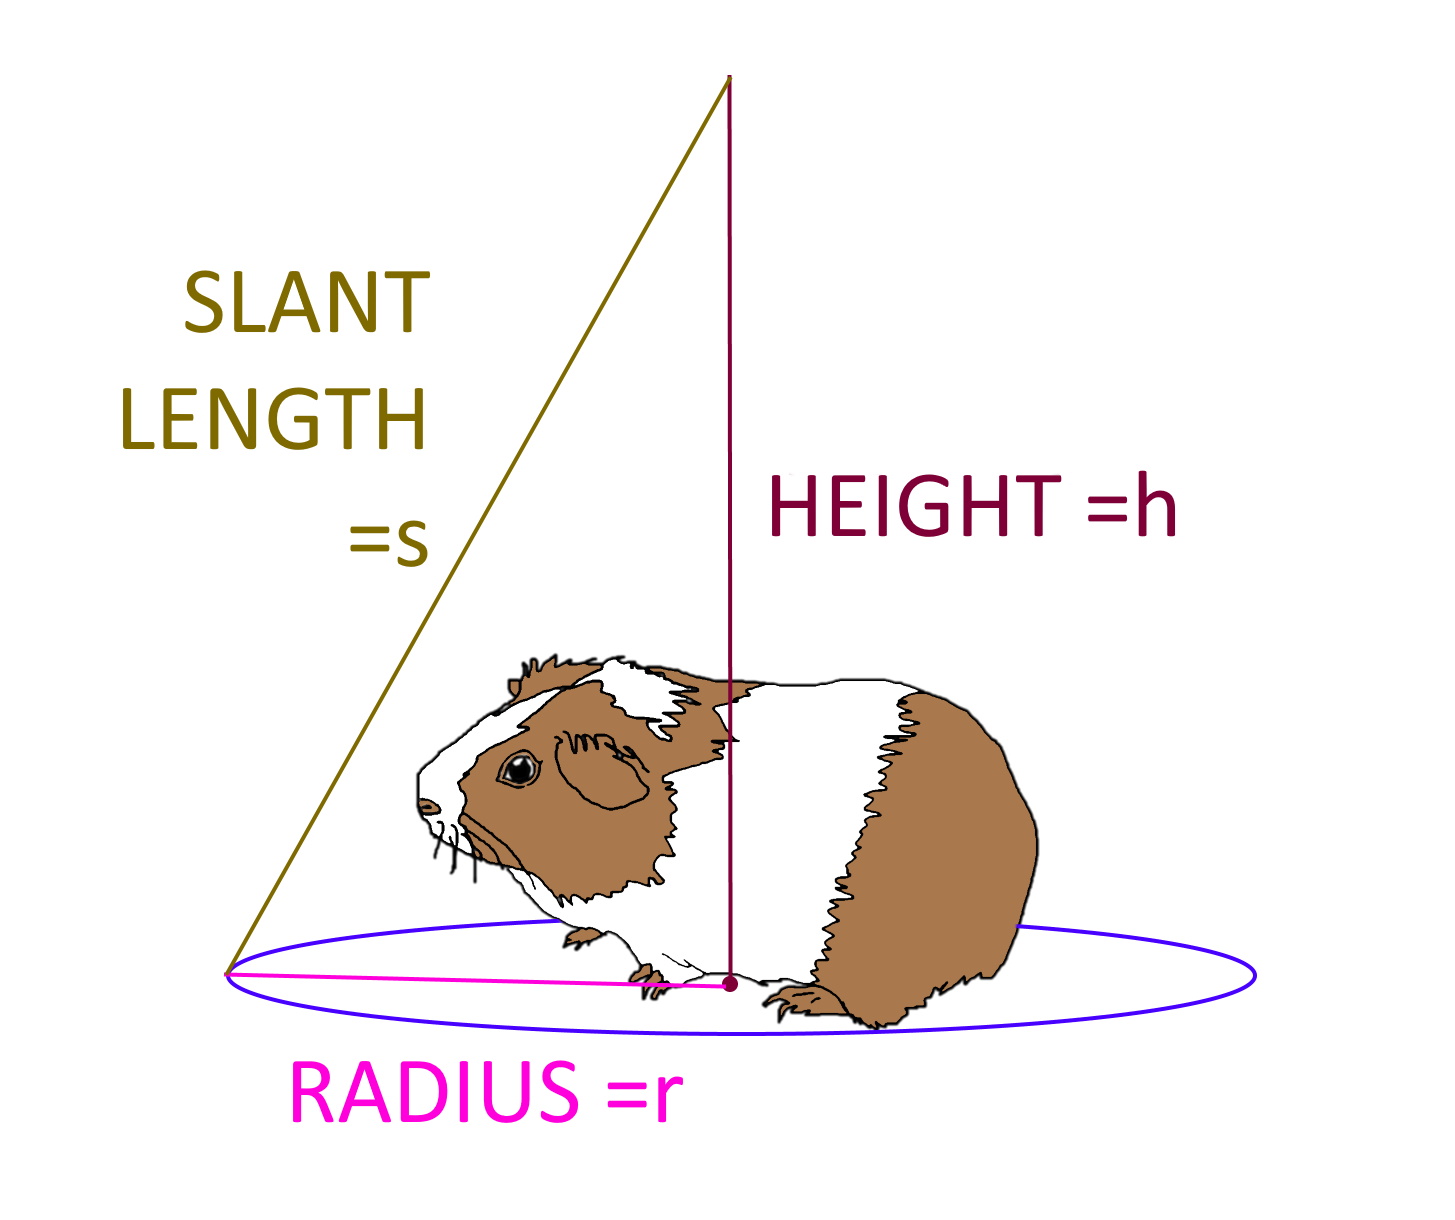
Now we need to work out how tall we want the teepee to be. This is kind of arbitrary, but bear in mind that if you make it too low you'll lose a lot of space due to the steeply sloped sides.
I nominated a height of 220mm
Height h = 220mm
Next we want to calculate the length of the sloping sides of the teepee.
All we need for that is the height (h) and radius (r).
Radius is simply half the diameter, so here r= 115mm
Do you remember Pythagoras? We've got a right angled triangle here, so we can easily calculate the length of the sloping side

In my case: Slant length = /sqrt 220² + 115²
/sqrt 48,400 + 13,225
/sqrt 61,625
= 248mm
Now we need to try and make this pattern shape for the upper part of the cone. We know it's going to be roughly this shape...
We've worked out the slant length (s), now we need to work out the circumference of our base in order to know the length of that outer curved edge
Going back to our original base circle with r = 115mm
the circumference (c) = 2 Pi r
(please note that NONE of the normal keyboard shortcuts to get a Pi symbol appear to work within blogger. That's an hour of my life I won't get back!)
back to the maths: c= 2 x 3.14 x 115
c= 722.5
The full circle of our base, and the more open curved edge of our top part will have the same length (c) of 722.5mm
Now we just need the angle at that apex point in the illustration above
angle (a) = 360r/s
a= 360x115 / 248
a= 167deg
So now we need to draw that shape on our pattern paper. Start with a straight, horizontal line of length=s
Use a protractor to find your internal angle then draw another line of length =s at that angle
Now, you need a big compass, or a piece of string, or just a good eye for a sweeping curve to draw the outer arc. The radius of this upper pattern piece is the slant length (s).
As I didn't have a compass big enough, I found it easiest to measure a number of points that were s distance from the centre angle then freehand draw my joining curve.
To finalise the pattern piece you can take a semicircular bite out of the top (it would get far too thick there if it all overlapped) then add the 10mm seam allowance all around
There you have it, a pattern piece for the base and the top section of whatever dimension cone tent you choose to make.
To construct the tent I used leftover bits of wool coating for the outer, a thick interfacing, and then wool sweater fabric for the inner lining - all scraps from garment sewing
Cut 1 base and 1 upper in each of the inner, outer and interfacing.
The porthole door is cut to size (no seam allowance needed, then the outer and inner fabrics placed right sides together with the interfacing in between and the porthole edge was finished with bias binding. This is also the time to do any embroidery or monogramming over the door.
I didn't photograph all the construction, but that's easy to imagine. Everything can be sewn inside out (almost like one of those diablo spinning top toys in shape) and then turned right side out through an opening left in the base of the lining/cone attachment.
I also cut two extra bases out of wool sweater fabric, and then a few layers of wool quilt batting and made these little quilted sandwich pads that can be removed for washing (and shaking out poop). they make me laugh cause they look exactly like old fashioned stove top hotplates!
So those pictures are all the too small tents (I've unpicked the names and will list them on eBay for someone else's littler pets). Here are the boys checking out their new bigger tents...
Little did they know that the very next day they'd be coming to work with me, and those tents would become their post-neutering recovery beds!
Wrong tents, but they're too stoned to notice!
That was back in April. They're well recovered and have stopped trying to kill each other. They have, of course, managed to trash their tents. At least I've recorded all the details here so next winter I can quickly and easy make new ones to whatever dimensions the boys require.


Shelley, these are adorable. So are the occupants but the maths does my head in! 🤣
ReplyDelete